technique

Losing Bad Backgrounds

When you have to walk through one of the most impressive buildings in central London, out of the back door to where they keep the broken furniture and litter bins to shoot your picture… you feel a little hard done by!

Royal Navy, Army, Royal Air Force and Metropolitan Police explosive ordnance disposal teams gathered at the National Army Museum to show off their toys and to announce to the world that there is now a formal educational qualification on offer for bomb disposal. The outside yard set aside for them was not a photographer’s idea of a great location so I instantly started to go through the range of “tricks” that you pick up through a career for getting rid of awful or unhelpful backgrounds.

My first idea was to frame so tightly on a young disposal officer that there would be no real background at all. Secondly I tried using the ground as my backdrop by looking down at another kevlar clad soldier working on a practice mine.

My third stab at it was to use a very long lens (70-200 f2.8 with a 1.4x converter) wide open to throw the background out of focus on a shot of a Royal Naval diver in his dry suit and underwater breathing apparatus. Each of these images worked, but I wanted drama so I settled on shooting an Engineer with his remote controlled robot from below using a winter sky as my backdrop. (more…)

Choosing The Mood

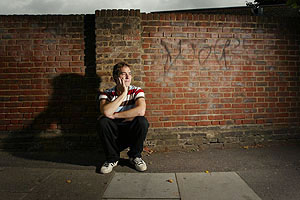
Every time you take a photograph you are saying something about what is in the image. It’s impossible to avoid a frozen frame being anything other than an interpretation of that moment so it becomes a mark of a good photographer to make sure that every element of the image (composition, subject matter and light) helps to paint a consistent story.

The mood required for every image – especially with portraits – is something that you have to consider very carefully.
Some lighting guides will tell you that there is a lighting set up for each mood and that it is a simple matter of placing light A in position B and light C in position D to achieve this. I have to agree that there are some obvious starting points for many of the moods that I use, but there are many other factors that have to be taken into account when setting the scene.

Even a short list of variables such as time of day, age of subject, subjects clothing and location mean that there can be no such thing as a standard lighting rig. This portrait of a teacher who feels that he wasn’t prepared during his training for the attitude of pupils needed a lot of thought. (more…)

Replacing Colour

Sometimes you see a picture, you want to take that picture and you can’t. A dimly lit room with all sorts of stimulating lights, smells and sounds used to help children with physical disabilities learn to use their powered wheelchairs as well as enjoy themselves presented such a dilemma.

The lights in the room were coloured with lighting gels and changed as the child operated different buttons. There was also a curtain made from fibre optic cables with coloured lights being fed down them but the available light reading for the scene was 2 seconds at f2.8 on 400 ISO.
The whole scene was a perfect illustration for the story about the school so I decided that the only way to make the shot was to copy the light using a flash unit, some available light and some coloured gels of my own.

The choice of colours from lights in the room was red, green, orange and blue and of those colours I had all of the colours with me. Our newspaper reproduces red better than most colours so I decided to go with that option. (more…)

Pepping Up The Background

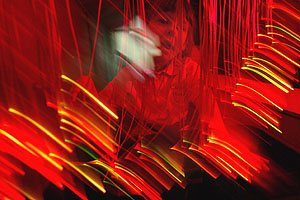
Some photographs have to be simple. There are often very few options for lighting the main subject, but there is nothing to stop you adding some interest by lighting another part of the frame.

As part of my daily job I often photograph people who we will need to run photographs of on a regular basis. I normally have to make sure that I have enough different images from that session to give the picture desk a chance to re-use the session several times. The location cannot always be relied upon to provide a wide range of opportunities so it’s important to vary the composition and lighting as much as possible. In an ideal world your subject will bring changes of clothing to help ring the changes, but that isn’t always the case.

This trades union official works in an inner city office building which has seen better days. The outdoor area is an interesting courtyard with some seating and is constantly in the shade. There was no choice other than to light the scene and I decided to use a single Lumedyne head connected to a 200 w/s pack and a 90cm opaque white umbrella.

I set the light at an angle of about 60 degrees from the axis of the lens to the right and about fifteen degrees above the subject’s eyeline. The distance from the subject to the flash was about two metres (80 inches) and the flash reading on 200 ISO was f9. I decided that the power was a bit high, so I turned it down to 100 joules which gave a reading of f6.7. There wasn’t any ambient light involved in the image with a shutter speed of 1/125th of a second and the background was too dark. (more…)

Pool of Light

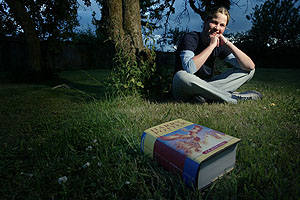
Creating a pool of light is one of the most effective ways of emphasising part of an image. There are many ways to achieve this, but for the traveling photographer who has to carry their own kit a small piece of aluminium foil has to be one of the simplest.

This portrait of a young book reviewer needed to have atmosphere. She had read “The Order of The Phoenix” in less than two days to complete her review of the books and it made sense to use light in the gathering dusk to give the image something extra.

Under the trees the light reading was only 1/30th of a second at f8, but that gave a bleached out sky. The sky on 1/250th at f8 was a better tone, but rather grey. I decided to add some colour by putting some 85B gel over my Lumedyne flash head and exposing the pictures on a tungsten white balance. This gave the sky and all other areas not covered by the flash a pleasing blue hue. The shifted colour on it’s own was not enough to give the drama that I wanted, so I took the piece of folded aluminium foil that I always carry from my bag and formed it into a tube. (more…)

Contrast, Colour and Glass

Most photographers take a deep breath and touch wood for good luck when they are aked to shoot pictures with glass in them. The arrival in the world of digital cameras with LCD screens has taken away a lot of the guess work about where and how the reflections of the light and the rest of the world fall.

This portrait of a “young achiever” and a solar panel needed to be shot at a time when there was little or no light around. The British summer oftens throws up days when the available light exposure just doesn’t have enough contrast to make good photographs. The picture editor’s instructions called for some form of drama so I decided to shoot the picture with plenty of refelcted light on the panel itself.

My first reaction was to use a flash with a snooted reflector that gave a spot light feel. I tried a few frames with this set up, but the gradation of the highlight on the panel as well as the harsh shadow on the girl’s face didn’t work and it was time to try plan B.
My Lumedyne flash units always have their diffuser caps over the reflectors while in transit to protect the tubes and plan B is always to shoot with the diffuser in place and no other form of light modifier. The effect was still too harsh, so I was left with the option of using a softer light modifier such as a soft box or an umbrella. My first thought was to go for a soft box, but all of mine are rectangular in shape and I was worried that the light on the solar panel wouldn’t have a the kind of “hot spot” that I wanted. (more…)

The View From Above 2

In a remarkably similar composition to the previous technique page this example uses some ambient light with it’s own very strong colour to give an unusual atmosphere whilst adding enough flash light to keep the subject’s skin tones correct.

You would be correct in guessing that orange is one of my favourite colours when it comes to both graphics and photographs. It works well when converted to CMYK for newspaper and magazine reproduction and carries over very well as a web safe colour on the Internet. It also has the advantage of being the colour that that many types of incandescent bulbs show up when you shoot with a daylight balanced digital camera or film. The colour temperature of most household bulbs ranges from around 3000K to 3600K, but certain types of industrial lighting is even warmer at around 2800K.

The wooden floor had just been polished to a wonderful finish and, just like last month’s technique, I decided to get up high and shoot down. The only problems that this presents are; a) getting myself high enough, and b) getting the light high enough.

The first of these two dilemmas was easily overcome by using a large gymnastic stool (a bit like the stools that elephants stand on in the circus) that was already in the room. (more…)

The View From Above

One of the simplest techniques that I use is to shoot a portrait from above. The temptation with this kind of shot is to use a very wide angle lens and a small step ladder, but the combined risks of your own feet straying into the composition and achieving ugly distortion mean that I prefer to save the technique for times when I can get a lot higher up. Environmental portraiture does exactly what it says – it portrays people in their environment and uses the clues from the surroundings to say something about the subject. Sometimes you need to come in closer, to concentrate on the subject’s face with no distractions. This need can often be dictated to you by the lack of a suitable environment, the background occasionally offers up few clues and many distractions.

I have written before on this site about the usefulness of the floor as a clean background. The head teacher in this image runs one of the biggest and poorest schools in east London, but the main building is relatively new and offered up some good backdrops. I shot pictures in a range of different areas, but this slate floor gave me what I was looking for.

This was the fourth and final way that I tried to shoot the portrait and the uniformity of the grey slate floor gave me a very simple option. The school has a walkway about 4.5 metres (15 feet) above the main entrance and we waited until the pupils were in lessons before setting up the shot.

I was using a new Lumedyne “Signature” series flash unit for this job and I set up the flash at the maximum height that the stand would allow which is about 2.4 metres (8 feet) from the ground. (more…)