
Some of my posts here on the blog over the years have drifted into the “niche” category. I’m afraid that today we are going full steam ahead into the heart of niche-ness.
I have mentioned Canon’s Content Transfer Professional app a few times without reader comment. After last month’s post about a very busy few weeks I received three separate requests to expand on why I bother to pay £5.99 a month for an app that a lot of my colleagues find difficult to use, uninspiring and a bit of a waste of their hard-earned money. At the risk of sounding like a salesman from the Canon app team I’m going to try my best to explain what it is, what it does and what it doesn’t do.
Looking at version 1.2.10.15 (build 458), I’m going to start with “what it doesn’t do”. There are two reasons why I have chosen to write that way around:
- If you are looking for something that this app cannot do then I’m saving you time and giving you a reason to stop reading.
- Should Canon’s app development team happen to read this then maybe they can find a way to get this already useful app to do some, or all, of the things that it can’t and won’t do.
The first thing that it can’t/won’t do is to talk to multiple cameras at once. Like most photographers working in the areas that I do, I shoot with two or more cameras at any one time and if I am transferring content from one there’s a very good chance that I will want to do so with all of the cameras.
Secondly, it doesn’t seem to want to transfer RAW images. If you shoot using one card to store RAW and the other to store JPG the app won’t recognise the RAW files no matter how you set the camera up. For all sorts of reasons I have now swapped to shooting RAW and JPG to both cards mirroring each other – but that’s a whole other blog post (that I may write very soon. Probably).
Thirdly, if you switch the camera off to change a battery or card the app needs to be told to go back to what it was doing if you were using it to transmit photographs live.
Fourthly, if you connect camera to phone or tablet wirelessly it uses the wifi connection and therefore effectively cuts you off from the internet if you want device to device connections. I would love to be able to use wireless but, in my experience, it is more trouble that it is worth.
Finally, on an iPad the app is just an upscaled iPhone app. I would love to see a dedicated iPad version that makes use of the screen real estate in a meaningful way.
If one or more of those is a deal-breaker for you then you can click away from this post BUT you will be missing some of the features that I find most useful including:
- Automatically setting the correct date and time in your camera from your phone or tablet
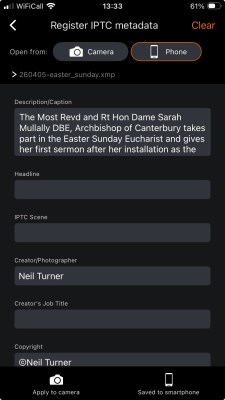
- The ability to pre-load a caption into your cameras that is then automatically attached to every frame that you shoot until you either turn off the IPTC function in the camera menu or replace the caption with a new one
- Be able to transmit from the camera using FTP where the only wifi network has a landing page which won’t let you connect direct with your camera
- Edit IPTC captions on an image that you have transferred from the camera to the phone/tablet before transmitting them
- Send pictures via FTP from your phone or tablet
If you are still here then I guess that one or more of those functions appeals to you. Of course a lot of Canon users will be thinking that some of those functions are available with Canon’s EOS Utility application on a computer and that others are covered by FTP client applications on all devices. That’s true but computers are heavy, bulky and really tough to walk around with in your pocket. Sometimes (and by that I mean quite often) it’s just easier to do it with a phone.
On a day-to-day basis, this is what I do using Content Transfer Professional (or CTP from now on).
- When I know what I’m doing for the day (usually the day before but not always) I write base IPTC captions on a computer using Photo Mechanic and save them as .XMP files to a cloud service. Apple’s iCloud is my preferred choice but when I am working with a team then Dropbox is often easier and I can readily share the Dropbox link with colleagues ahead of time so that they can grab the .XMP files that they need. Sometimes it is only one file but I have been known to need three or even four different base captions through a day’s shooting.
- I connect each camera in turn to the phone or tablet (that’s an iPhone in my case but it works just as well with Android or any kind of tablet and I sometimes use my iPad Mini). I tend to do this with a cable rather than messing about with flaky wireless connections. Older iPhones and iPads with Lightning connectors need a specific bit of cable that you can buy from Canon it is an Anker 514 Lightning to USB-C (if you are reading this Canon or Anker, it’s not actually long enough so please make a longer one just for me because USB-C to USB-C extension cables don’t seem to work). Newer iPhones, iPads and almost all Android devices use a USB-C to USB-C data cable so all is well there. You have to make sure that you select “Canon Apps for iPhone” in the image transfer menu on a Canon camera (fourth purple tab on an EOS R5 MkII), otherwise the camera and phone will not communicate. Once connected it really helps if you have selected “Auto date/time setting” from the Camera Linkage menu in the bottom right of the CTP screen. This will set the camera clock exactly to what your phone’s clock is saying every time from then on.
- The next step is to select “Metadata settings” from the middle icon in the bottom row of the CTP screen. Then to go “IPTC information”, highlight the “phone” icon, find your XMP file which will load and then go to the bottom left of the screen and touch “Apply to camera” and OK that (twice).
- You should also check in the camera’s menu (usually a custom function and it is orange/brown fourth tab on an R5 MkII) that “Add IPTC information” is ON.
- Throughout the day you can repeat this really quick process for each camera as the base caption needs to be updated – either with one you have pre-written or with one you can write in the CTP app itself. This takes a maximum of three minutes per camera.
If that is all you do with the app, then I would argue that it is already paying for itself – especially if you are using FTP to transmit direct from the camera. This is just one function. I suspect that the app developers would say that steps 1-5 above are just ancillary functions and actually transferring images is what the app was made to do. Remember it can do all of this wirelessly but I am going to talk about how I use it which normally involves a bit of cable.
So let’s work from the top down on the home screen:
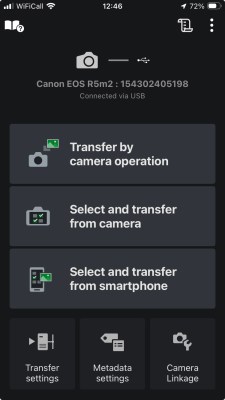
Underneath the little camera icon it tells you which camera is connected (if at all) and how it is connected. After that you have “Transfer by camera operation” and touching that brings up several choices.
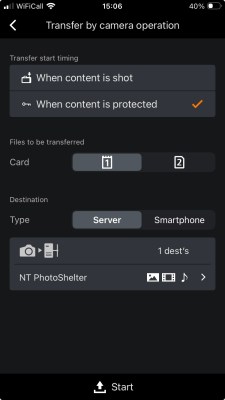
- The first is when the transfer should start and you can choose between “when the content is shot” and “when content is protected”. I tend to use the latter so I can decide on the back of the camera which files are transferred.
- The second choice is from which memory card and my advice would always be the same card as you review images on when looking on the LCD.
- The third and final one is where the images should transfer to and you can choose between an FTP server or the smartphone itself. My preferred choice is always an FTP server because speed is normally what I am looking for but having the option to bring it into the phone for editing or amending the caption is a really useful choice.
- Once you have made your settings in place you simply touch “start” at the bottom of the screen and off you go. Every image you either shoot or protect (depending on choice 1 and 2) will be transferred or transmitted.
- I have found this to be the most efficient and fastest way to do this plus, if you then ingest the card into Photo Mechanic on a computer the protected files will show up with the small tick in the contact sheet.
Next on the Home Screen you have“select and transfer from camera” which allows you to view the images on your phone or tablet and import them or transmit them. At this stage you can also add IPTC captions if you wish to. I have to be honest and say that despite playing with this option I have never used it live on a job. My camera screen (LCD or viewfinder) when reviewing and protecting images is superior to my iPhone screen in lots of ways that matter. I will, one day, try this on an iPad to see if that changes my mind but so far I am happy with the way it works.
Finally we have “select and transfer from smartphone” which allows you to go through the pictures you have downloaded and possibly fully captioned, cropped and toned (I use Lightroom for this) to then send to your FTP server. I have written about this before when I blogged about my iPad workflow a couple of years back. I have used this in anger a few times and it really does work. It’s not as good as using a laptop but when weight and portability matter it’s a great option to have.
There we go; the surface has been scratched. Learning everything there is to know about CTP is a full day course that I have yet to teach. I mentioned at the outset that this was niche stuff and that anyone who lost interest was welcome to drop out. If you have got this far then you are in for a bit of a learning curve when you install the app on your phone and or tablet but I hope that I have helped get you started by telling you what I use it for.

One comment