technique

Brutal architecture and portraits

I have an admission to make… I love shooting portraits on cloudy days around concrete buildings with urban skylines. There, I’ve said it. As a photographer I find brutal architecture and grey winter days both challenging and creatively stimulating. Combine the two and you have a blank canvas for interesting images – as long as you have a cooperative subject.

©Neil Turner, February 2009

This portrait is of an academic working at a central London research and teaching institute. The building is a classic modern brutal concrete one and I have shot pictures there dozens of times over the years. I have never managed to get access to the roof before and I have always imagined that it would be a great place to shoot, with decent views of the surrounding skyline.

It was a windy and dark February day and so I wanted to find a spot out of the wind. The roof features a couple of large concrete towers which contain lift machinery and other services and the southerly one has a short walkway running through it. On a sunny day this would be perfect shade in which to place your subject. On this day it was equally perfect shelter from the wind and probable rain. There are also railings which are perfect for attaching lighting stands to so that they don’t blow away.

The picture above wasn’t the first that I shot. I had tried quite a few angles to get the London skyline in but the wind forced a retreat into the covered walkway. I decided that being out of the wind gave me the chance to shoot with a 24″ x 36″ (60cm x 90cm) Chimera soft box on my Lumedyne flash head. The softbox is old and has both the inner and outer diffusers permanently sewn in and I wanted to make use of it’s softness so I placed it as close to the subject as possible. In this frame it is about three feet (90cm) from his face off at about a 45 degree angle to the left of the camera with the bottom of the softbox about level with his chin.

I always try to start with an available light reading for the sky which came out at about 1/250th of a second at f5.6 on 200 ISO. I wanted the sky to be darker and so I decided to shoot at f8 instead. This meant that I had to adjust the power output on the flash to give me the aperture that I wanted and that meant 1/4 power (50 watt/seconds). The first test shot told me that I needed some separation between his hair and the dirty grey concrete and so I set a second flash (Vivitar 285 HV) on a stand directly behind him on 1/16th power to give him a fairly aggressive hair/rim light. This isn’t a technique that I use very often but in this case it made the difference between a muddy image and one with some real edge. The combination of the big soft light and the hard hair light gives the portrait a particular mood which compliments the sky and the architecture.

Like many of the techniques that I use, this one needs to be used sparingly so that it has maximum effect when it does get used.

Owning up to some bad habits

“It’s all about light”. That’s a message that I hope everyone who visited the technique pages on my web site will take away. When you are the one who controls that light, you have a large number of options open to you. This month I have been trying a new toy and I thought that I’d use that as an excuse to write about how and why I choose the quality of the light.

©Neil Turner/TSL | London | December 2004

The first thing I have to do is own up to some fairly bad habits:

The first is that I go through personal fashions in the way I light and in the kit that I carry with me. One month I’ll use softboxes and then the next month I’ll use umbrellas. One week I will keep the flash as only one element of the scene and the next the flash will overwhelm the ambient light.

My second bad habit is that I will light women in a different way to men. 99% of the time I will use a much softer set up for female subjects than I would for males.

Thirdly, I’m aware that I tend to use a harder light on older skin (especially men). Older people seem to have a lot less moisture in their skin and so their faces have a lot less shine.

I’m much more likely to direct a spectacles wearer about the angle of their head, simply to avoid getting bad reflections in their glasses. I also try to find out if people wear contact lenses and get them to look more squarely at me to avoid getting any strange shapes in their eyes.

So far I’m painting myself as a bit of a lazy photographer. I like to think that it’s not laziness – more a realistic attitude towards getting the shot right. When you are shooting people, you often end up shooting a very different picture than the one that you first envisaged so my bad habits are there to simply give me an easy starting point. Getting on with the shoot is part of my style. I rarely spend very much time wandering around formulating ideas, largely because I am regularly expected to set up, shoot and break down in a matter of minutes. Having the “safe shot” in the bag is something of a religion to me and I find that giving in to my “bad habits” makes my practice a lot easier.

Many photographers use the same technique day in and day out. I cannot claim to do everything differently every day, and sometimes I feel like a chef who has a limited range of ingredients that I can select, mix and adapt to create new and interesting combinations. Every once in a while a new ingredient becomes available, a new toy to play with. Does that make me gadget boy? Or does it simply help to keep my work fresh?

There are, apparently, two types of news photographers…

News photography isn’t a huge industry. It employs a few thousand people here in the UK and it’s amazing how many of those know each other, or at least know of each other. That having been said, it’s also amazing that so few people can be divided into so many small pockets. Sports photographers, news photographers, local newspaper photographers and features photographers all come to mind as sub-divisions of the business. Whilst talking to a couple of colleagues the other day I was made aware of another division. A division that you seem to fall on one side or the other of according to the way you see and shoot pictures.

John Redwood MP – back in the day. ©Neil Turner, January 1994

Apparently I’m a “light and shader” whilst my two colleagues referred to themselves as “tight and brights”. They told me that the division here in the UK was broadly along the lines of tabloid versus broadsheet, mass market versus serious. This explanation was both amusing and, in a lot of ways, pleasing. I like to think of myself as a more serious photographer – one whose use of light and shade is central to their style but I was a bit worried that they seemed to be writing off what they do at the same time.

Make no mistake, these are two top class photographers, each with a staff job on one of the two biggest selling newspapers in the country. They provide their picture editors with the right images day in and day out that satisfy the constraints of the designs and the tastes of the readers. Both are also intelligent and articulate journalists and so I did start to wonder whether they were just taking the mickey out of me – implying that I take myself and my work too serioiusly.

The chances are that it is a little of everything. I suspect that they and the other tight and brighters like to differentiate themselves from the mainstream and I also suspect that they envy the small amount of extra creative freedom that the light and shaders seem to get. It also makes you realise how hard the job of wire service and agency photographers must be – satisfying two very distinct markets at the same time and having to have an eye for different types of images on the same job.

No doubt there are other divisions between photographers. I can think of a few other ways of dividing us up: I once heard one of my photographic heroes talking about the “that will do gang” – referring to an attitude amongst some professionals whereby they will do enough to satisfy their brief without going the extra yards let alone the extra mile in order to produce the best work possible that he contended was what made doing the job so satisfying and what made hime rush to get out of bed almost every working day.

I know what he means. I found myself getting excited about shooting an interesting portrait a week or so ago – excited enough that it would be slightly uncool to admit it. I love taking pictures and I love to make use of light and shade. I’ve got to shoot some tight and bright images later this week and I will think of my two tabloid colleagues when I do.

The last refuge of the desperate photographer

Originally posted in January 2009, this piece is one of the ‘new’ technique pieces that I published around that time.

The use of the silhouette as a deliberate ploy in photography was once branded as “the last refuge of the desperate photographer” – a label that I have always contested. I have used the technique many times when I have not been allowed to identify the subject of the picture (usually children or vulnerable adults whose identity needs to be concealed) but I also use it when there is a need for an image with real impact. Creating a silhouette with flash isn’t difficult, using the technique sparingly can be.

Once you have made the decision to try a silhouette using flash, there are a few basics that you need to consider:

  • The subject must have little or no available light on them
  • You must have a background that can be lit easily
  • If the background has important detail you need enough depth of field to keep both subject and background sharp
  • The subject to be silhouetted should be in sharp focus and have a distinct outline

Once the basics are in place, then there are creative decisions to be made such as composition, placement of flash. This first example is of a member of my family who spends time at the gym so that he can show the world his physique. We were chatting one day and he said that he wanted something striking for the top of his Facebook page. I showed him a couple of ideas using silhouettes and we shot this…

©Neil Turner, October 2008

I was shooting with a Canon EOS1D MkII and a Canon 24-70 f2.8L lens. I wasn’t able to move myself around too much without shifting furniture and would have preferred to be shooting nearer the telephoto end of the range to deliberately remove any clutter. As it was, the lens was at 34mm (add the 1.3x factor and you get a 44.2 full frame equivalent field of view) and I cropped the image to the “letterbox” shape.

In this case I used the subject himself to mask the flash which was a Canon 550ex speedlight triggered in manual mode by a Canon ST-E2 transmitter. The first few frames had the background (a wall in my dining room) pretty evenly lit, which was a bit boring. The background is unimportant in this image and so the depth of field doesn’t matter too much. The exposure was 1/90th of a second at f13 on 200 ISO. I don’t recall why the exposure was 1/90th instead of 1/250th to utterly eliminate any available light but in a normal situation I would have gone for 1/250th.

I have some grid attachments for my Lumedyne flash heads and so I taped one of those over the flash to give me more of a circular pool of light. I aimed the flash slightly upwards so that I achieved the effect that you see above. It’s a very simple image that works for the intended purpose very well.

The second example is from a story I shot for a magazine about two brothers who work together at a school in London. I had shot hundreds of images of the buildings and a lot of portraits of the elder brother who is the boss. I had a lot of more conventional portraits of the two of them together as well so I decided to try this two person silhouette which shows the special cladding used throughout the central core of the building.

©Neil Turner, September 2008

The cladding itself has a yellow colour and so I decided to place a Lumedyne flash unit directly behind the seat that they were sitting on. It was very close to the wall, which give far steeper fall off of the light and a more dramatic outline. I find that the best place to focus for a silhouette is on the edge of the subject rather than the normal eye or face. I was shooting with a 16-35 f2.8L lens on a Canon EOS1D MkII at the wide end of the scale and the exposure here was 1/250th at f9.5. The flash was dialed down to 1/8th power and at that aperture I had easily enough depth of field to get the brothers both sharp and to have easily enough detail in the background.

Magazines seem to like this kind of image if they have a spread to fill or they want something a bit different for the contents page. You don’t always have to use flash to create silhouettes but the conditions required in nature to get a good one aren’t easy to arrange! Low level winter sunshine here in the UK is good and of course dusk and dawn without cloud cover anywhere in the world are great. I have also used illuminated signs and billboards when they are bright enough but for the sheer degree of simplicity and control, these flash-lit examples are hard to beat.

Getting the viewer’s attention without them knowing how?

From time to time I deliver seminars to fellow photographers and I give lectures to students, PR people and just about anyone who will listen. If I get long enough, there is a central theme to what I try to say. It really amounts to defining the difference between a photographer and somebody with a camera. It’s about how we see the world and how we show others that world.

Professor Heinz Wolff. ©Neil Turner/TSL, May 2005

Photographers do more than push that button. We bring creativity, experience and thought to the process to give our images something that “just push the button” photographs would rarely ever have. At this point in a live lecture there are usually a few worried faces, a few that are toying with calling out b***s*** and a majority that are just puzzled. Let me explain.

What a successful photograph has is a view of the world or of people that the viewer instantly recognises but will give them an interpretation that they would not see with either the naked eye or their own pictures. Successful pictures contain the information that the photographer wanted to include but exclude all sorts of stuff that doesn’t need to be there. Good photographers use a whole bunch of techniques to deliver a view that is familiar but sufficiently different to make the viewer look again. By now the audience members who will benefit from the lecture are trying to work out what I mean by techniques. A two dimensional image of three dimensional reality frozen in time is what still photography will always give – that’s “just” physics. We can do so much more.

In days gone by photographs were always an interpretation of the world because they contained no colour. The vast majority of the population see in colour and so delivering them a picture in tones of black, white and grey has always been the simplest way to make the real unreal but recognisable. Make the black and white print properly and you are really starting to produce the kind of pictures that I am talking about.

Converting an image to monochrome is the oldest and simplest technique but we have so many others. Shooting from different angles lets the photographer show their vision. I wrote an essay many years ago called “six feet up is bad” which basically said that photographs taken from a normal adult standing height had a much harder time of making the viewer see something in a scene that they wouldn’t have seen themselves. Take the picture from below two feet or above eight feet and your perspective shifts and the photograph stands a better chance of catching the viewer’s subconscious eye. Similarly, using longer or wider lenses than the human eye would relate to gives the photographer a way to pass on their vision. Using shallow depths of field or interesting light, having saturated colours or leaving colour casts normally corrected by the human eye all give us extra tools and techniques for making our images far more interesting.

Of course you can go too far – but that’s all part of what makes photography so interesting. Use too many tricks in the same image and you just end up with a statement about how you took a picture rather than having a great picture.

On almost every assignment I shoot wide and I shoot tight. I shoot from low angles and from height. I light a lot more of my work than most photographers but I try to give my clients choice between obviously and subtly lit images. If I do shoot a picture at f5.6 in average light on a 50mm lens from five feet ten inches of of the ground with the subject ten feet away it’s quite a shock to me!

The most successful images are those that get the viewer’s attention without them knowing why.

Back On The Beach

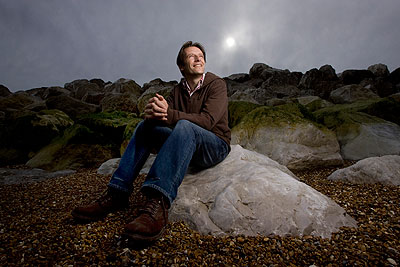
I was born by the sea, I live by the sea and I really enjoy shooting portraits by the sea. This example was of a young teacher who has moved his family to the coast to get a better way of life and he had given an interview to the paper about the way he lives – cycling to work, spending time with his family and generally making the most of the beaches in his area. My brief was simple – shoot a nice portrait on the beach!

Most people assume that photographers like brilliant sunshine. I guess that most people only take pictures on nice sunny days because that’s their holidays and the scenery often looks better with brilliant blue skies and high contrast landscapes. People never look their best in direct sunlight – they squint and have heavy and horrible shadows around their eyes and faces. There are enough technique pieces on this web site about overpowering daylight for you to know how much trouble I go to to get rid of those nasty shadows. My subject for this portrait was disappointed when I arrived on an overcast and rather damp afternoon in June. I spent time assuring him that I was happy with the light and that we would end up with a better image and more interesting because of it. (more…)

About Angles

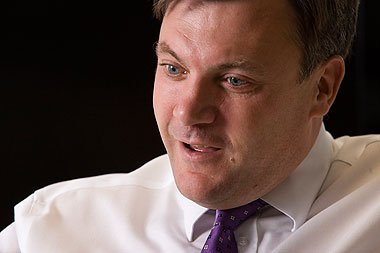
I have to shoot a lot of portraits during interviews and there have been several technique examples on this web site about the techniques and decisions that need to be made when doing that kind of work. This one isn’t about lighting set-ups or pre-planning – this is simply about seeing an angle and making the most out of it. This gentleman is Ed Balls: Member of Parliament and Secretary of State for Children, Schools and Families in Gordon Brown’s Government. The reporter had a short time to ask him questions from our readers and to conduct an interview around his responses. I had to shoot with my back to a glass wall and against the light. I set up a Lumedyne with a simple shoot through umbrella almost directly opposite the Secretary of State and behind the reporter. I had limited space in which to move and shoot.

This wasn’t the first time that I’d shot him. It wasn’t even the first time that week. We had met a few days previously at an event with Henry Winkler (yeah, The Fonz!) where Henry read from his new book to some kids and Ed acted as his straight man. Great fun. Anyway, back to the interview… (more…)

Door Light

I was inspired to share the “how” for this picture because of a comment from a colleague who said that I had been “lucky to find such a nice pool of light”. I was amused, annoyed and complimented all at the the same time because I created this light and he obviously thought that it looked as if it was a natural effect. Much of the best lighting looks as if it were not lit… so how was this one achieved?

I had been asked by the picture editor to get a good range of portraits of this man who is the Vice President of a company that handles examination papers. The logo was needed in some frames and this plate screwed to a wall in a corridor was the only one on offer. The layout was like this…

The brown lines that you can see on the layout are fire doors – big heavy wooden doors with three small square glass panels in each one. The Lumedyne flash unit with a Pocket Wizard receiver on was placed outside the door and the door was closed. The subject was lit entirely by the hard, un-modified flash coming through those three glass panels. Lining up exactly where the light will fall is very easy – if the subject can see the flash head, then it can see them. After that it is just a question of shooting a couple of frames and judging on the camera’s LCD screen where the light is falling and then raising, lowering or moving the flash accordingly. (more…)