commercial

What they don’t teach you in college

This post was originally written in 2003. Things, sadly, haven’t really changed and so I thought that it deserved yet another airing.

For better or for worse, the vast majority of people entering the photographic profession are coming from college courses. I have no problem with that, I came from one myself and so did a lot of my favourite photographers. But…

I’ve been a working photographer since 1986 and based on a few things I have picked up since then I have come up with a list of things that they should have taught us that were not on the syllabus. A whole range of vital skills that go a long way to marking out the complete professional from the aspiring “not there yet”.

Obviously when it comes to choosing which lens to use, or selecting backgrounds and props – only experience and familiarity with your kit and brief will do, and colleges are good at telling their students that. There are, however, some skills that are never even mentioned that are vital.

  • People skills: The ability to handle anyone that you are either photographing, who have influence over those being photographed or who are just getting in the way.
  • More people skills: You need to be able to charm the ‘jobsworth’ security man and persuade the reluctant PR and to do it all without breaking into a fit of temper until such times as all else has failed and you have no other option
  • Even more people skills: As a news photographer you need to be able to communicate with anyone from a starving refugee to a pampered celebrity in a meaningful and constructive way – often on the same day! You have to get them to trust you, to do what you want them to do and achieve all of this with dignity and respect.
  • Advanced people skills: As a portraitist you have to have the ability to talk to absolutely anyone and to keep the conversation going at a light but interesting level whilst setting up equipment, making vital technical decisions and shooting the job.
  • Extended people skills: You need to have a sense of your own place in the scheme of things. It’s no use throwing a prima donna tantrum if you are not getting what you want and are never going to get it. It gets even worse when the person you are arguing with is a close personal friend of the editor. Know when to give in, to make another plan and get your shot anyway.

You are probably getting my drift by now. Once you have acquired all of the technical skills and bought all of the kit that you need all that’s required is to learn how to conduct yourself. I often refer to the photographer as the “Social Chameleon”, changing colours and attitude to suit their surroundings. This should be both physical – dressing appropriately so as not antagonize the people that you are dealing with, and mental – adopting the right attitude – be it meek or aggressive, as friendly or confrontational as the situation requires.

Maybe photographers should all adopt some of the techniques used by the best sales people and mix them with skills more common in the diplomatic service. I have watched charity workers running soup kitchens and marvelled at their ability to be both understanding and firm, and I have watched police officers and been stunned by the way that they get the information that they want whilst conducting an otherwise friendly conversation.

My biggest tip on this subject is to find some common ground with whoever you are talking to and work it. It might be sport, it might be the weather or the journey that you both had to get where you have met. If I’m in someone’s home I will often talk about a piece of art or furniture on display or their pet cat or dog. It doesn’t matter what you chat about, you are chatting and barriers are coming down. Avoid contentious subjects unless you are really sure of yourself.

So there you are, what they don’t teach you in college is how to handle people. It’s not just a skill needed by photographers – it’s a life skill. I think that’s why a lot of the greatest photographers have come from other careers where they have learned about people and use those skills in their new profession.
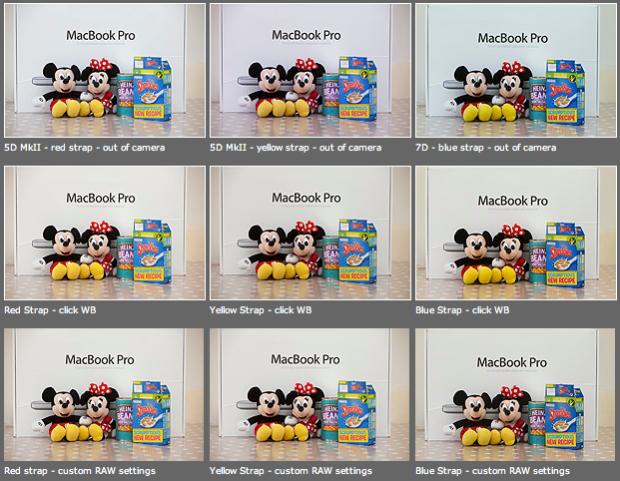
Colour calibrating digital camera bodies

When you work with one camera and you shoot RAW all of the time it really doesn’t matter if that camera has a tendency towards magenta, yellow or cyan – the shift will be consistent and you can cope with it very easily in post-production. If, on the other hand, you work with more than one camera and each of them has a subtle shift in a different direction then your workflow can be slowed down when you have to constantly colour correct images shot under identical lighting in different directions. Like all things in photography, there is more than one way to solve this problem.

As you can see from the top row of images above – the three cameras that I use have different colour shifts with my slightly newer 5D MkII (codename yellow strap… because it has a yellow strap!) displaying quite a strong magenta shift whilst the 7D (codename blue strap, you can guess why) is a little cold and my oldest 5D MkII (red strap) is pretty neutral but maybe 1/3 of an f-stop brighter. I am going to use the red strap body as my basis for changing the colours on the other two a) because it is the most neutral to start with and b) because it has been serviced and cleaned by Canon quite recently.

Obviously these pictures were shot under controlled conditions using the same light source, the same lens on a tripod and have been converted from their RAW using no adjustments whatsoever. I shot multiple frames using each body as a sample just to make sure that there was no shift between frames on the same camera.

The second row of examples are the same RAW files with a white balance applied to exactly the same spot on the white box between Mickey and Minnie’s ears. As you can see this gets us a whole lot closer to matching the pictures for colour and this technique is fine when you have something in the frame which allows you to use the eye-dropper tool in Adobe Camera RAW (and in other similar raw conversion applications) and it is also fine when you only have a few images to process in this way. If you shoot an event where there are hundreds of frames, then you would spend an unnecessary amount of time balancing in this way.

The third row of examples utilises one of the cool features of the latest versions of Adobe Camera RAW in either Photoshop or Lightroom (and I’m sure that other software does this too) which allows you to set a default set of settings ranging from white balance to black levels, contrast, saturation to sharpening and noise control for each camera which the software detects from the serial number in the EXIF data as you bring it into the RAW conversion control pane. This is great for a lot of work and is a good option if you usually shoot on a fixed white balance.

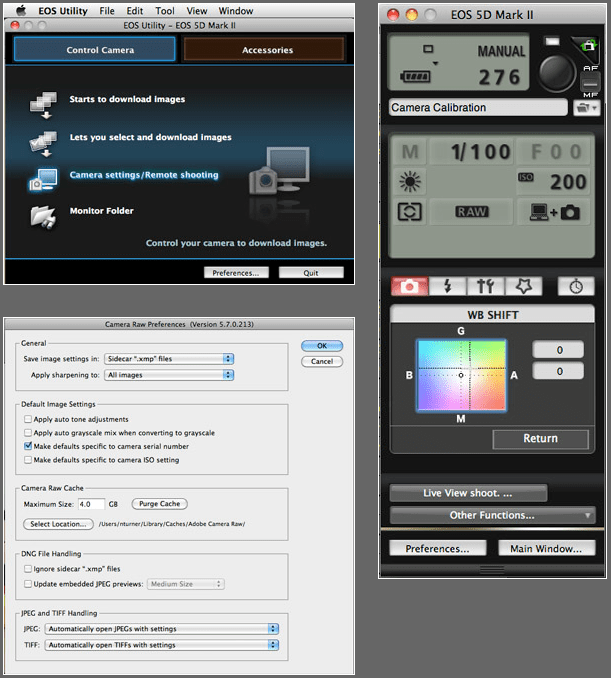
These three techniques work for pretty much every digital camera and every scan. Some, more modern and more expensive, cameras allow you to go one crucial step further and that is to tell the camera to automatically shift by a fixed amount of colour for every frame – so that if your camera has a magenta shift like my yellow strap camera you can counterbalance that in camera and your images will show up as they should – no matter which white balance you are using at the time. The next few illustrations are based on a Canon 5D MkII using Canon’s own EOS Utility:

The illustration above top left of the three shows the home screen of the EOS Utility application and the “camera settings/remote shooting option is what you need.

This brings up the window on the top right which has an option marked WB shift that allows you to control the cross hairs and set an exact shift for the camera that is connected at the time. It is simple and very, very useful.

The illustration bottom left refers to the technique in Adobe Camera RAW (Photoshop CS4 in this case) in which you set a custom import for each camera and this is the preference pane that you need to find it.

It would be great if there was some software that allowed you to perform an exact “chip” calibration in the same way that you can calibrate a computer screen. Of course, the ability to calibrate the LCD on the back of a DSLR would be cool too but in the mean time here are three ways that you can use the combination of a good RAW converter and your camera’s built-in options to get all of your cameras working the same way as each other. It takes time, it’s fiddly but will save you a great deal of hassle over the course of a few weeks work.

The copyright symbol and Windows

I’m a Mac user and I have been for the last sixteen years. They make some great tools and some amazing gadgets but the best thing about Macs is that they seem to be made for people like me. I was having this conversation with a student on one of the excellent photographic courses at the Arts University College at Bournemouth and I realised that my preference for Apple computers can be summed up by the fact that the copyright symbol is just there – alt+g – whereas on a Windows machine you have to hunt for it. I have just Googled “how to find the copyright symbol on a Windows computer” and had to laugh out loud at the first website that came up:

“Hold down the Alt key and type 0169 if you have separate numeric keys on your keyboard. Alternatively you can go to programmes, accessories and select “character map” which allows you to assign a short cut to any symbol that you choose. Unfortunately not every copy of Windows has this loaded and you may need to reload it from your system discs”.

Does this seem long-winded to you? Shouldn’t a symbol as important as the copyright one just be there? I know that the option of using (c) is there and almost everyone recognises it but the correct symbol should be much easier to find than it is on most Windows machines.

The serious point here is that copyright is important. Actually, copyright is vital and we all need to mark our work at every opportunity to make sure that everyone knows that all intellectual property has an owner and stop copyright abuse.

Being self-critical

One of the best things about studying photography at college was having so many of your peers around to help critique your work on a daily basis. It often hurt at the time and more than once I decided to ignore the advice of my friends and forge ahead with my own style. After college there was always the darkroom or the lab where you would talk to other photographers and get some feedback on what you were doing. Then there were a few years when we were hand processing film wherever we happened to be and scanning it, quickly followed by the early digital era. That brief period between the darkroom and the almost universal uptake of the internet and adoption of digital was a tough time for those of us who liked to talk about our work with other photographers.

Now we have choices. We can submit our work to picture sharing networks or publish them on our own sites and hope that others take the time to have a look. Excitingly, we have a growing number of photography discussion groups such as Photo Forum in London where like-minded folks can get together and see the work of others, talk about it, help each other and get inspiration.

There is, however, another option. Self-critcism. The concept is simple – you look at your own work very very closely and try to see how you could have done it better, more imaginatively or maybe just differently. As a freelancer, based a hundred miles from London, this is something that I am going to spend more and more time doing. It was easy to look at a friend’s work and pass a comment or two but it is a lot tougher de-constructing your own images. So much so that I have been giving some thought to having a structure for looking at my own pictures. My first thought was to have some headings under which to work: image quality, composition, light, first impression, suitability for the job were all there in my first list. It’s a decent way to analyse images but I can’t help thinking that there is a better and more enjoyable way to critique my own work.

I tried opening a small number of random images from the past months work and really studying them hard, trying to imagine that they weren’t mine. I found myself coming up against headings and categories again and so I marked six images with a numerical score out of ten under five separate headings and ended up with scores ranging from 20/50 to 44/50. An interesting exercise, but boring and outrageously bureaucratic! What would I have said if these pictures had been by someone else? The first thought that came into my head was that I wouldn’t have wanted to hear about how hard the job was or why certain compromises had been made – the very things that I know about my own work.

Taking a look at the pictures without giving myself a proverbial “pat on the back” for overcoming technical and physical difficulties brought me closer to the answer. Answering questions like “does it have instant appeal?”, “is it a good picture?” and “does it fulfil the brief?” without the excuses that I had been giving myself started to work. The next step was to try to put myself in the shoes of the client and factor in what they might have thought about them. It was getting complicated but I found myself looking at my own work in a far more detached way than I ever had done before.

Applying this process to an edit that I had done a week or so previously allowed me to go back and make that edit so much tighter. I have a very bad habit of editing far too loosely and giving myself a few rules to work with definitely helped me.

At the end of the process I made three decisions:

  • To be far tougher on myself when editing
  • To seek out help from other photographers to review what I’m doing
  • To have another look at my portfolio and see if I can re-shape it

It’s amazing where a few idle thoughts lead you

From journalism to design and all spaces in between

No matter what you talk about in life there seems to be a scale: left to right, top to bottom, right to wrong. I can now add a new one….journalism to design. These are the two ends of the scale that I exist in as a photographer. At one extreme my work is pure journalism and at the other it’s little more than eye candy.

©Neil Turner. London, June 2009

The pressures that I feel when I’m out working come from both directions, and both sets of pressures come from the newspaper. My instincts are clearly those of a news photographer, but more and more I find that my work is required, judged and edited by designers. This makes me nervous because they wouldn’t ever consider meddling with the written journalism and I sometimes find my pictures being selected on the basis of how well they add to the graphical feel of the page.

I’m not saying that there isn’t a place for this attitude to pictures in lifestyle magazines, but the success of those magazines has meant that attitude spilling over into newspapers. Daily and weekly papers have always been dominated by the written word and photographs have always had to struggle for their place as an integral part of the journalism. I am fairly convinced that no significant newspaper has ever had a photographer as it’s editor, so it isn’t surprising that words dominate.

The constant changes in “who does what” inside newspapers has lead to the appointment of more and more designers who seem to have become very influential, not only in a design sense but in a more general editorial way too. Photographers are being sidelined by yet another group of workers.

Going back to my left to right argument, there are pages within a newspaper that are predominantly news and there are pages that are rightly about lifestyle. I have no problem with this except where the emphasis becomes blurred and decisions about photographs are made because they make the page look good on pages where the journalistic content should be king. Editorial photography is a far wider field than news photography and I want to be able to shoot in a wide range of styles to suit the whole spectrum, but more and more of my colleagues here in London are feeling the pressure to shoot in a softer, more feature based style all of the time. Don’t get me wrong, I think that great photography is great photography no matter why the pictures were taken and no matter where they are intended to go…but…the hijacking of news pages by people with anything other than journalism in their thoughts has to be resisted.

I strongly believe in giving designers and layout artists greater flexibility so I hope that everyone will realise that I want to meet “the enemy” halfway and not just sit sniping on the sidelines. I just get very depressed when I hear designers and layout people talking about photographs, good photographs as so much “window dressing”. The answer? Appoint more picture literate people to senior positions on newspapers, treat news photography with due respect and never allow photography to become just another element of design