pr

Colour calibrating digital camera bodies

When you work with one camera and you shoot RAW all of the time it really doesn’t matter if that camera has a tendency towards magenta, yellow or cyan – the shift will be consistent and you can cope with it very easily in post-production. If, on the other hand, you work with more than one camera and each of them has a subtle shift in a different direction then your workflow can be slowed down when you have to constantly colour correct images shot under identical lighting in different directions. Like all things in photography, there is more than one way to solve this problem.

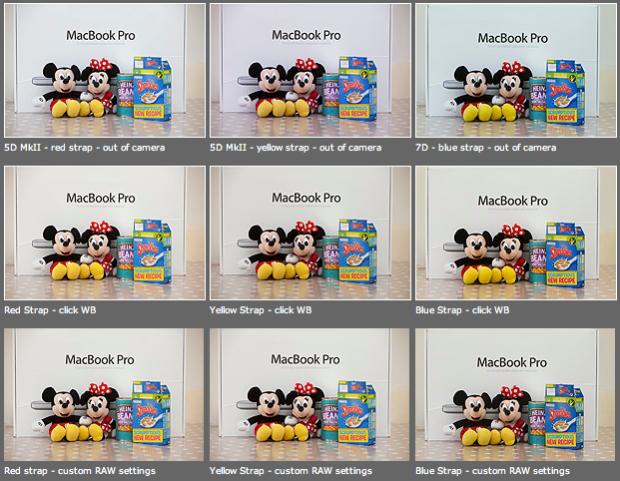
As you can see from the top row of images above – the three cameras that I use have different colour shifts with my slightly newer 5D MkII (codename yellow strap… because it has a yellow strap!) displaying quite a strong magenta shift whilst the 7D (codename blue strap, you can guess why) is a little cold and my oldest 5D MkII (red strap) is pretty neutral but maybe 1/3 of an f-stop brighter. I am going to use the red strap body as my basis for changing the colours on the other two a) because it is the most neutral to start with and b) because it has been serviced and cleaned by Canon quite recently.

Obviously these pictures were shot under controlled conditions using the same light source, the same lens on a tripod and have been converted from their RAW using no adjustments whatsoever. I shot multiple frames using each body as a sample just to make sure that there was no shift between frames on the same camera.

The second row of examples are the same RAW files with a white balance applied to exactly the same spot on the white box between Mickey and Minnie’s ears. As you can see this gets us a whole lot closer to matching the pictures for colour and this technique is fine when you have something in the frame which allows you to use the eye-dropper tool in Adobe Camera RAW (and in other similar raw conversion applications) and it is also fine when you only have a few images to process in this way. If you shoot an event where there are hundreds of frames, then you would spend an unnecessary amount of time balancing in this way.

The third row of examples utilises one of the cool features of the latest versions of Adobe Camera RAW in either Photoshop or Lightroom (and I’m sure that other software does this too) which allows you to set a default set of settings ranging from white balance to black levels, contrast, saturation to sharpening and noise control for each camera which the software detects from the serial number in the EXIF data as you bring it into the RAW conversion control pane. This is great for a lot of work and is a good option if you usually shoot on a fixed white balance.

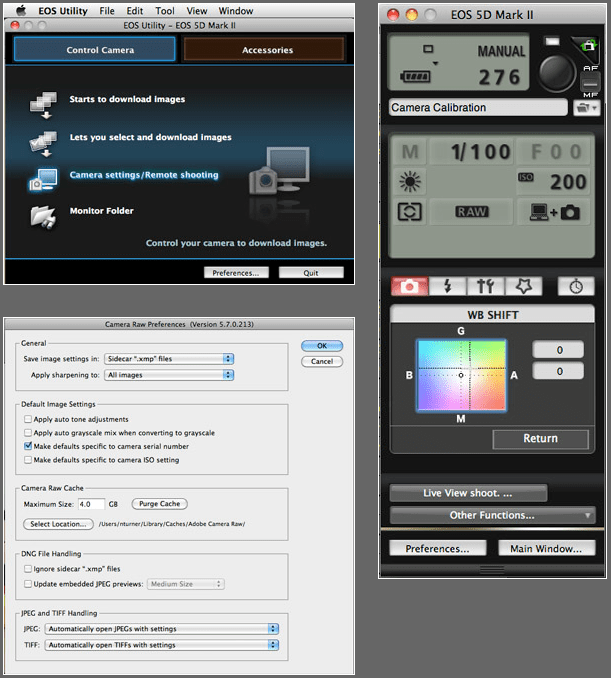
These three techniques work for pretty much every digital camera and every scan. Some, more modern and more expensive, cameras allow you to go one crucial step further and that is to tell the camera to automatically shift by a fixed amount of colour for every frame – so that if your camera has a magenta shift like my yellow strap camera you can counterbalance that in camera and your images will show up as they should – no matter which white balance you are using at the time. The next few illustrations are based on a Canon 5D MkII using Canon’s own EOS Utility:

The illustration above top left of the three shows the home screen of the EOS Utility application and the “camera settings/remote shooting option is what you need.

This brings up the window on the top right which has an option marked WB shift that allows you to control the cross hairs and set an exact shift for the camera that is connected at the time. It is simple and very, very useful.

The illustration bottom left refers to the technique in Adobe Camera RAW (Photoshop CS4 in this case) in which you set a custom import for each camera and this is the preference pane that you need to find it.

It would be great if there was some software that allowed you to perform an exact “chip” calibration in the same way that you can calibrate a computer screen. Of course, the ability to calibrate the LCD on the back of a DSLR would be cool too but in the mean time here are three ways that you can use the combination of a good RAW converter and your camera’s built-in options to get all of your cameras working the same way as each other. It takes time, it’s fiddly but will save you a great deal of hassle over the course of a few weeks work.
Modified beauty dish

A couple of years ago I bought a slightly used 14″ beauty dish with a fitting that I couldn’t identify. I used it a couple of times with my old Lumedyne kit and kept meaning to make an adapter so that it was easy to attach and detach without looking like a “bodger”. I never got around to it – largely because the work that I was doing didn’t really call for that kind of light. A couple of months ago I came accross the dish and decided to adapt it for use with my Elinchrom Ranger Quadras.

To make it work properly with the Ranger Quadras I had to remove the orginal fitting. The dish is made out of relatively thin aluminium and it was very easy to use a hacksaw to take the whole of the fitting off. There were three screws holding the wires that keep the dome on position and I removed those to get ready to use the same holes to attach the Elinchrom fitting. This was made from a 13cm reflector which was cut through the reflector bowl in three places, allowing me to spread the metal of the reflector wider so that it could be bent to mirror the curviture of the beauty dish. I then drilled three holes in the modified Elinchrom reflector to match the three existing screw holes in the beauty dish and screwed the whole thing back together. Finally I used some gaffer tape to cover the slightly sharp edges of the Elinchrom reflector where I had cut it.

What you see in the three images above is the “finished” beauty dish. It is lightweight which is great for heads as small as the Elinchrom ones and it puts out a beautiful even light. I have shot some portraits using it but I cannot show them here yet because the client hasn’t used them in the magazine for which they were shot.

The total cost was £20.00 for the secondhand beauty dish, about £25.00 for the Elinchrom reflector that was sacrificed to make the adapter and some gaffer tape. Change from £50.00!

As a footnote, the colleague who proofread this piece for me asked why the cable has two yellow stripes around it. The answer is that I like to be able to identify bits of kit from a distance and the two stripes signifies that it is a two (and a bit) metre cable and that it was bought at the same time as the head. Newer purchases get different colours and a three metre cable would have three stripes. A simple idea but it really helps when you are working quickly and need to set up kit or make changes in a hurry.

Photocalls… aaaargghhh!

On the day when several US wire services took the principled decision not to distribute images from the White House that they had not themselves taken I thought that the timing was right to resurrect one of my own opinion pieces which expresses how I, and many of my colleagues, feel about the pre-arranged photocall. At their very best they can provide useable photographs, but the rest of the time they merely offer up banal images. The question is…does it have to be this way?

Organising photocalls should be a separate profession, but it isn’t. Public relations firms seem to have the knack of setting up ridiculous tableaux with pointless props and “C” list celebrities whilst many companies have their own in-house marketing teams who try to shoehorn as many executives in grey suits into a photograph as possible.

No matter how many of the assembled highly skilled and hugely experienced professional photographers tell the PRs that their idea of a photograph will never make it into their newspapers, the PR people still seem to make it a matter of pride to stop us getting good pictures.

Just when you think it couldn’t become more farcical they hand out the press releases. Many of these documents weigh more than a decent SLR (lens included) and a large photocall may well account for a couple of trees (branches included). How many times do we have to tell the PR people that a single sheet of paper with the relevant names and a one paragraph summary of the event would be a lot more desirable? (and environmentally friendly!). These days the release could even be on a USB memory stick or even passed around by bluetooth, which goes even further to reduce the carbon footprint of the event.

In these days of digital photography and laptops you would think that they would at least organize a bit of space so that some of us could use it to acquire and send our pictures – maybe even lay on some wi-fi. Apparently what is actually needed is some fatty canapes, white tablecloths and wine at 11am. We would really appreciate some thought about parking (not plentiful in London) and rapidly approaching deadlines, but the PR would rather fuss about name badges and being seen to be working hard trying to accommodate some obscure request from someone with little or no need to be there. PRs – get your priorities right!

So, if you are organizing a photocall soon here are some tips:

  • Make sure that the photocall notice is issued in good time and doesn’t make inflated claims about what is on offer.
  • Organize parking or make it clear where the nearest public parking can be found.
  • Keep any signs and logos to a minimum – if it doesn’t need to be there, get rid of it.
  • Welcome photographers and give them a run through of what might be likely to happen.
  • Listen to the constructive criticisms of experienced photographers who will suggest changes and improvements to your plans.
  • Make sure that the photographers are given enough time and space to do their jobs. Keep bystanders at bay and, if you have employed your own photographer, make sure that they allow the invited photographers priority.
  • Provide an accurate and concise press release – it could be on a USB flash stick to save paper and help photographers cut and paste correct spellings
  • Arrange space, power points and even wi-fi connections to enable photographers to file their images

Photocalls are the jobs that none of us want to be sent on. It need not be like that, but a small army of PRs out there seem determined to promote mediocrity and banality.