work

Professionalism 101 (or P101 for short)

©Neil Turner/TSL

The hardest part of the transition from good photographer to professional photographer is in understanding the difference between the two. I once wrote that the best definition of “professional” is someone who gets the shot 99.9% of the time and has a damned good excuse for the rest. Still true, but professionalism has another side to it – one that can be learned pretty easily.

Clients are used to dealing with professionals: Slick presentation, questions being answered before they are asked and great customer service. These are all things that we expect as consumers and in business we expect even more. As a professional, you are in a market place and you have to compete.

We work in an image-conscious business and we live in an increasingly image-conscious world. Even as self-employed freelancers we need to have corporate identities of our own. The vast majority of our clients have proper business cards and 99.9% of them have email addresses that tell you who they are and who they work for.

I am constantly amazed by the number of decent photographers who hand out slightly apologetic home-made inkjet printed cards and I’m shocked by the number of Yahoo and Hotmail accounts that people rely on. Webmail is useful but it does nothing to positively affirm you as a professional. Buying and running your own web domain is not difficult or expensive and it really helps to give potential customers the impression that you are in business and that you have been for some time. If your email address matches your portfolio website there is a certain synergy. If your on-line presence is a gallery on Flickr and your email is london-snapper@webmail.com then you really are missing a trick.

Keeping everything the same, presenting a corporate image and playing the game doesn’t detract from your photography. Quite the opposite; it removes a potential barrier to clients taking you seriously. Having a well-designed and easily navigated portfolio on the internet is almost as important as owning a camera. Being a member of at least one of the professional bodies that offer searchable freelance directories is also a very good idea.

Moving on in the story a little, you have met the client, they like your folio and they give you some work. Professionalism moves up a gear and this is your first job for them so you cannot make presentational mistakes now. Be clear when accepting the commission what the fees and expenses are, what rights you are selling them and what they are expecting from you. Get technical specifications, deadlines, delivery addresses (FTP, email or postal) sorted out and then go and do what you are there to do – shoot the pictures.

Let’s say, for arguments sake that the job requires a CD with twenty high-resolution, post-produced RGB JPEG files in the post. P101 says that the client will be used to proper presentation and so your CD should not be a PC World own brand disc with a few illegible words written in marker pen in a cracked plastic case. Printing proper CD labels is very cheap. Getting discs printed on an upmarket Inkjet printer isn’t expensive and having a few hundred professionally screen-printed will not break the bank. Slim CD cases are OK but softer plastic flexible cases are better and they will cope with the postal system far better. Of course the disc should be labelled with the date but the main impression should be that this came from Joe Bloggs – professional. The packaging should be professional, the label on the outside should be neat and tidy and you should have a properly printed compliment slip in there too.

None of this makes you a better photographer, none of this will actually impress the client. But none of this costs much money either. What it will do is not raise any negative thoughts. The hand written scrawl on the cheap disc stands a good chance of making a negative impression – yet hundreds of photographers still do it.

So what about what is actually on the disc. There are the pictures of course. It’s important to make sure that they meet any specification given to you by the client and it’s also vital to make sure that the client can open the disc on whatever system they use – but what else? Make space on the disc for a PDF file containing licensing information and a second PDF with the caption details (it’s amazing how many picture buyers still don’t understand or see the metadata that you embed in the images). For some clients a set of clearly marked low resolution, screen sized sRGB JPEGs can be useful too.

Going deeper still, think about the metadata that you attach to the files. Professionals have to add IPTC caption details. Who, what, why, when and where. No matter which imaging application you use you have to put into words what is in the picture – which balding middle aged man is which, where they were taken with a date and possibly a time. You also have to add your details. Stamp your identity right there in the metadata. Use the © symbol liberally so that everyone knows who owns the pictures. The tricky thing here is to know which box you put this information into. Many newspapers want you to put everything into the main caption/description box. Others only want the names and places in the main box. Most magazines and commercial clients don’t have a preference. If in doubt put it all in the main caption/description box and add it all in the other relevant boxes too.

Metadata has another face – EXIF. These are the shooting details that your camera will add to digital files. Some are useful – time, day and date. Others are annoying – which lens, shutter speed, white balance. Does the client need to know this stuff? Probably not – so delete it.

This is not rocket science 101. This is, however, a very competitive market. P101 says that you have to do everything that you can to give the client confidence that you are a pro and that you will deliver the goods. I was giving a talk on this very topic at a college when a very-self-assured young man told me that he wasn’t interested in any of this “plastic b******t” and that his clients would have to take him for what he was – an excellent photographer. This kind of approach might have worked twenty years ago but it doesn’t have a snowball-in-hell’s chance in the 21st Century.

Having a “USP” (unique selling point) is a great idea as a photographer, but being the one who eschews good presentation and good practice is a pointlessly high-risk strategy. If you want to take pictures for a living, you have to get people to pay you. Most of the people who control the market place wear suits and respond well to corporate image. It’s a game and you would be well advised to play it.

Shooting in less than favourable weather.

Another re-posting; this time posted in April 2009 but from a job that I shot in 2006…

One of the best things about being a photographer is that you get to do some pretty odd things. Sometimes you climb to the top of a tall building and have a look at the view. At other times you get to meet interesting and amazing people and take their pictures. At other times you have to get up early on a bleak winter’s day, go to the beach, wade into the water just after dawn to get the tide and the picture. It all adds to the fun of the job.

©Neil Turner/TSL

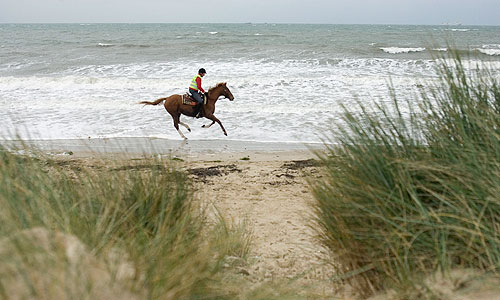
I shot this commission a while ago and I have been meaning to write it up since then. The story was about a school head teacher who owns a horse that she keeps in stables near the sea. She refers to her horse as her “work life balance” – something that we all need, but few of us have quite such a visible symbol of it!

Being a teacher, she is at school most days. During the holidays she gets away to the coast and rides whenever she can and if the tide is right she can ride on the beach. It was an October morning and we met at dawn in the car park near the stables. My brief was to get a double page spread for a magazine which showed her enjoying herself.

Of course photographers rarely get to choose the weather and it was raining with a reasonably strong wind. The tide was just right (we checked the tables in advance) and so we started to shoot some pictures of her riding on the sand. It’s a stretch of coast that I know well and I knew that there was a high chance of poor weather. There’s nothing that you can do when the deadline is tight except to shoot the best pictures that you can.

The picture above was taken towards the end of the session and by this time it was getting lighter. The exposure was up to 1/500th of a second at f3.5 on a 24-70 f2.8L lens. We had started at 1/125th at f2.8 and the light was doubling every twenty minutes or so. Unusually for me I shot this job without lights, without flash – just good old ambient. Had there been any sunshine, there would have been the complicating factor of having to shoot almost directly into the sun if I wanted to stay on the beach.

Most of the pictures were taken on a 70-200 f2.8L lens and I made use of a monopod whilst the light was low. I shoot on beaches quite a lot and I always take a large piece of plastic to sit my camera bag and anything else that I put down onto. If the plastic sheet is big enough, you can also use it to wrap everything but sand still gets in and salt still seems to coat everything.

©Neil Turner/TSL

I always try to give picture editors a lot of choice and to give them small “drop-in” pictures to use if they need a second or third image for an article. The wider the variety of magazines and papers that I work for, the more I find that the drop-in picture gets used in unusual and creative ways. Magazine clients appreciate choice.

©Neil Turner/TSL

The reason that I wanted to mention this job was the combination of the early start, the poor light, the wind, the rain and getting absolutely soaking wet wading knee deep into the sea. Maybe it was because of all of these factors that I enjoyed it – who knows.

I wrote a while ago about my addiction to Timberland boots and I was very grateful for them on this job. My jeans were wet but my feet stayed dry.

Photographic policy

Just in case you haven’t noticed, I’m a photographer. I also teach a bit of photography and write about the subject too. The latest addition to my ‘portfolio career’ is what I can only describe as photographic consultancy. I have done a few corporate training sessions aimed at people who aren’t necessarily shooting pictures but who are handling them on behalf of their employer. It started off with some PR managers from a range of Universities a few years ago and has been a very small part of what I do ever since then.

This week, I did a bespoke session for an NGO talking about copyright, licensing, permissions, model release, photographing children and how to get PR pictures used in the media. All of that in less than one day meant that we didn’t get right down into the finer details. For some organisations the knowledge that they need to do more will be enough to get them going. A company wide photographic policy has to be a ‘must-have’ with the amount of images, websites, pamphlets, brochures, publications and social media in circulation (officially and otherwise).

We are in the Christmas party season and a good, well publicised policy telling staff what is and is not acceptable would be very useful. Twitter, Facebook, Flickr and the rest are public platforms and un-wisely placed images or video are bad news. It isn’t only about stopping bad stuff happening though; good pictures need to be licensed, captioned and stored properly. The quantity of pictures held on company systems seems to have expanded exponentially and it makes sense to have policies that make use of the good stuff whilst making that the bad, the off-message and the out of date images are never seen.

As a professional photographer it is really hard to see photographs sourced from keen amateurs, micro stock sites and crowd-sourcing as anything other than lost income but that is the way the world has gone and we need to learn to work with it. People like me, with a lot of experience in the industry, can help to form policies for small, medium and even large businesses based on our knowledge of the law, ethics and technical matters. It isn’t going to cost a fortune and any company who ignores the concept of a photography policy could end up regretting it.

Back on Memory Lane again

I don’t know about you but I can put my finger on exact dates and point to pictures that changed the way that I shoot pictures. Aside from the obvious ones such as the day that I used a digital SLR for the first time and the day that I bought my first medium format camera one very special day and one picture made me think really hard about the kind of lighting that I wanted to use.

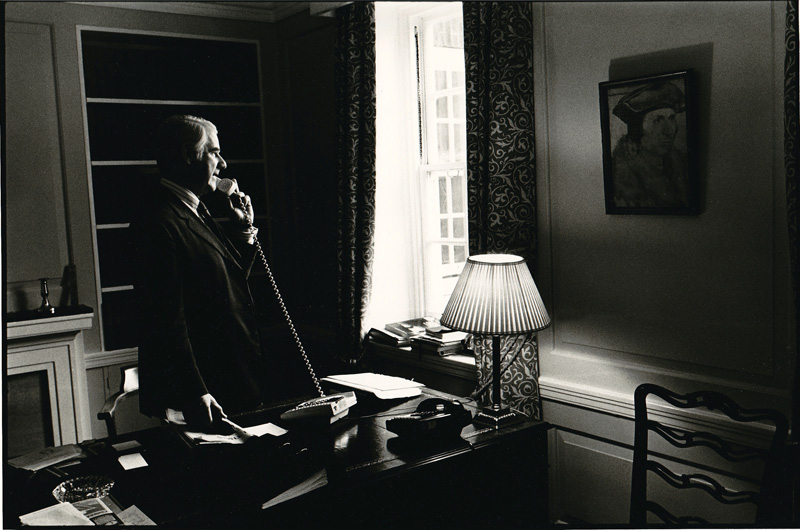
Desmond Fennell QC. ©Neil Turner

This black and white portrait of Desmond Fennell OBE QC was taken in his chambers at one of London’s famous Inns of Court – The Temple. It was shot for a newspaper and it was during a time in my career that I was using a single Elinchrom 23 flash head with a soft box and a bit of cable connecting the camera to the flash. Nothing unusual there I hear you thinking… how did this change Neil’s life?

Cue anecdote: I was sent to shoot a portrait so I took my standard gear. When I was shown in to the eminent man’s office I started to look around for a power point to plug my Elinchrom into. He answered the phone at that moment (he was chairing a major public enquiry at the time) and so I looked at the desk lamp and followed the cable to the socket in the wall. The trouble is that it was the wrong kind of socket… the UK standard three pin plug has rectangular prongs and his only socket had round holes. Square pegs, round holes… ohhh c**p.

It wasn’t that I was incapable of shooting with either a speedlight or just using the ambient light it was just a bit of a shock. This was actually the second frame that I shot – Nikon FM2 with a 35mm f2 Nikkor, Kodak Tri-X film pushed to 800 ISO.

I like to think that I learn from my professional mistakes and I like to think that after a few days a shock turns into an eye-opener and I remember coming away from this shoot with two lessons learned. The first was to always shoot some ambient light because it often makes stunning pictures – especially at quiet, off-guard moments and the second was to buy some battery powered lights. In truth, that took about three years to accomplish properly and I invested in a lot of extension leads in the mean time. I recall the day that my first Lumedyne kit went into action – complete with a Wein infra-red trigger. No cables. I shot a portrait of another lawyer and left her office singing one of the songs from the Disney version of Pinocchio – “I got no strings to hold me down…”

Six feet up is bad?

©Neil Turner, October 2000. Oxford.

©Neil Turner, October 2000. Oxford.

This was first published in the Autumn of 2000 on the DP Review website as a follow-up to a review I did of the original Canon G1 Powershot

It is very easy to hold the camera to your eye and take a picture. Good photography requires us all to think about where we are taking the picture from as well as what we are taking. The best photographs are made when the photographer chooses a vantage point to suit the subject, and it is surprising how few subjects are suited by the height of a human standing at their full five to six feet. This is compounded by the fact that when someone views the image they will see pretty much what they themselves would have taken because they haven’t been told about bending your knees or climbing a ladder to shoot better pictures.

It is no accident that many of the world’s best photographers wear denims most of the time, and I take pride in the fact that I spend so much of my time kneeling that I have “housemaids knee”. Sooner or later I will end up flat on my face or up on a chair to give something extra to a composition – namely a point of view that the person looking at the image would not have seen themself.

This image was shot in the beautiful University City of Oxford on a Canon G1 using the swivel LCD to get the camera at ground level without having to lie in the dirt myself. The lens was less that two inches from the cobble stones and this ultra low angle gives the image a dynamic quality that would have been missing had I been standing at my full five foot ten inches. The photograph is different from most pictures taken of this tourist magnet and I’m sure that my antics were the reason for the puzzled look on the passer by’s face.

My point is that when you get your camera out think about the height of the lens. If you end up shooting from a standing position, well that’s OK – but I will lay good money that 90% of pictures are better when taken from below four feet or over seven.

Colour calibrating digital camera bodies

When you work with one camera and you shoot RAW all of the time it really doesn’t matter if that camera has a tendency towards magenta, yellow or cyan – the shift will be consistent and you can cope with it very easily in post-production. If, on the other hand, you work with more than one camera and each of them has a subtle shift in a different direction then your workflow can be slowed down when you have to constantly colour correct images shot under identical lighting in different directions. Like all things in photography, there is more than one way to solve this problem.

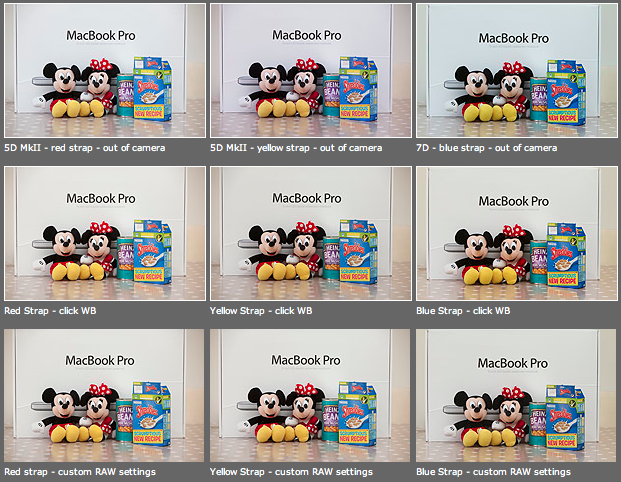
As you can see from the top row of images above – the three cameras that I use have different colour shifts with my slightly newer 5D MkII (codename yellow strap… because it has a yellow strap!) displaying quite a strong magenta shift whilst the 7D (codename blue strap, you can guess why) is a little cold and my oldest 5D MkII (red strap) is pretty neutral but maybe 1/3 of an f-stop brighter. I am going to use the red strap body as my basis for changing the colours on the other two a) because it is the most neutral to start with and b) because it has been serviced and cleaned by Canon quite recently.

Obviously these pictures were shot under controlled conditions using the same light source, the same lens on a tripod and have been converted from their RAW using no adjustments whatsoever. I shot multiple frames using each body as a sample just to make sure that there was no shift between frames on the same camera.

The second row of examples are the same RAW files with a white balance applied to exactly the same spot on the white box between Mickey and Minnie’s ears. As you can see this gets us a whole lot closer to matching the pictures for colour and this technique is fine when you have something in the frame which allows you to use the eye-dropper tool in Adobe Camera RAW (and in other similar raw conversion applications) and it is also fine when you only have a few images to process in this way. If you shoot an event where there are hundreds of frames, then you would spend an unnecessary amount of time balancing in this way.

The third row of examples utilises one of the cool features of the latest versions of Adobe Camera RAW in either Photoshop or Lightroom (and I’m sure that other software does this too) which allows you to set a default set of settings ranging from white balance to black levels, contrast, saturation to sharpening and noise control for each camera which the software detects from the serial number in the EXIF data as you bring it into the RAW conversion control pane. This is great for a lot of work and is a good option if you usually shoot on a fixed white balance.

These three techniques work for pretty much every digital camera and every scan. Some, more modern and more expensive, cameras allow you to go one crucial step further and that is to tell the camera to automatically shift by a fixed amount of colour for every frame – so that if your camera has a magenta shift like my yellow strap camera you can counterbalance that in camera and your images will show up as they should – no matter which white balance you are using at the time. The next few illustrations are based on a Canon 5D MkII using Canon’s own EOS Utility:

The illustration above top left of the three shows the home screen of the EOS Utility application and the “camera settings/remote shooting option is what you need.

This brings up the window on the top right which has an option marked WB shift that allows you to control the cross hairs and set an exact shift for the camera that is connected at the time. It is simple and very, very useful.

The illustration bottom left refers to the technique in Adobe Camera RAW (Photoshop CS4 in this case) in which you set a custom import for each camera and this is the preference pane that you need to find it.

It would be great if there was some software that allowed you to perform an exact “chip” calibration in the same way that you can calibrate a computer screen. Of course, the ability to calibrate the LCD on the back of a DSLR would be cool too but in the mean time here are three ways that you can use the combination of a good RAW converter and your camera’s built-in options to get all of your cameras working the same way as each other. It takes time, it’s fiddly but will save you a great deal of hassle over the course of a few weeks work.

Five levels of image manipulation

The Curve section of the EPUK website has always been a great source of information for photographers already working in editorial markets and for those who would like to do so in the future. I have written a few pieces for them over the years and my latest piece is about five different levels of image manipulation and how they should be used in newspapers and magazines.

As we celebrate the twentieth birthday of Photoshop we should take a few minutes to think about how the subject of image manipulation is regarded both inside and outside of our profession. In truth there is a sizeable majority of the population who think that every image that they see has been heavily retouched or altered.

Documentary, news and reportage photographers have a real battle to convince a sceptical world that their images tell the truth.

You might find it helps you to form your own thoughts on image manipulation by looking at these five categories of altering pictures and deciding for yourself which are appropriate for the kind of work that you do, and then using them to educate clients, friends and colleagues about how we as an industry view this very important subject.

  1. Normal darkroom practices – correction of colour, tone, contrast and saturation to reflect the way the image should look. Light dodging and burning.
  2. Darkroom interpretation – changes limited to colour, heavier dodging and burning, unnatural saturation and contrast that make the image an interpretation of reality.
  3. Minor alterations – adding or removing elements to or from the image, other than by cropping, that do not change the essential message of the image.
  4. Major alterations – adding or removing elements to or from the image that heighten or change the essential message of the image.
  5. Image montage – using elements of more than one image to make a photograph that is no longer a genuine representation of the scene.

For the purposes of news I would say that 1 is OK, and that 2 might be.

By the time you get to 3 then I would say that was unacceptable for news – unless there is a label attached or there are good public interest reasons for the manipulation (such as preserving the anonymity of vulnerable people).

The real danger here is that much of the public assume everything we do is altered. It does us no favours for this assumption to go unchallenged. The real sadness is that so many photographers supplying news images ignore the ethical implications – largely because they know no better.

Image manipulation is a serious subject and one that should be addressed by every photographer every time they sit at their screen and every time they see their work in print

Teamwork

Great news photography doesn’t just stem from a good photographer. There is are a whole number of people that come together in the planning, execution and reproduction of top class images and the real downside of being a freelancer is that I miss being part of a really great team.

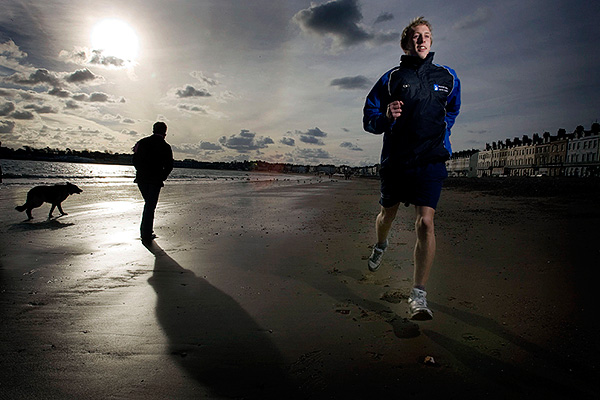
©Neil Turner/TSL | Weymouth, Dorset | December 2007

Being a photographer is usually part of a process. Images are commissioned, stories are bought and sold, edits are done and newspapers are printed. It’s a big and complicated jigsaw and being the person who operates the camera has to be the best part. There is no such thing as a run of the mill commission, but the process often goes like this;

  • The story is commissioned
  • The arrangements are made
  • The photographer is briefed
  • The photographs are taken
  • The edit is done
  • The pages are laid out
  • The newspaper/magazine is printed

There can be upwards of thirty people involved in the whole process and it’s important that the communication is good and that it goes in all directions. Some photographers aren’t as lucky as I am – this piece from the Sports Shooter site is a tongue in cheek rant against bad communications and poor commissioning. Unfortunately lot’s of photographers fail to live up to their obligations, indeed many don’t even recognise that they even have those obligations. It is up to us to talk to the picture editor, the journalist and ask the right questions. Getting the correct information from everyone else in the chain gives the photographer the best possible opportunity to shoot the right photographs and to tell the story in the best way possible. A failure to communicate ties the creative hands of the photographer and drastically reduces their chance of making a great set of pictures.

Sometimes the commissioning editor will forget an important detail, and at other times spelling mistakes and wrong addresses will get in the way of the pictures. Checking details, double checking spellings and discussing the story with the editorial staff will always prove to be time well spent:

  • It helps with the story under discussion
  • It improves your own relationship with the editorial team
  • It goes a little way to improving photographer editorial relations on a world scale!

Of course the picture desk need to do their bit in this vital piece of symbiosis because photographers really appreciate being given accurate information, input into the story and feedback after publication. Two way conversations work, and the industry needs more of them.