Author: dg28

I've been a full-time editorial & corporate photographer since 1986 and I'm still as passionate about the work now as I was then. These days I also write about photography, teach photography and act as a consultant on all things photographic - so, basically, photography is my professional life.

The photographer’s “uniform”…

I was told the other day that I was wearing my uniform with pride. What uniform you may ask? It seems that the uniform in question was that of a freelance news photographer. I have known for many years that many of us tend to dress in similar ways: we all spend a lot of our time kneeling down or lying down to get the best angle. In the winter we all get cold when we are working outdoors and so it comes as no surprise that we all choose similar clothing. So what was I wearing?

The first thing that I did was to look down and make a mental note of my attire. Heavy duty winter coat, fleece scarf, heavy weight denim jeans and my much loved Timberland boots. They are ancient, they are warm and the tread is still pretty good. These boots have waded into the sea, they have stomped through Scandinavian snow and they have marched across many miles of the New Forest with the family. Most importantly of all, they have seen me through a lot of miles on the streets of London.

You’d be right to think of this as a uniform – how many of my colleagues have a black or grey North Face jacket on their backs? It wouldn’t be an exaggeration to say “most”! I have no idea if mine is the latest technology (its Hyvent, whatever that is) or the coolest (black and grey?) but it works amazingly well. This too has kept me warm in the northern areas of Finland in the depths of winter. In fact, I even have a warmer one that I find it hard to wear. That McMurdo parka was a big investment for me and I’ve worn it twice.

I have just remembered that I was also wearing some amazing grey fleece gloves that my brother bought me a while back. They are made by Rohan and they are perfect for a photographer. They allow you to use the camera well enough (even the tiny buttons on the back of a Canon EOS 5D MkII) and manage to keep the worst of the chill off of your hands. The trouble is that they don’t have a name on them and the Rohan website doesn’t show any gloves so I guess that the recommendation isn’t all that helpful.

I’ve written before (although I really cannot remember were) about the photographer as chameleon. The idea is that we need to adapt to our surroundings and sort of blend in. In the city, surrounded by other members of the media it is pretty simple – once you’ve seen one black winter jacket with cameras hanging from it then you’ve pretty much seen them all. It gets trickier when you are the only one there. I’ve done jobs that required a dinner suit and others which asked for high visibility vests and construction helmets (more of the latter recently) but the majority of the jobs don’t come with a written dress code. The trick is to go for the right kind of smart casual wherever possible and to cover it all up with an expensive looking coat.

What you wear says plenty about you. Looking like a photographer tends to help you be accepted as a professional and helps you shortcut the whole credibility issue. I want my Doctor to wear a white coat and my postman to have the right clothing too. If you look like an archetype, if you play along with people’s prejudices it tends to relax them. If I turn up to shoot someone’s photograph dressed like a postman or a doctor I’m going to have to work that little bit harder to convince them that I know what I’m doing and that I am a professional photographer.

So that’s my winter uniform sorted. What shall I wear this summer?

The last refuge of the desperate photographer

Originally posted in January 2009, this piece is one of the ‘new’ technique pieces that I published around that time.

The use of the silhouette as a deliberate ploy in photography was once branded as “the last refuge of the desperate photographer” – a label that I have always contested. I have used the technique many times when I have not been allowed to identify the subject of the picture (usually children or vulnerable adults whose identity needs to be concealed) but I also use it when there is a need for an image with real impact. Creating a silhouette with flash isn’t difficult, using the technique sparingly can be.

Once you have made the decision to try a silhouette using flash, there are a few basics that you need to consider:

  • The subject must have little or no available light on them
  • You must have a background that can be lit easily
  • If the background has important detail you need enough depth of field to keep both subject and background sharp
  • The subject to be silhouetted should be in sharp focus and have a distinct outline

Once the basics are in place, then there are creative decisions to be made such as composition, placement of flash. This first example is of a member of my family who spends time at the gym so that he can show the world his physique. We were chatting one day and he said that he wanted something striking for the top of his Facebook page. I showed him a couple of ideas using silhouettes and we shot this…

©Neil Turner, October 2008

I was shooting with a Canon EOS1D MkII and a Canon 24-70 f2.8L lens. I wasn’t able to move myself around too much without shifting furniture and would have preferred to be shooting nearer the telephoto end of the range to deliberately remove any clutter. As it was, the lens was at 34mm (add the 1.3x factor and you get a 44.2 full frame equivalent field of view) and I cropped the image to the “letterbox” shape.

In this case I used the subject himself to mask the flash which was a Canon 550ex speedlight triggered in manual mode by a Canon ST-E2 transmitter. The first few frames had the background (a wall in my dining room) pretty evenly lit, which was a bit boring. The background is unimportant in this image and so the depth of field doesn’t matter too much. The exposure was 1/90th of a second at f13 on 200 ISO. I don’t recall why the exposure was 1/90th instead of 1/250th to utterly eliminate any available light but in a normal situation I would have gone for 1/250th.

I have some grid attachments for my Lumedyne flash heads and so I taped one of those over the flash to give me more of a circular pool of light. I aimed the flash slightly upwards so that I achieved the effect that you see above. It’s a very simple image that works for the intended purpose very well.

The second example is from a story I shot for a magazine about two brothers who work together at a school in London. I had shot hundreds of images of the buildings and a lot of portraits of the elder brother who is the boss. I had a lot of more conventional portraits of the two of them together as well so I decided to try this two person silhouette which shows the special cladding used throughout the central core of the building.

©Neil Turner, September 2008

The cladding itself has a yellow colour and so I decided to place a Lumedyne flash unit directly behind the seat that they were sitting on. It was very close to the wall, which give far steeper fall off of the light and a more dramatic outline. I find that the best place to focus for a silhouette is on the edge of the subject rather than the normal eye or face. I was shooting with a 16-35 f2.8L lens on a Canon EOS1D MkII at the wide end of the scale and the exposure here was 1/250th at f9.5. The flash was dialed down to 1/8th power and at that aperture I had easily enough depth of field to get the brothers both sharp and to have easily enough detail in the background.

Magazines seem to like this kind of image if they have a spread to fill or they want something a bit different for the contents page. You don’t always have to use flash to create silhouettes but the conditions required in nature to get a good one aren’t easy to arrange! Low level winter sunshine here in the UK is good and of course dusk and dawn without cloud cover anywhere in the world are great. I have also used illuminated signs and billboards when they are bright enough but for the sheer degree of simplicity and control, these flash-lit examples are hard to beat.

Photocalls… aaaargghhh!

On the day when several US wire services took the principled decision not to distribute images from the White House that they had not themselves taken I thought that the timing was right to resurrect one of my own opinion pieces which expresses how I, and many of my colleagues, feel about the pre-arranged photocall. At their very best they can provide useable photographs, but the rest of the time they merely offer up banal images. The question is…does it have to be this way?

Organising photocalls should be a separate profession, but it isn’t. Public relations firms seem to have the knack of setting up ridiculous tableaux with pointless props and “C” list celebrities whilst many companies have their own in-house marketing teams who try to shoehorn as many executives in grey suits into a photograph as possible.

No matter how many of the assembled highly skilled and hugely experienced professional photographers tell the PRs that their idea of a photograph will never make it into their newspapers, the PR people still seem to make it a matter of pride to stop us getting good pictures.

Just when you think it couldn’t become more farcical they hand out the press releases. Many of these documents weigh more than a decent SLR (lens included) and a large photocall may well account for a couple of trees (branches included). How many times do we have to tell the PR people that a single sheet of paper with the relevant names and a one paragraph summary of the event would be a lot more desirable? (and environmentally friendly!). These days the release could even be on a USB memory stick or even passed around by bluetooth, which goes even further to reduce the carbon footprint of the event.

In these days of digital photography and laptops you would think that they would at least organize a bit of space so that some of us could use it to acquire and send our pictures – maybe even lay on some wi-fi. Apparently what is actually needed is some fatty canapes, white tablecloths and wine at 11am. We would really appreciate some thought about parking (not plentiful in London) and rapidly approaching deadlines, but the PR would rather fuss about name badges and being seen to be working hard trying to accommodate some obscure request from someone with little or no need to be there. PRs – get your priorities right!

So, if you are organizing a photocall soon here are some tips:

  • Make sure that the photocall notice is issued in good time and doesn’t make inflated claims about what is on offer.
  • Organize parking or make it clear where the nearest public parking can be found.
  • Keep any signs and logos to a minimum – if it doesn’t need to be there, get rid of it.
  • Welcome photographers and give them a run through of what might be likely to happen.
  • Listen to the constructive criticisms of experienced photographers who will suggest changes and improvements to your plans.
  • Make sure that the photographers are given enough time and space to do their jobs. Keep bystanders at bay and, if you have employed your own photographer, make sure that they allow the invited photographers priority.
  • Provide an accurate and concise press release – it could be on a USB flash stick to save paper and help photographers cut and paste correct spellings
  • Arrange space, power points and even wi-fi connections to enable photographers to file their images

Photocalls are the jobs that none of us want to be sent on. It need not be like that, but a small army of PRs out there seem determined to promote mediocrity and banality.

Getting the viewer’s attention without them knowing how?

From time to time I deliver seminars to fellow photographers and I give lectures to students, PR people and just about anyone who will listen. If I get long enough, there is a central theme to what I try to say. It really amounts to defining the difference between a photographer and somebody with a camera. It’s about how we see the world and how we show others that world.

Professor Heinz Wolff. ©Neil Turner/TSL, May 2005

Photographers do more than push that button. We bring creativity, experience and thought to the process to give our images something that “just push the button” photographs would rarely ever have. At this point in a live lecture there are usually a few worried faces, a few that are toying with calling out b***s*** and a majority that are just puzzled. Let me explain.

What a successful photograph has is a view of the world or of people that the viewer instantly recognises but will give them an interpretation that they would not see with either the naked eye or their own pictures. Successful pictures contain the information that the photographer wanted to include but exclude all sorts of stuff that doesn’t need to be there. Good photographers use a whole bunch of techniques to deliver a view that is familiar but sufficiently different to make the viewer look again. By now the audience members who will benefit from the lecture are trying to work out what I mean by techniques. A two dimensional image of three dimensional reality frozen in time is what still photography will always give – that’s “just” physics. We can do so much more.

In days gone by photographs were always an interpretation of the world because they contained no colour. The vast majority of the population see in colour and so delivering them a picture in tones of black, white and grey has always been the simplest way to make the real unreal but recognisable. Make the black and white print properly and you are really starting to produce the kind of pictures that I am talking about.

Converting an image to monochrome is the oldest and simplest technique but we have so many others. Shooting from different angles lets the photographer show their vision. I wrote an essay many years ago called “six feet up is bad” which basically said that photographs taken from a normal adult standing height had a much harder time of making the viewer see something in a scene that they wouldn’t have seen themselves. Take the picture from below two feet or above eight feet and your perspective shifts and the photograph stands a better chance of catching the viewer’s subconscious eye. Similarly, using longer or wider lenses than the human eye would relate to gives the photographer a way to pass on their vision. Using shallow depths of field or interesting light, having saturated colours or leaving colour casts normally corrected by the human eye all give us extra tools and techniques for making our images far more interesting.

Of course you can go too far – but that’s all part of what makes photography so interesting. Use too many tricks in the same image and you just end up with a statement about how you took a picture rather than having a great picture.

On almost every assignment I shoot wide and I shoot tight. I shoot from low angles and from height. I light a lot more of my work than most photographers but I try to give my clients choice between obviously and subtly lit images. If I do shoot a picture at f5.6 in average light on a 50mm lens from five feet ten inches of of the ground with the subject ten feet away it’s quite a shock to me!

The most successful images are those that get the viewer’s attention without them knowing why.

Back On The Beach

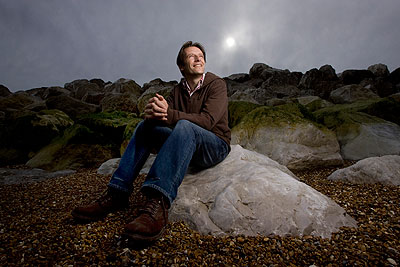
I was born by the sea, I live by the sea and I really enjoy shooting portraits by the sea. This example was of a young teacher who has moved his family to the coast to get a better way of life and he had given an interview to the paper about the way he lives – cycling to work, spending time with his family and generally making the most of the beaches in his area. My brief was simple – shoot a nice portrait on the beach!

Most people assume that photographers like brilliant sunshine. I guess that most people only take pictures on nice sunny days because that’s their holidays and the scenery often looks better with brilliant blue skies and high contrast landscapes. People never look their best in direct sunlight – they squint and have heavy and horrible shadows around their eyes and faces. There are enough technique pieces on this web site about overpowering daylight for you to know how much trouble I go to to get rid of those nasty shadows. My subject for this portrait was disappointed when I arrived on an overcast and rather damp afternoon in June. I spent time assuring him that I was happy with the light and that we would end up with a better image and more interesting because of it. (more…)

About Angles

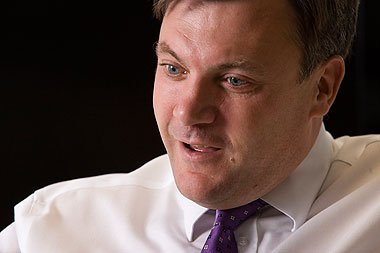
I have to shoot a lot of portraits during interviews and there have been several technique examples on this web site about the techniques and decisions that need to be made when doing that kind of work. This one isn’t about lighting set-ups or pre-planning – this is simply about seeing an angle and making the most out of it. This gentleman is Ed Balls: Member of Parliament and Secretary of State for Children, Schools and Families in Gordon Brown’s Government. The reporter had a short time to ask him questions from our readers and to conduct an interview around his responses. I had to shoot with my back to a glass wall and against the light. I set up a Lumedyne with a simple shoot through umbrella almost directly opposite the Secretary of State and behind the reporter. I had limited space in which to move and shoot.

This wasn’t the first time that I’d shot him. It wasn’t even the first time that week. We had met a few days previously at an event with Henry Winkler (yeah, The Fonz!) where Henry read from his new book to some kids and Ed acted as his straight man. Great fun. Anyway, back to the interview… (more…)

Door Light

I was inspired to share the “how” for this picture because of a comment from a colleague who said that I had been “lucky to find such a nice pool of light”. I was amused, annoyed and complimented all at the the same time because I created this light and he obviously thought that it looked as if it was a natural effect. Much of the best lighting looks as if it were not lit… so how was this one achieved?

I had been asked by the picture editor to get a good range of portraits of this man who is the Vice President of a company that handles examination papers. The logo was needed in some frames and this plate screwed to a wall in a corridor was the only one on offer. The layout was like this…

The brown lines that you can see on the layout are fire doors – big heavy wooden doors with three small square glass panels in each one. The Lumedyne flash unit with a Pocket Wizard receiver on was placed outside the door and the door was closed. The subject was lit entirely by the hard, un-modified flash coming through those three glass panels. Lining up exactly where the light will fall is very easy – if the subject can see the flash head, then it can see them. After that it is just a question of shooting a couple of frames and judging on the camera’s LCD screen where the light is falling and then raising, lowering or moving the flash accordingly. (more…)

Hiding the Flash in the Frame

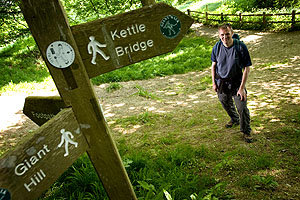
The great thing about creative flash is that you can play around and pretty much make it up as you go along. Learning from each set up as you go isn’t just a useful side effect it is the whole point. Just recently I have been hiding the flash in the picture a lot. This basically means that the light souce isn’t off to the side of the frame – it’s strategically hideen somewhere right there. I use doors and walls, poles and posts and even other people to mask the location of the flash, but it is there. This portrait of a teacher who does a lot of walking in the hills near his Dorset home is a useful case study. We had already shot quite a few really nice images of him using flash to overpower the daylight (see technique example here) and one of him walking without flash that you can see below: (more…)