opinion

Six feet up is bad?

©Neil Turner, October 2000. Oxford.

©Neil Turner, October 2000. Oxford.

This was first published in the Autumn of 2000 on the DP Review website as a follow-up to a review I did of the original Canon G1 Powershot

It is very easy to hold the camera to your eye and take a picture. Good photography requires us all to think about where we are taking the picture from as well as what we are taking. The best photographs are made when the photographer chooses a vantage point to suit the subject, and it is surprising how few subjects are suited by the height of a human standing at their full five to six feet. This is compounded by the fact that when someone views the image they will see pretty much what they themselves would have taken because they haven’t been told about bending your knees or climbing a ladder to shoot better pictures.

It is no accident that many of the world’s best photographers wear denims most of the time, and I take pride in the fact that I spend so much of my time kneeling that I have “housemaids knee”. Sooner or later I will end up flat on my face or up on a chair to give something extra to a composition – namely a point of view that the person looking at the image would not have seen themself.

This image was shot in the beautiful University City of Oxford on a Canon G1 using the swivel LCD to get the camera at ground level without having to lie in the dirt myself. The lens was less that two inches from the cobble stones and this ultra low angle gives the image a dynamic quality that would have been missing had I been standing at my full five foot ten inches. The photograph is different from most pictures taken of this tourist magnet and I’m sure that my antics were the reason for the puzzled look on the passer by’s face.

My point is that when you get your camera out think about the height of the lens. If you end up shooting from a standing position, well that’s OK – but I will lay good money that 90% of pictures are better when taken from below four feet or over seven.

Colour calibrating digital camera bodies

When you work with one camera and you shoot RAW all of the time it really doesn’t matter if that camera has a tendency towards magenta, yellow or cyan – the shift will be consistent and you can cope with it very easily in post-production. If, on the other hand, you work with more than one camera and each of them has a subtle shift in a different direction then your workflow can be slowed down when you have to constantly colour correct images shot under identical lighting in different directions. Like all things in photography, there is more than one way to solve this problem.

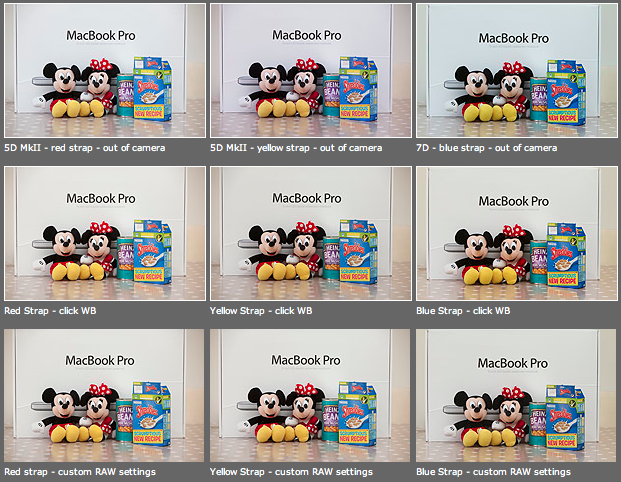
As you can see from the top row of images above – the three cameras that I use have different colour shifts with my slightly newer 5D MkII (codename yellow strap… because it has a yellow strap!) displaying quite a strong magenta shift whilst the 7D (codename blue strap, you can guess why) is a little cold and my oldest 5D MkII (red strap) is pretty neutral but maybe 1/3 of an f-stop brighter. I am going to use the red strap body as my basis for changing the colours on the other two a) because it is the most neutral to start with and b) because it has been serviced and cleaned by Canon quite recently.

Obviously these pictures were shot under controlled conditions using the same light source, the same lens on a tripod and have been converted from their RAW using no adjustments whatsoever. I shot multiple frames using each body as a sample just to make sure that there was no shift between frames on the same camera.

The second row of examples are the same RAW files with a white balance applied to exactly the same spot on the white box between Mickey and Minnie’s ears. As you can see this gets us a whole lot closer to matching the pictures for colour and this technique is fine when you have something in the frame which allows you to use the eye-dropper tool in Adobe Camera RAW (and in other similar raw conversion applications) and it is also fine when you only have a few images to process in this way. If you shoot an event where there are hundreds of frames, then you would spend an unnecessary amount of time balancing in this way.

The third row of examples utilises one of the cool features of the latest versions of Adobe Camera RAW in either Photoshop or Lightroom (and I’m sure that other software does this too) which allows you to set a default set of settings ranging from white balance to black levels, contrast, saturation to sharpening and noise control for each camera which the software detects from the serial number in the EXIF data as you bring it into the RAW conversion control pane. This is great for a lot of work and is a good option if you usually shoot on a fixed white balance.

These three techniques work for pretty much every digital camera and every scan. Some, more modern and more expensive, cameras allow you to go one crucial step further and that is to tell the camera to automatically shift by a fixed amount of colour for every frame – so that if your camera has a magenta shift like my yellow strap camera you can counterbalance that in camera and your images will show up as they should – no matter which white balance you are using at the time. The next few illustrations are based on a Canon 5D MkII using Canon’s own EOS Utility:

The illustration above top left of the three shows the home screen of the EOS Utility application and the “camera settings/remote shooting option is what you need.

This brings up the window on the top right which has an option marked WB shift that allows you to control the cross hairs and set an exact shift for the camera that is connected at the time. It is simple and very, very useful.

The illustration bottom left refers to the technique in Adobe Camera RAW (Photoshop CS4 in this case) in which you set a custom import for each camera and this is the preference pane that you need to find it.

It would be great if there was some software that allowed you to perform an exact “chip” calibration in the same way that you can calibrate a computer screen. Of course, the ability to calibrate the LCD on the back of a DSLR would be cool too but in the mean time here are three ways that you can use the combination of a good RAW converter and your camera’s built-in options to get all of your cameras working the same way as each other. It takes time, it’s fiddly but will save you a great deal of hassle over the course of a few weeks work.

Five levels of image manipulation

The Curve section of the EPUK website has always been a great source of information for photographers already working in editorial markets and for those who would like to do so in the future. I have written a few pieces for them over the years and my latest piece is about five different levels of image manipulation and how they should be used in newspapers and magazines.

As we celebrate the twentieth birthday of Photoshop we should take a few minutes to think about how the subject of image manipulation is regarded both inside and outside of our profession. In truth there is a sizeable majority of the population who think that every image that they see has been heavily retouched or altered.

Documentary, news and reportage photographers have a real battle to convince a sceptical world that their images tell the truth.

You might find it helps you to form your own thoughts on image manipulation by looking at these five categories of altering pictures and deciding for yourself which are appropriate for the kind of work that you do, and then using them to educate clients, friends and colleagues about how we as an industry view this very important subject.

  1. Normal darkroom practices – correction of colour, tone, contrast and saturation to reflect the way the image should look. Light dodging and burning.
  2. Darkroom interpretation – changes limited to colour, heavier dodging and burning, unnatural saturation and contrast that make the image an interpretation of reality.
  3. Minor alterations – adding or removing elements to or from the image, other than by cropping, that do not change the essential message of the image.
  4. Major alterations – adding or removing elements to or from the image that heighten or change the essential message of the image.
  5. Image montage – using elements of more than one image to make a photograph that is no longer a genuine representation of the scene.

For the purposes of news I would say that 1 is OK, and that 2 might be.

By the time you get to 3 then I would say that was unacceptable for news – unless there is a label attached or there are good public interest reasons for the manipulation (such as preserving the anonymity of vulnerable people).

The real danger here is that much of the public assume everything we do is altered. It does us no favours for this assumption to go unchallenged. The real sadness is that so many photographers supplying news images ignore the ethical implications – largely because they know no better.

Image manipulation is a serious subject and one that should be addressed by every photographer every time they sit at their screen and every time they see their work in print

The copyright symbol and Windows

I’m a Mac user and I have been for the last sixteen years. They make some great tools and some amazing gadgets but the best thing about Macs is that they seem to be made for people like me. I was having this conversation with a student on one of the excellent photographic courses at the Arts University College at Bournemouth and I realised that my preference for Apple computers can be summed up by the fact that the copyright symbol is just there – alt+g – whereas on a Windows machine you have to hunt for it. I have just Googled “how to find the copyright symbol on a Windows computer” and had to laugh out loud at the first website that came up:

“Hold down the Alt key and type 0169 if you have separate numeric keys on your keyboard. Alternatively you can go to programmes, accessories and select “character map” which allows you to assign a short cut to any symbol that you choose. Unfortunately not every copy of Windows has this loaded and you may need to reload it from your system discs”.

Does this seem long-winded to you? Shouldn’t a symbol as important as the copyright one just be there? I know that the option of using (c) is there and almost everyone recognises it but the correct symbol should be much easier to find than it is on most Windows machines.

The serious point here is that copyright is important. Actually, copyright is vital and we all need to mark our work at every opportunity to make sure that everyone knows that all intellectual property has an owner and stop copyright abuse.

Bad weather and batteries

OK, so I forgot to post and say “happy new year”. I’m trying to make my blog posts count and my new year’s blog resolution is to be “relevant, regular and interesting”. The first thing that I want to do is to heap praise on the batteries used in the Elinchrom Ranger Quadra system. The weather in the UK over Christmas was pretty cold and in Perthshire, where we spent Christmas, it was very cold indeed. I had my Ranger Quadra kit in the car boot for well over a week of sub-zero temperatures and the batteries still worked perfectly.

The same cannot be said for the Quantum turbo that was also there. I know that this might seem a small point to most of you but the ability of batteries to keep their charge in cold weather is a big selling point for professional gear. Obviously this wasn’t a scientifically controlled experiment but I am really pleased to know that the gear seems to have this very welcome durability.

Teamwork

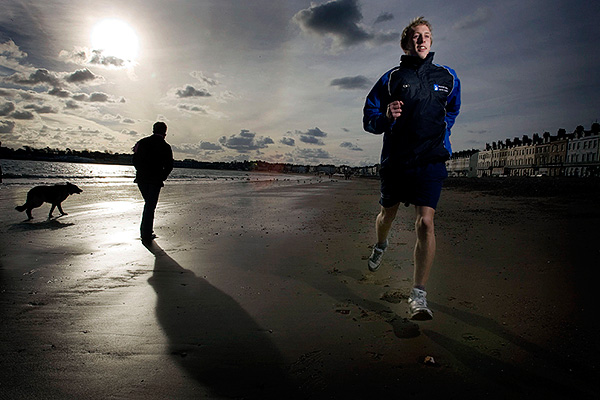
Great news photography doesn’t just stem from a good photographer. There is are a whole number of people that come together in the planning, execution and reproduction of top class images and the real downside of being a freelancer is that I miss being part of a really great team.

©Neil Turner/TSL | Weymouth, Dorset | December 2007

Being a photographer is usually part of a process. Images are commissioned, stories are bought and sold, edits are done and newspapers are printed. It’s a big and complicated jigsaw and being the person who operates the camera has to be the best part. There is no such thing as a run of the mill commission, but the process often goes like this;

  • The story is commissioned
  • The arrangements are made
  • The photographer is briefed
  • The photographs are taken
  • The edit is done
  • The pages are laid out
  • The newspaper/magazine is printed

There can be upwards of thirty people involved in the whole process and it’s important that the communication is good and that it goes in all directions. Some photographers aren’t as lucky as I am – this piece from the Sports Shooter site is a tongue in cheek rant against bad communications and poor commissioning. Unfortunately lot’s of photographers fail to live up to their obligations, indeed many don’t even recognise that they even have those obligations. It is up to us to talk to the picture editor, the journalist and ask the right questions. Getting the correct information from everyone else in the chain gives the photographer the best possible opportunity to shoot the right photographs and to tell the story in the best way possible. A failure to communicate ties the creative hands of the photographer and drastically reduces their chance of making a great set of pictures.

Sometimes the commissioning editor will forget an important detail, and at other times spelling mistakes and wrong addresses will get in the way of the pictures. Checking details, double checking spellings and discussing the story with the editorial staff will always prove to be time well spent:

  • It helps with the story under discussion
  • It improves your own relationship with the editorial team
  • It goes a little way to improving photographer editorial relations on a world scale!

Of course the picture desk need to do their bit in this vital piece of symbiosis because photographers really appreciate being given accurate information, input into the story and feedback after publication. Two way conversations work, and the industry needs more of them.

Being self-critical

One of the best things about studying photography at college was having so many of your peers around to help critique your work on a daily basis. It often hurt at the time and more than once I decided to ignore the advice of my friends and forge ahead with my own style. After college there was always the darkroom or the lab where you would talk to other photographers and get some feedback on what you were doing. Then there were a few years when we were hand processing film wherever we happened to be and scanning it, quickly followed by the early digital era. That brief period between the darkroom and the almost universal uptake of the internet and adoption of digital was a tough time for those of us who liked to talk about our work with other photographers.

Now we have choices. We can submit our work to picture sharing networks or publish them on our own sites and hope that others take the time to have a look. Excitingly, we have a growing number of photography discussion groups such as Photo Forum in London where like-minded folks can get together and see the work of others, talk about it, help each other and get inspiration.

There is, however, another option. Self-critcism. The concept is simple – you look at your own work very very closely and try to see how you could have done it better, more imaginatively or maybe just differently. As a freelancer, based a hundred miles from London, this is something that I am going to spend more and more time doing. It was easy to look at a friend’s work and pass a comment or two but it is a lot tougher de-constructing your own images. So much so that I have been giving some thought to having a structure for looking at my own pictures. My first thought was to have some headings under which to work: image quality, composition, light, first impression, suitability for the job were all there in my first list. It’s a decent way to analyse images but I can’t help thinking that there is a better and more enjoyable way to critique my own work.

I tried opening a small number of random images from the past months work and really studying them hard, trying to imagine that they weren’t mine. I found myself coming up against headings and categories again and so I marked six images with a numerical score out of ten under five separate headings and ended up with scores ranging from 20/50 to 44/50. An interesting exercise, but boring and outrageously bureaucratic! What would I have said if these pictures had been by someone else? The first thought that came into my head was that I wouldn’t have wanted to hear about how hard the job was or why certain compromises had been made – the very things that I know about my own work.

Taking a look at the pictures without giving myself a proverbial “pat on the back” for overcoming technical and physical difficulties brought me closer to the answer. Answering questions like “does it have instant appeal?”, “is it a good picture?” and “does it fulfil the brief?” without the excuses that I had been giving myself started to work. The next step was to try to put myself in the shoes of the client and factor in what they might have thought about them. It was getting complicated but I found myself looking at my own work in a far more detached way than I ever had done before.

Applying this process to an edit that I had done a week or so previously allowed me to go back and make that edit so much tighter. I have a very bad habit of editing far too loosely and giving myself a few rules to work with definitely helped me.

At the end of the process I made three decisions:

  • To be far tougher on myself when editing
  • To seek out help from other photographers to review what I’m doing
  • To have another look at my portfolio and see if I can re-shape it

It’s amazing where a few idle thoughts lead you

A rant against dull and predictable photography

Originally posted in November 2002, this was a classic rant against dull and predictable photography…

I’m afraid that I get quite excited by a good argument. The cut and thrust of intellectual discourse is both stimulating and fulfilling, but I have decided that there really is no point in arguing with a disciple!

Discussion forums are great places to spend five minutes, pick up a few tips and dispense some of one’s own “wisdom”. I visit a few photography forums from time to time, and I hope that advice that I have given has helped a few people get more from their photography. The thing that upsets me, however, is the prevalence of self appointed experts who follow the teachings of photographic gurus.

A couple of months ago I wrote about various bits of advice that I have been given in my time wielding a camera. I came to the unremarkable conclusion that the best bit of advice had been to ignore advice from somebody who claims that there is only one way to achieve something in photography. The world of High Street photography seems to be fertile territory for gurus and their disciples. One or two high profile photographers have established ways of doing family portraiture that have barely moved on since the 1980s. Whole industries have grown up manufacturing the cliche’d accessories that keep the cult of posing guide and lighting ratios going. No matter which High Street around the world you go to, there they are… the blotchy canvas backdrops and fake bookcases, posing cushions and fake rugs that are featured in the “How You Must Do Portraiture” videos.

As a production line and money making business model these methods of portraiture are singularly successful. Every home in the world seems to have some images produced by the “factory photographers”, but just like factory farming you get bland and often tasteless products churned out by people who either don’t care, have lost sight of why they did the job in the first place or just see it as a way to make money. Whilst this all saddens me a great deal, it is a good business model and you have to make a living and pay your bills somehow.

What really upsets me about this kind of work is that there is a massive number of people out there who are exposed to this kind of work and follow the gurus. They go out and buy the video because that’s what they believe portraiture is all about, they buy the blotchy canvases because they feature heavily in the videos and they finally get sucked into thinking that this is what photography is all about. I want to kick and shout and make people realise that you don’t have to have battery hens to get eggs. If you want battery eggs, go to the supermarket and buy them – but if you want something better, something tastier then you have got to start keeping your own chickens. Photography at all levels of ability allows you to produce what you want to. Creative and interesting portraiture is just around the corner as long as you don’t get suckered into believing that there is anything remotely original about canvas backdrops and set lighting ratios.

I was working in a school the other day and a parent had come to collect their child’s “portrait” taken at school. She picked it up and went to leave when the receptionist called after her to say that she had picked up the wrong child. The parent replied “…does it matter, all the kids look the b****y same in these snaps anyway!” I wanted to applaud her, she was so right. The “individually created” portrait is no better unless the photographer is going to create a new canvas back cloth for each client and then dispose of them straight afterwards.

I hope that the people pedaling the lie that this kind of work is somehow “classic portraiture” all over the internet will throw off their robes and admit that there just might be another way of achieving wonderful and desirable images.

My call goes out – Amateur photographers, wannabes and bored professionals everywhere… rise up, burn those backdrops, dump those videos and escape the cult now. There is a world of interesting, unique and occasionally truly original work to be done out there. Before you know where you are, that chant (ommmm-mainlight,fill light,hair light,backlight-ommmm) will just be a distant and mildly embarrassing memory.

©Neil “don’t copy me, just learn from my mistakes” Turner.