Developing a new course

Several months ago I had a conversation with a man called Tom Hill who runs a private journalism school called Up To Speed Journalism in my home town of Bournemouth. We were looking at the options of expanding the range of courses on offer to include one for news photographers. A few weeks ago we started looking very seriously at the idea and Tom has now decided to start accepting applications for the first course which runs from January 2011.

I am delighted to have been involved in the development of the course and I will be teaching some of the elements of the course. The big tasks now are to attract the right students and to make sure that we bring the industry along with us at a time when there are very few jobs out there for new entrants to the profession. The idea is simple: to give those who come on the course the information, skills and techniques that they will need to start out on their careers as news photographers. It’s all very exciting and if you want to know more, go to the Up To Speed website where there is quite a bit of information and where you can ask questions about the course.

Colour calibrating digital camera bodies

When you work with one camera and you shoot RAW all of the time it really doesn’t matter if that camera has a tendency towards magenta, yellow or cyan – the shift will be consistent and you can cope with it very easily in post-production. If, on the other hand, you work with more than one camera and each of them has a subtle shift in a different direction then your workflow can be slowed down when you have to constantly colour correct images shot under identical lighting in different directions. Like all things in photography, there is more than one way to solve this problem.

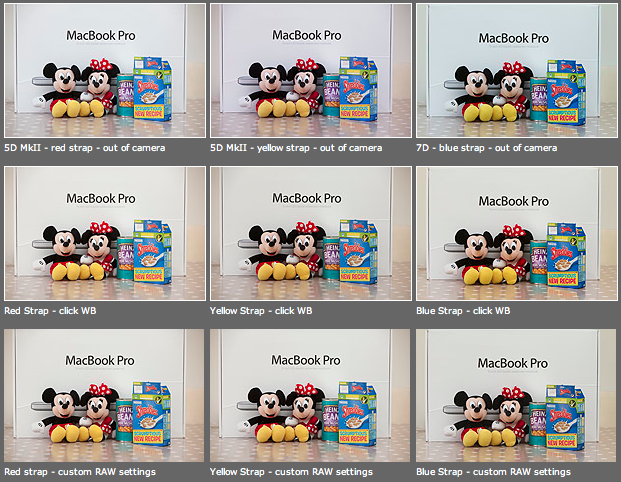
As you can see from the top row of images above – the three cameras that I use have different colour shifts with my slightly newer 5D MkII (codename yellow strap… because it has a yellow strap!) displaying quite a strong magenta shift whilst the 7D (codename blue strap, you can guess why) is a little cold and my oldest 5D MkII (red strap) is pretty neutral but maybe 1/3 of an f-stop brighter. I am going to use the red strap body as my basis for changing the colours on the other two a) because it is the most neutral to start with and b) because it has been serviced and cleaned by Canon quite recently.

Obviously these pictures were shot under controlled conditions using the same light source, the same lens on a tripod and have been converted from their RAW using no adjustments whatsoever. I shot multiple frames using each body as a sample just to make sure that there was no shift between frames on the same camera.

The second row of examples are the same RAW files with a white balance applied to exactly the same spot on the white box between Mickey and Minnie’s ears. As you can see this gets us a whole lot closer to matching the pictures for colour and this technique is fine when you have something in the frame which allows you to use the eye-dropper tool in Adobe Camera RAW (and in other similar raw conversion applications) and it is also fine when you only have a few images to process in this way. If you shoot an event where there are hundreds of frames, then you would spend an unnecessary amount of time balancing in this way.

The third row of examples utilises one of the cool features of the latest versions of Adobe Camera RAW in either Photoshop or Lightroom (and I’m sure that other software does this too) which allows you to set a default set of settings ranging from white balance to black levels, contrast, saturation to sharpening and noise control for each camera which the software detects from the serial number in the EXIF data as you bring it into the RAW conversion control pane. This is great for a lot of work and is a good option if you usually shoot on a fixed white balance.

These three techniques work for pretty much every digital camera and every scan. Some, more modern and more expensive, cameras allow you to go one crucial step further and that is to tell the camera to automatically shift by a fixed amount of colour for every frame – so that if your camera has a magenta shift like my yellow strap camera you can counterbalance that in camera and your images will show up as they should – no matter which white balance you are using at the time. The next few illustrations are based on a Canon 5D MkII using Canon’s own EOS Utility:

The illustration above top left of the three shows the home screen of the EOS Utility application and the “camera settings/remote shooting option is what you need.

This brings up the window on the top right which has an option marked WB shift that allows you to control the cross hairs and set an exact shift for the camera that is connected at the time. It is simple and very, very useful.

The illustration bottom left refers to the technique in Adobe Camera RAW (Photoshop CS4 in this case) in which you set a custom import for each camera and this is the preference pane that you need to find it.

It would be great if there was some software that allowed you to perform an exact “chip” calibration in the same way that you can calibrate a computer screen. Of course, the ability to calibrate the LCD on the back of a DSLR would be cool too but in the mean time here are three ways that you can use the combination of a good RAW converter and your camera’s built-in options to get all of your cameras working the same way as each other. It takes time, it’s fiddly but will save you a great deal of hassle over the course of a few weeks work.

Modified beauty dish

A couple of years ago I bought a slightly used 14″ beauty dish with a fitting that I couldn’t identify. I used it a couple of times with my old Lumedyne kit and kept meaning to make an adapter so that it was easy to attach and detach without looking like a “bodger”. I never got around to it – largely because the work that I was doing didn’t really call for that kind of light. A couple of months ago I came accross the dish and decided to adapt it for use with my Elinchrom Ranger Quadras.

To make it work properly with the Ranger Quadras I had to remove the orginal fitting. The dish is made out of relatively thin aluminium and it was very easy to use a hacksaw to take the whole of the fitting off. There were three screws holding the wires that keep the dome on position and I removed those to get ready to use the same holes to attach the Elinchrom fitting. This was made from a 13cm reflector which was cut through the reflector bowl in three places, allowing me to spread the metal of the reflector wider so that it could be bent to mirror the curviture of the beauty dish. I then drilled three holes in the modified Elinchrom reflector to match the three existing screw holes in the beauty dish and screwed the whole thing back together. Finally I used some gaffer tape to cover the slightly sharp edges of the Elinchrom reflector where I had cut it.

What you see in the three images above is the “finished” beauty dish. It is lightweight which is great for heads as small as the Elinchrom ones and it puts out a beautiful even light. I have shot some portraits using it but I cannot show them here yet because the client hasn’t used them in the magazine for which they were shot.

The total cost was £20.00 for the secondhand beauty dish, about £25.00 for the Elinchrom reflector that was sacrificed to make the adapter and some gaffer tape. Change from £50.00!

As a footnote, the colleague who proofread this piece for me asked why the cable has two yellow stripes around it. The answer is that I like to be able to identify bits of kit from a distance and the two stripes signifies that it is a two (and a bit) metre cable and that it was bought at the same time as the head. Newer purchases get different colours and a three metre cable would have three stripes. A simple idea but it really helps when you are working quickly and need to set up kit or make changes in a hurry.

Five levels of image manipulation

The Curve section of the EPUK website has always been a great source of information for photographers already working in editorial markets and for those who would like to do so in the future. I have written a few pieces for them over the years and my latest piece is about five different levels of image manipulation and how they should be used in newspapers and magazines.

As we celebrate the twentieth birthday of Photoshop we should take a few minutes to think about how the subject of image manipulation is regarded both inside and outside of our profession. In truth there is a sizeable majority of the population who think that every image that they see has been heavily retouched or altered.

Documentary, news and reportage photographers have a real battle to convince a sceptical world that their images tell the truth.

You might find it helps you to form your own thoughts on image manipulation by looking at these five categories of altering pictures and deciding for yourself which are appropriate for the kind of work that you do, and then using them to educate clients, friends and colleagues about how we as an industry view this very important subject.

  1. Normal darkroom practices – correction of colour, tone, contrast and saturation to reflect the way the image should look. Light dodging and burning.
  2. Darkroom interpretation – changes limited to colour, heavier dodging and burning, unnatural saturation and contrast that make the image an interpretation of reality.
  3. Minor alterations – adding or removing elements to or from the image, other than by cropping, that do not change the essential message of the image.
  4. Major alterations – adding or removing elements to or from the image that heighten or change the essential message of the image.
  5. Image montage – using elements of more than one image to make a photograph that is no longer a genuine representation of the scene.

For the purposes of news I would say that 1 is OK, and that 2 might be.

By the time you get to 3 then I would say that was unacceptable for news – unless there is a label attached or there are good public interest reasons for the manipulation (such as preserving the anonymity of vulnerable people).

The real danger here is that much of the public assume everything we do is altered. It does us no favours for this assumption to go unchallenged. The real sadness is that so many photographers supplying news images ignore the ethical implications – largely because they know no better.

Image manipulation is a serious subject and one that should be addressed by every photographer every time they sit at their screen and every time they see their work in print

The copyright symbol and Windows

I’m a Mac user and I have been for the last sixteen years. They make some great tools and some amazing gadgets but the best thing about Macs is that they seem to be made for people like me. I was having this conversation with a student on one of the excellent photographic courses at the Arts University College at Bournemouth and I realised that my preference for Apple computers can be summed up by the fact that the copyright symbol is just there – alt+g – whereas on a Windows machine you have to hunt for it. I have just Googled “how to find the copyright symbol on a Windows computer” and had to laugh out loud at the first website that came up:

“Hold down the Alt key and type 0169 if you have separate numeric keys on your keyboard. Alternatively you can go to programmes, accessories and select “character map” which allows you to assign a short cut to any symbol that you choose. Unfortunately not every copy of Windows has this loaded and you may need to reload it from your system discs”.

Does this seem long-winded to you? Shouldn’t a symbol as important as the copyright one just be there? I know that the option of using (c) is there and almost everyone recognises it but the correct symbol should be much easier to find than it is on most Windows machines.

The serious point here is that copyright is important. Actually, copyright is vital and we all need to mark our work at every opportunity to make sure that everyone knows that all intellectual property has an owner and stop copyright abuse.

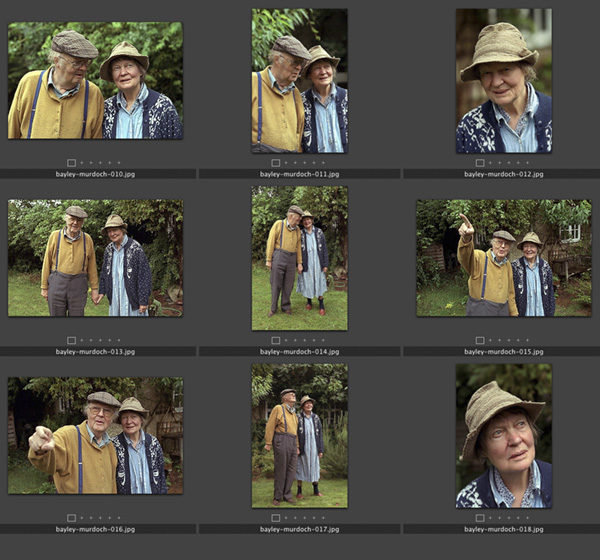
Contact sheet: Dame Iris Murdoch and John Bayley, Oxford, September 1998

When this set of photographs, one of the last of her, was taken Dame Iris was in the latter stages of Alzheimer’s and her husband described her as being like “a very nice 3-year-old,”. She died in Oxford on February 8, 1999. In his memoir “Elegy for Iris” John Bayley portrays his brilliant wife lovingly but unsentimentally. He was in turn very much in love with her and very caring about her when I spent a brief time shooting this set of pictures. She was unaware of who I was or what I was doing but his hand was always in hers and she seemed to accept that everything was OK because of that.

The original caption simply read: Professor John Bayley and Dame Iris Murdoch photographed in the back garden of their home in Oxford. 09.09.1998 photo: Neil Turner/Times Higher Education Supplement. ©News International

The Times Higher Education Supplement was running a review of Professor Bayley’s book about his wife and the Picture Editor had asked me to drive to Oxford to shoot his portrait. While I was driving between London and Oxford I was told that at least two other photographers would be shooting before me and that it was “unlikely” that Dame Iris would be in the pictures. I don’t mind doing portraits of authors on those days when you form an orderly queue with reporters and television crews for your chance to do the same five minute job but this one seemed a little less “organised”.

I arrived in that part of Oxford where it seems every second home is owned by a Nobel Prize winner or a celebrity academic to find their house looking a little sorry for itself. The front garden, the fences and the paintwork all needed some TLC and I quite like to shoot portraits around those areas. I had twenty minutes to wait and started to think about the light, the colours and watch for other photographers and journalists to come out. Nobody appeared so I grabbed my gear and knocked on the door. When Professor Bayley answered, he looked like the gardener but spoke exactly how you might imagine an Oxford Professor would.

In the film “Iris” which stars Dame Judi Dench as the older Iris Murdoch the house is untidy. Actually having been there I can tell you that untidy doesn’t even come close. There were books and newspapers everywhere. Televisions were on the BBC in almost every room and there was Dame Iris herself sitting quietly at the kitchen table. I was nervous about asking if she would be available for the pictures but Professor Bayley seemed to know what I wanted to ask and told me that he wanted her to be in the pictures with him but that she found flash disturbing. I was shooting 35mm colour negative film at the time and so we decided that the house was too dark and too untidy to be a good location for a portrait. Ironically these days I would have probably done some pictures on my 5D MkIIs using the small amount of available light indoors at 3200 ISO but there was no way that 800 ISO colour negative would cope.

The beauty of these pictures is that nobody from the publishers had been round to tidy up, dress them up or even attempt to sanitise the images. Because of that we were able to make some lovely portraits. We chatted about garden birds, foliage and the English weather. It was a surreal time.

In the end I shot 72 frames (two rolls of 200 ISO Fuji Colour Negative film) which I drove back to London where the film was processed by the newspaper darkroom and all scanned onto a Kodak Photo CD at a resolution unthinkable for a digital camera at the time – the equivalent of a 6 megapixel camera when the Kodak DCS520 was just becoming available with it’s 1.9 megapixel chip. The cameras used here were a Canon EOS1V and an EOS1N with 28-70 f2.8L and 70-200 f2.8L lenses.

Bad weather and batteries

OK, so I forgot to post and say “happy new year”. I’m trying to make my blog posts count and my new year’s blog resolution is to be “relevant, regular and interesting”. The first thing that I want to do is to heap praise on the batteries used in the Elinchrom Ranger Quadra system. The weather in the UK over Christmas was pretty cold and in Perthshire, where we spent Christmas, it was very cold indeed. I had my Ranger Quadra kit in the car boot for well over a week of sub-zero temperatures and the batteries still worked perfectly.

The same cannot be said for the Quantum turbo that was also there. I know that this might seem a small point to most of you but the ability of batteries to keep their charge in cold weather is a big selling point for professional gear. Obviously this wasn’t a scientifically controlled experiment but I am really pleased to know that the gear seems to have this very welcome durability.

Metropolitan Police guidelines for dealing with the media

Guidelines for MPS staff on dealing with media reporters, press photographers and television crews.

Members of the media are not only members of the public; they can influence the way the Metropolitan Police Service is portrayed. It is important that we build good relationships with them, even when the circumstances are difficult. They have a duty to report many of those things that we have to deal with – crime, demonstrations, accidents, major events and incidents. This guide is designed to help you take the appropriate action when you have to deal with members of the media.

Members of the media have a duty to report from the scene of many of the incidents we have to deal with. We should actively help them carry out their responsibilities provided they do not interfere with ours.

Where it is necessary to put cordons in place, it is much better to provide the media with a good vantage point from which they can operate rather than to exclude them, otherwise they may try to get around the cordons and interfere with police operations. Providing an area for members of the media does not exclude them from operating from other areas to which the general public have access.

Members of the media have a duty to take photographs and film incidents and we have no legal power or moral responsibility t prevent or restrict what they record. It is a matter for their editors to control what is published or broadcast, not the police. Once images are recorded, we have no power to delete or confiscate them without a court order, even if we think they contain damaging or useful evidence.

If someone who is distressed or bereaved asks for police to intervene to prevent members of the media filming or photographing them, we may pass on their request but we have no power to prevent or restrict media activity. If they are trespassing on private property, the person who owns or controls the premises may eject them and may ask for your help in preventing a breach of the peace while they do so. The media have their own rules of conduct an complaints procedure if members of the public object.

To help you identify genuine members of the media, they carry identification, which they will produce to you on request.

Members of the media do not need a permit to photograph or film in public places.

To enter private property while companying police, the media must obtain permission, which must be recorded, from the person who owns or is in control of the premises. We cannot give or deny permission to members of the media to enter private premises whether the premises are directly involved in the police operation or not. This is a matter between the person who owns or is in control of the premises and the members of the media.

Giving members of the media accident to incident scenes is a matter for the Senior Investigating Officer. The gathering of evidence and forensic retrieval make access unlikely in the early stages and this should be explained to members of the media. Requests for access should be passed to the Senior Investigating Officer who should allow access in appropriate cases as soon as practicable.

Advice and assistance in dealing with members of the media is available 24 hours a day via the Press Bureau at New Scotland Yard.