balance

Shooting in less than favourable weather.

Another re-posting; this time posted in April 2009 but from a job that I shot in 2006…

One of the best things about being a photographer is that you get to do some pretty odd things. Sometimes you climb to the top of a tall building and have a look at the view. At other times you get to meet interesting and amazing people and take their pictures. At other times you have to get up early on a bleak winter’s day, go to the beach, wade into the water just after dawn to get the tide and the picture. It all adds to the fun of the job.

©Neil Turner/TSL

I shot this commission a while ago and I have been meaning to write it up since then. The story was about a school head teacher who owns a horse that she keeps in stables near the sea. She refers to her horse as her “work life balance” – something that we all need, but few of us have quite such a visible symbol of it!

Being a teacher, she is at school most days. During the holidays she gets away to the coast and rides whenever she can and if the tide is right she can ride on the beach. It was an October morning and we met at dawn in the car park near the stables. My brief was to get a double page spread for a magazine which showed her enjoying herself.

Of course photographers rarely get to choose the weather and it was raining with a reasonably strong wind. The tide was just right (we checked the tables in advance) and so we started to shoot some pictures of her riding on the sand. It’s a stretch of coast that I know well and I knew that there was a high chance of poor weather. There’s nothing that you can do when the deadline is tight except to shoot the best pictures that you can.

The picture above was taken towards the end of the session and by this time it was getting lighter. The exposure was up to 1/500th of a second at f3.5 on a 24-70 f2.8L lens. We had started at 1/125th at f2.8 and the light was doubling every twenty minutes or so. Unusually for me I shot this job without lights, without flash – just good old ambient. Had there been any sunshine, there would have been the complicating factor of having to shoot almost directly into the sun if I wanted to stay on the beach.

Most of the pictures were taken on a 70-200 f2.8L lens and I made use of a monopod whilst the light was low. I shoot on beaches quite a lot and I always take a large piece of plastic to sit my camera bag and anything else that I put down onto. If the plastic sheet is big enough, you can also use it to wrap everything but sand still gets in and salt still seems to coat everything.

©Neil Turner/TSL

I always try to give picture editors a lot of choice and to give them small “drop-in” pictures to use if they need a second or third image for an article. The wider the variety of magazines and papers that I work for, the more I find that the drop-in picture gets used in unusual and creative ways. Magazine clients appreciate choice.

©Neil Turner/TSL

The reason that I wanted to mention this job was the combination of the early start, the poor light, the wind, the rain and getting absolutely soaking wet wading knee deep into the sea. Maybe it was because of all of these factors that I enjoyed it – who knows.

I wrote a while ago about my addiction to Timberland boots and I was very grateful for them on this job. My jeans were wet but my feet stayed dry.
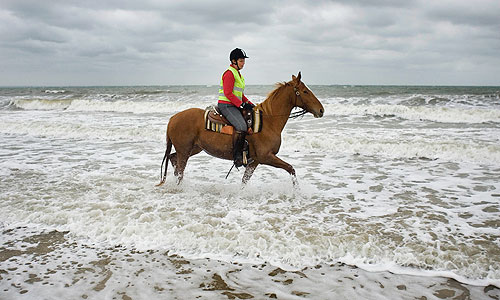
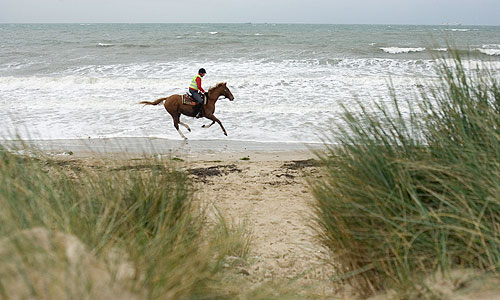
Drop-in pictures.

This one was first published in April 2009…

We are in the middle of a recession – a pretty big one at that. Sensible professional photographers all over the world are looking at their business models, talking to their clients and trying to give themselves an edge. A few are trying to compete on price which might work in some markets but will almost certainly destroy others. The rest of us are just looking at what we do and how we do it in the hope that we can raise our collective game.

One thing that I have always done is to give picture editors what they have asked for and then give them something that they might well be able to use but hadn’t asked for. Current fashions in mainstream magazine design seem to call for a range of what we call “drop-in” pictures. Small supporting details that help to break up the copy and also tell the story.

©Neil Turner

This example of a basket of wine corks came from a commission to shoot a conference which featured a full scale banquet in the very splendid surroundings of one of the Oxford Colleges. It’s not an exciting picture but it really helps to tell the story. It can be used large or small or not at all. It took a minute to shoot, another minute to edit and forty five seconds to transmit. It helped to break up a set of images of middle aged men in black suits eating by candlelight and stands out in the clients image browsing software as “different”.

©Neil Turner

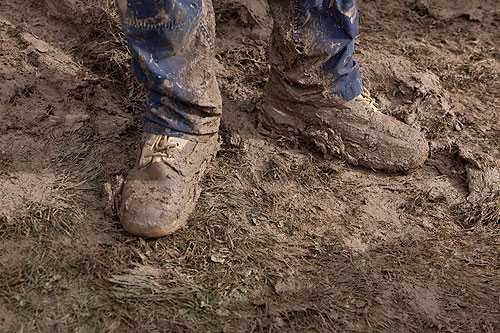
Same client, very different project. This was a story about an ecologically managed office complex where they were still making improvements. A simple shot of the builder’s muddy boots helps the story along. They didn’t use this frame but it was submitted in much the same way that the image of the corks was and almost certainly had the same effect on screen.

©Neil Turner

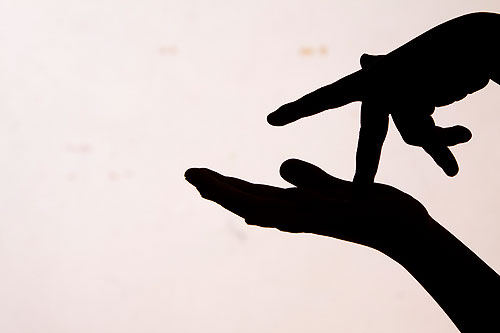
This final example, shot for an education magazine, had an entirely different effect. Shot as a supporting image – the designer saw it and decided to base the entire layout around it. The story was about using Makaton, a relatively simple sign language, to help teach primary school pupils a broad range of things. They ran headlines and copy over the pale background in a very imaginative way – a use for a very simple picture that I had never envisaged.

To sum up: when you shoot the kind of editorial work that I do it takes no time at all to add these simple images to an edit. They will be useful in years to come as stock images and they give designers and picture editors options that they hadn’t asked for. Some people might say that I’m giving “my edge” away here but I hope that I offer clients a package deal with at least four edges. I always tell students to whom I give talks about the job that I do that they need to think beyond simply what they have been asked for. It is a given that you give the client what they asked for but I have never heard one complain that you have given them something more.

Colour calibrating digital camera bodies

When you work with one camera and you shoot RAW all of the time it really doesn’t matter if that camera has a tendency towards magenta, yellow or cyan – the shift will be consistent and you can cope with it very easily in post-production. If, on the other hand, you work with more than one camera and each of them has a subtle shift in a different direction then your workflow can be slowed down when you have to constantly colour correct images shot under identical lighting in different directions. Like all things in photography, there is more than one way to solve this problem.

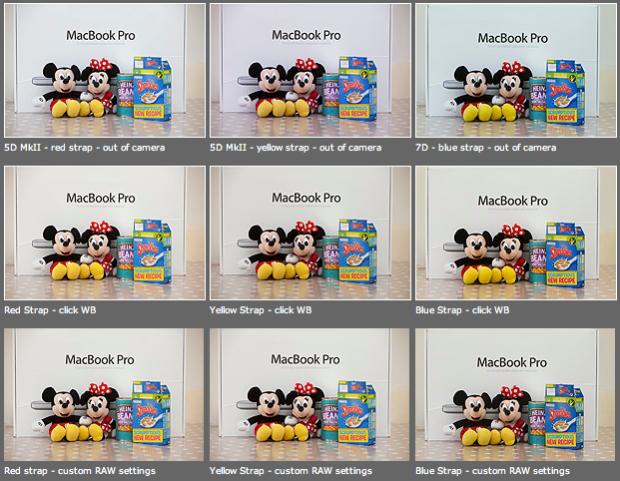
As you can see from the top row of images above – the three cameras that I use have different colour shifts with my slightly newer 5D MkII (codename yellow strap… because it has a yellow strap!) displaying quite a strong magenta shift whilst the 7D (codename blue strap, you can guess why) is a little cold and my oldest 5D MkII (red strap) is pretty neutral but maybe 1/3 of an f-stop brighter. I am going to use the red strap body as my basis for changing the colours on the other two a) because it is the most neutral to start with and b) because it has been serviced and cleaned by Canon quite recently.

Obviously these pictures were shot under controlled conditions using the same light source, the same lens on a tripod and have been converted from their RAW using no adjustments whatsoever. I shot multiple frames using each body as a sample just to make sure that there was no shift between frames on the same camera.

The second row of examples are the same RAW files with a white balance applied to exactly the same spot on the white box between Mickey and Minnie’s ears. As you can see this gets us a whole lot closer to matching the pictures for colour and this technique is fine when you have something in the frame which allows you to use the eye-dropper tool in Adobe Camera RAW (and in other similar raw conversion applications) and it is also fine when you only have a few images to process in this way. If you shoot an event where there are hundreds of frames, then you would spend an unnecessary amount of time balancing in this way.

The third row of examples utilises one of the cool features of the latest versions of Adobe Camera RAW in either Photoshop or Lightroom (and I’m sure that other software does this too) which allows you to set a default set of settings ranging from white balance to black levels, contrast, saturation to sharpening and noise control for each camera which the software detects from the serial number in the EXIF data as you bring it into the RAW conversion control pane. This is great for a lot of work and is a good option if you usually shoot on a fixed white balance.

These three techniques work for pretty much every digital camera and every scan. Some, more modern and more expensive, cameras allow you to go one crucial step further and that is to tell the camera to automatically shift by a fixed amount of colour for every frame – so that if your camera has a magenta shift like my yellow strap camera you can counterbalance that in camera and your images will show up as they should – no matter which white balance you are using at the time. The next few illustrations are based on a Canon 5D MkII using Canon’s own EOS Utility:

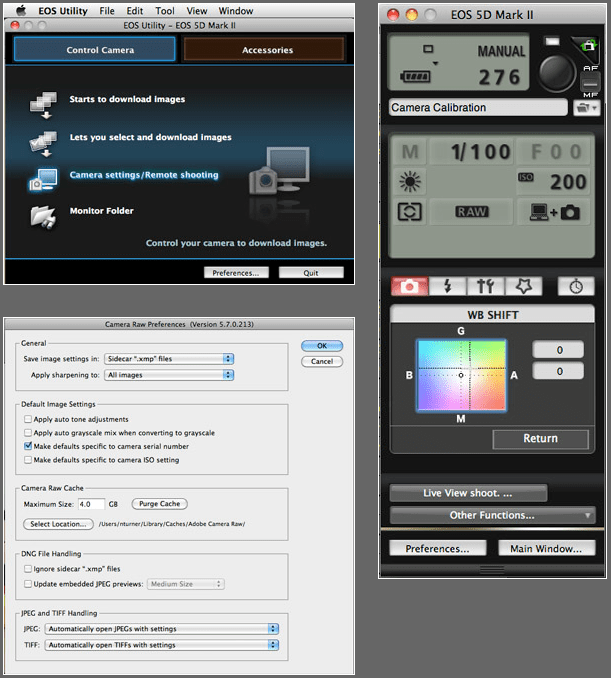
The illustration above top left of the three shows the home screen of the EOS Utility application and the “camera settings/remote shooting option is what you need.

This brings up the window on the top right which has an option marked WB shift that allows you to control the cross hairs and set an exact shift for the camera that is connected at the time. It is simple and very, very useful.

The illustration bottom left refers to the technique in Adobe Camera RAW (Photoshop CS4 in this case) in which you set a custom import for each camera and this is the preference pane that you need to find it.

It would be great if there was some software that allowed you to perform an exact “chip” calibration in the same way that you can calibrate a computer screen. Of course, the ability to calibrate the LCD on the back of a DSLR would be cool too but in the mean time here are three ways that you can use the combination of a good RAW converter and your camera’s built-in options to get all of your cameras working the same way as each other. It takes time, it’s fiddly but will save you a great deal of hassle over the course of a few weeks work.

Teamwork

Great news photography doesn’t just stem from a good photographer. There is are a whole number of people that come together in the planning, execution and reproduction of top class images and the real downside of being a freelancer is that I miss being part of a really great team.

©Neil Turner/TSL | Weymouth, Dorset | December 2007

Being a photographer is usually part of a process. Images are commissioned, stories are bought and sold, edits are done and newspapers are printed. It’s a big and complicated jigsaw and being the person who operates the camera has to be the best part. There is no such thing as a run of the mill commission, but the process often goes like this;

  • The story is commissioned
  • The arrangements are made
  • The photographer is briefed
  • The photographs are taken
  • The edit is done
  • The pages are laid out
  • The newspaper/magazine is printed

There can be upwards of thirty people involved in the whole process and it’s important that the communication is good and that it goes in all directions. Some photographers aren’t as lucky as I am – this piece from the Sports Shooter site is a tongue in cheek rant against bad communications and poor commissioning. Unfortunately lot’s of photographers fail to live up to their obligations, indeed many don’t even recognise that they even have those obligations. It is up to us to talk to the picture editor, the journalist and ask the right questions. Getting the correct information from everyone else in the chain gives the photographer the best possible opportunity to shoot the right photographs and to tell the story in the best way possible. A failure to communicate ties the creative hands of the photographer and drastically reduces their chance of making a great set of pictures.

Sometimes the commissioning editor will forget an important detail, and at other times spelling mistakes and wrong addresses will get in the way of the pictures. Checking details, double checking spellings and discussing the story with the editorial staff will always prove to be time well spent:

  • It helps with the story under discussion
  • It improves your own relationship with the editorial team
  • It goes a little way to improving photographer editorial relations on a world scale!

Of course the picture desk need to do their bit in this vital piece of symbiosis because photographers really appreciate being given accurate information, input into the story and feedback after publication. Two way conversations work, and the industry needs more of them.

A rant against dull and predictable photography

Originally posted in November 2002, this was a classic rant against dull and predictable photography…

I’m afraid that I get quite excited by a good argument. The cut and thrust of intellectual discourse is both stimulating and fulfilling, but I have decided that there really is no point in arguing with a disciple!

Discussion forums are great places to spend five minutes, pick up a few tips and dispense some of one’s own “wisdom”. I visit a few photography forums from time to time, and I hope that advice that I have given has helped a few people get more from their photography. The thing that upsets me, however, is the prevalence of self appointed experts who follow the teachings of photographic gurus.

A couple of months ago I wrote about various bits of advice that I have been given in my time wielding a camera. I came to the unremarkable conclusion that the best bit of advice had been to ignore advice from somebody who claims that there is only one way to achieve something in photography. The world of High Street photography seems to be fertile territory for gurus and their disciples. One or two high profile photographers have established ways of doing family portraiture that have barely moved on since the 1980s. Whole industries have grown up manufacturing the cliche’d accessories that keep the cult of posing guide and lighting ratios going. No matter which High Street around the world you go to, there they are… the blotchy canvas backdrops and fake bookcases, posing cushions and fake rugs that are featured in the “How You Must Do Portraiture” videos.

As a production line and money making business model these methods of portraiture are singularly successful. Every home in the world seems to have some images produced by the “factory photographers”, but just like factory farming you get bland and often tasteless products churned out by people who either don’t care, have lost sight of why they did the job in the first place or just see it as a way to make money. Whilst this all saddens me a great deal, it is a good business model and you have to make a living and pay your bills somehow.

What really upsets me about this kind of work is that there is a massive number of people out there who are exposed to this kind of work and follow the gurus. They go out and buy the video because that’s what they believe portraiture is all about, they buy the blotchy canvases because they feature heavily in the videos and they finally get sucked into thinking that this is what photography is all about. I want to kick and shout and make people realise that you don’t have to have battery hens to get eggs. If you want battery eggs, go to the supermarket and buy them – but if you want something better, something tastier then you have got to start keeping your own chickens. Photography at all levels of ability allows you to produce what you want to. Creative and interesting portraiture is just around the corner as long as you don’t get suckered into believing that there is anything remotely original about canvas backdrops and set lighting ratios.

I was working in a school the other day and a parent had come to collect their child’s “portrait” taken at school. She picked it up and went to leave when the receptionist called after her to say that she had picked up the wrong child. The parent replied “…does it matter, all the kids look the b****y same in these snaps anyway!” I wanted to applaud her, she was so right. The “individually created” portrait is no better unless the photographer is going to create a new canvas back cloth for each client and then dispose of them straight afterwards.

I hope that the people pedaling the lie that this kind of work is somehow “classic portraiture” all over the internet will throw off their robes and admit that there just might be another way of achieving wonderful and desirable images.

My call goes out – Amateur photographers, wannabes and bored professionals everywhere… rise up, burn those backdrops, dump those videos and escape the cult now. There is a world of interesting, unique and occasionally truly original work to be done out there. Before you know where you are, that chant (ommmm-mainlight,fill light,hair light,backlight-ommmm) will just be a distant and mildly embarrassing memory.

©Neil “don’t copy me, just learn from my mistakes” Turner.