photography

The best lens for portraits?

On a photographers’ forum last week there was a lot of discussion about the best lens for portraits. Can of worms opened. Mac vs PC or Nikon vs Canon style debate well and truly started.

I have written before about portrait lenses and I won’t bore you with repeating my previous post (if you missed it, catch up here) except to say that when people ask this question they normally mean headshots or mug shots where the subjects head and shoulders will fill most of the frame.

©Neil Turner, February 2012. Bournemouth.

This portrait of a local artist was shot using an 85mm f1.8 Canon lens wide open but what lens should you use for this kind of picture. The debate will rage and answers anywhere between 85mm and 135mm (all measured on full-frame cameras) will be given, supported, doubted and even ridiculed. Most arguments that don’t get broad agreement also don’t have a simple answer. Sure there’s something lovely about the feel of a portrait shot on an 85 but what about the degree to which you have to invade the subject’s ‘personal space’ to get the composition? What about those 85mm lenses where the close focus isn’t good enough to get that bit tighter still? With a 135mm lens the personal space issues largely go away and the close focus issues almost always go away too – but is the effect as nice? Can you ever include something of the environment in those pictures? Would you even want to?

The actual answer (as always) is that it depends on you, your technique and your own taste in pictures. A few weeks ago I was looking back at some corporate headshots that I had shot and I had to tell another photographer on the other side of the world how I had shot them so that he could replicate them so that when his pictures and my pictures were printed on the same page nobody (hopefully) could tell that two photographers were involved. One of the things I needed to give him was the focal length of the lens used so I got the pictures, went through the EXIF data and noted it all down. I had used a 70-200 f2.8L lens and so the actual focal length was between 120mm and 130mm.

I was a little surprised that it was that long and so I grabbed a folder of images that I keep on my hard drive of corporate portraits to show prospective clients some examples of what I have done in the past and looked through the EXIF on those. These were pictures that, by definition, I really like and it quickly transpired that the tighter compositions were all shot between 120mm and 150mm on the 70-200. Again, quite a surprise – I had always seen myself as an 85mm lens user!

Well, one thing led to another and I decided to do a quick ‘audit’ of all of my favourite environmental portraits to see what lenses I have favoured. This was less of a shock because in the folder of 120 of my favourites the widest lens used was 16mm (on a 1.3x crop body, so we’ll call that 21mm for the purposes of this exercise) and the longest was a 300mm (on a 1.6x crop body which becomes 480mm in this context). There was a lot of bunching in the 35-45mm area and some more around the 120-150 area but the spread of focal lengths was otherwise pretty even – which pleased me greatly because it confirmed what I always say to others;

“There is no such thing as THE perfect portrait lens”.

This exercise is a bit time-consuming but it could have a lot of uses in professional photography. For example, anyone used to zooms wanting to buy a couple of prime lenses should think about going through the exercise to help them decide which ones would suit their style. Anyone wanting to know what lenses to replace as a matter of priority in these cash-strapped times could also benefit from a focal length analysis. The reverse is also true – a photographer who wants to change the way they do stuff could see what they normally shoot with and deliberately avoid those focal lengths. The possibilities are endless once you start to think and we can all do with a bit of style analysis from time to time. How we choose and use lenses has always been a preoccupation of mine and this exercise has helped me to rationalise that.

Indeed why stop there? EXIF data is amazingly useful and so you could also do an aperture comparison. My quick one revealed that I shoot a surprisingly large amount of pictures using three apertures f2.8, f8 and f22. In my sample, those three apertures accounted for over 50% of my pictures. I’m not sure what to make of it but I will work it out one day.

©Neil Turner/TSL. January 2008, London. 173mm focal length on a 1.3x crop body = 225mm

What started out as a simple answer to a simple question somehow turned into statistical analysis. Many people would say that is the exact opposite (they might even use the word antithesis) of what we, as creative people, should be doing. I have a lot of sympathy for that argument but, in a world where there are tens of thousands of great photographers vying for work, every little advantage we can eek out for ourselves and every piece of information that we have to work with could just be worth it’s weight in fluorite glass.

Capture One Pro and other workflows…

One of the subjects that I teach is workflow. I know that I’ve mentioned that before but I thought that I’d remind you of that when I explain why and how I have been learning all about Capture One Pro – the professional RAW conversion, tethered shooting and image enhancement tool from Phase One. I am on version 6.3.5 (the latest available) and this is the first time that I have seen it since version 4 a few years ago.

Principally designed to make the most of Phase One’s own imaging systems, it also works rather well with the whole gamut of professional file formats. I have been using it for quite a few days now and I thought that I’d post some thoughts on here.

Before I get down to my opinions on Capture One Pro I need to say that every piece of software that I’ve used has needed quite a long time to get used to and anyone who does “full reviews” based on a few hours of use is kidding both themselves and their readers. I also need to make it clear that I paid for this software and that I have absolutely no ties to Phase One.

I have now used Aperture, Lightroom, Photoshop, Photoshop Elements, Canon DPP, Graphics Converter and a few others and Capture One Pro is probably the easiest of the lot to get to like. My knowledge of Adobe Camera RAW in Photoshop has been gained over many years and many thousands of edits and it has only taken me a few days to feel almost as comfortable with Capture One. I’m still learning more and the more that I learn the more I like it. That isn’t always true of new software packages – even if you really want to like them…

The workspace that I'm currently using on a 15" MacBook Pro

I like lots of things about the way it works, about the interface and about how good the customer support and instruction manual are. Every time I think that I’ve found a flaw in the feature set of this software I search the knowledge bank or put a note on Twitter and there it is – the answer that tells me that everything I wanted was there all along. That is great but there seems to be one feature from Adobe Camera RAW that I use all of the time that isn’t there with Capture One Pro – good and accurate profiles of all of my Canon lenses ready to apply corrections.

My first impressions of the user interface centred around my inability to find the tools that I actually wanted. I knew that most were there because the literature told me they were and a very brief exchange on Twitter with the workflow genius that is Nick Wilcox-Brown let me know how to find them and add them to my custom user interface or “workspace” as the application calls it. Better still, you can create a range of custom workspaces and save them alongside the suggested ones for dual monitors, simple workflow, black & white or even a replica of the previous version (5) of the software. Being able to customise the workspace is not unique to this application but I believe that they have implemented it really well.

All of the adjustments and all of the options have easily controlled and finely adjustable controls (mostly sliders) and I found myself easing very quickly into the Phase One way of doing things.

Time for a short list of likes:

  • Customisable user interface
  • Easy to learn how to use
  • Extraordinary range of functions
  • Tethered shooting
  • Fantastic image quality
  • Value for money
  • Web contact sheets
  • Output of files to specific sizes

… and dislikes

  • Cannot find profiles for my Canon lenses
  • The sessions menus
  • Applying adjustment “recipes” seems hit and miss
  • The way that it handles IPTC metadata (I know that the sister app Media Pro does that better)
  • Speed of processing batches of files
  • Not recognising the simple tags that I can apply in camera or by using the ‘tag’ function in Photo Mechanic

That is a short list of dislikes and you have to actually use it to decide if you agree about the sessions menus – the way that Capture One likes to create a virtual time bubble for each job in much the same way that Aperture does by default. I may be doing something wrong when I’m trying to create, save and apply “recipes” which are a great idea (again shared with Aperture and others) that allow you to copy all of the adjustments that you have applied to one image to one or more others as well as keeping that set of adjustments for future use/adaptation. Sometimes the recipes worked and other times they didn’t.

My background is in news and editorial photography and IPTC metadata is a fundamental requirement for me and it forms a big part of my own workflow and the personal workflows of people that I work with when I’m doing coaching. Capture One Pro handles IPTC and is compliant with all of the IPTC fundamentals – it just doesn’t do it very well. The same can be said for quite a few image processing applications and I still love good old Photo Mechanic for the speed, accuracy and flexible way that it handles everything except RAW conversions and long term storage.

My final dislike is the speed when processing batches of files. On a two year old Apple MacBook Pro with an i5 2.4Ghz processor, 8GB or RAM it takes 50-60% longer to process a batch of 36 CR2 images from a Canon EOS5D MkII than Adobe Camera RAW inside Photoshop CS5 does. Individual files are shot through in almost the same time but batches are slower. I tried very hard to be scientific when comparing like with like but I am prepared to be proved wrong on this.

This isn’t really a full review – just some thoughts on an application that I am sure to have to teach very soon. Several people have already asked what advantages Capture One would give them over Lightroom or Adobe Camera RAW in Photoshop and, to be honest, I couldn’t really name any. If you already use and are happy with either Adobe product for processing RAW files then it doesn’t really make sense to spend more money and get Capture One Pro. BUT (and it is a but worthy of being in upper case) if you are looking at designing a new workflow for news and editorial work from the ground up and you don’t already have licenses for anything else I would strongly recommend getting Capture One Pro and using it in tandem with Photo Mechanic. Between the two you have a solid, reliable and well priced set of options that will, without doubt, deliver the goods. That would leave you in need of an archiving option and for that Phase One’s Media Pro might be a good solution. There are those who’d argue that between the two Phase One applications you have everything you’d need and they would be right but there is no getting away from the fact that Photo Mechanic does what it does so well that it is worth the money and then some. The same goes for Capture One Pro too.

Adobe Photoshop CS6 Beta

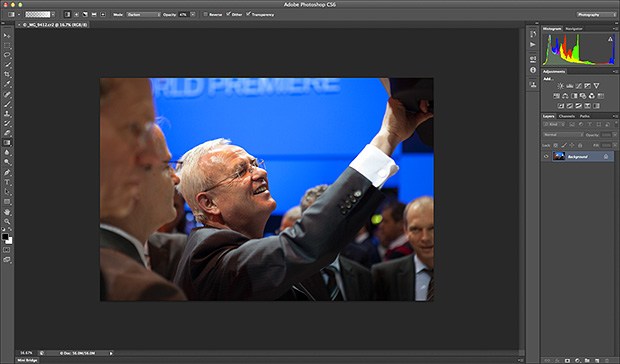
Like half of the photo geeks around the world, I have downloaded and started to play with the public beta version of Adobe’s latest version of Photoshop: CS6. This is a major revision of the software in terms of the interface which looks a lot more like Lightroom than ever before and is also a lot less “freestyle” than those used to versions such as CS3 and earlier would be familiar with. We now have a fixed window rather than the floating elements of previous versions and this will take quite a bit of time for me to get used to. It isn’t that I don’t like it, it’s just that it is a change.

Screen shot of the main window


To be honest, my main use of Photoshop is Adobe Camera RAW. I use it to convert the RAW files that I shoot into whatever file format the job requires, fine tuning the colours, composition and various other elements as I go. At first sight Camera RAW 7 is very little changed from Camera RAW 6xx that I use every day in Photoshop CS5. At least that’s what I thought until I used it in anger on a proper edit.

Screen shot of Adobe Camera RAW 7


If you look closely at the main adjustments palette to the right of the window, you suddenly see what the changes are and what they will mean for every day workflow. Gone are the labels such as Recovery, Fill-light and Brightness to be replaced with a set including Highlights, Shadows and Whites. So far, they seem to perform very similar functions when used on every day files but I have only edited two sets of pictures (neither of which have been “live” jobs) and so it may well be that I have missed something. Here are the two palettes side by side:

Adobe Camera RAW adjustments palettes from CS5 (ACR6) on the left and CS6 beta (ACR7) on the right.


I will continue to play with CS6 and ACR7 as long as the beta phase continues and I’m sure that I will come up with plenty more observations. I only use Photoshop as an optimisation tool and I don’t do any serious retouching or image manipulation with it so don’t expect an in-depth assessment of layers, filters and content aware fill from me – there are plenty of other photo geeks out there who will be able to blog about that kind of stuff!

Photographic education… again…

Here I am again writing about photographic education. Every time I’ve started down this road it has been entirely due to one or more conversations that I’ve had with someone unhappy about the way the system is working out for them. This morning I spoke to three students who have ended up on the wrong course. I may come back and write about them another day but the main outcome of those conversations has been to make me think about a wider question.

When you speak to professional photographers about photographic education in the United Kingdom you are very likely to hear tales of second year undergraduates who don’t know what an f-stop is and third years who haven’t had any training in digital workflow. On the face of it, that sounds absolutely indefensible. It doesn’t, however, tell the whole story.

Thousands of eighteen and nineteen year olds go off to university every September to study English and thousands more go to study History. Does anyone bemoan the lack of jobs for writers and historians? Do working authors and working historians complain loudly about the lack of training that these young people are getting in the technicalities of doing their jobs? No. The truth about photographic education is that not all courses are there to train people to be photographers.

A sizeable number of courses are designed to teach photography as more of an academic subject – learning for learning’s sake and mind expansion rather than training for a career behind the camera.

This kind of learning is still a relatively new concept for photography. Our colleagues who are engaged in fine art, the history of art and even fashion are further down the road towards embedding the study of their subject into the world of academe and photography needs to catch up.

I have no doubt that lecturers engaged in teaching photography as an academic pursuit know what they are doing and know what, when and how they are teaching it. The thing that I am a lot less sure about is whether all of the students enrolled on those courses realise that they are pursuing an academic study. In fact, I am convinced that a surprisingly large number don’t realise that until they are well into the first year and that many don’t really wake up and smell the coffee until they are even further into their studies.So as far as I can see we have two separate but parallel problems here:

  • A lack of realisation from the profession that not all photographic courses are there to train photographers.
  • A problem for students who don’t understand that not all photographic courses are there to train photographers.

What should we do? Two parallel problems with a single solution: Better PR. Photographic education needs better PR. Looking towards schools, colleges, parents, students, the public and the profession all courses – especially the academic ones – need to make it clear who they are and what they are doing.

Photography should be studied as an academic subject; its cultural presence and power is worthy of research and study. Its history and even its technology are topics equally as valid as others that are understood and accepted as legitimate subjects in a way that photography is struggling to be.

Photography is also a vocation and courses that set out to train students for a career behind the lens need to make it clear that that is their goal and set about doing it to a standard that the industry requires and the students deserve.

We need two distinctly different approaches to photographic education and we need the courses following each route to be confident, open and clear about what they are doing. Courses that attempt to steer a course between the two and produce graduates who haven’t had a proper academic workout or whose technical knowledge and creative talents haven’t been optimised and refined are failing everyone. Let’s get behind photographic education and let’s help to get the courses to get their PR right.

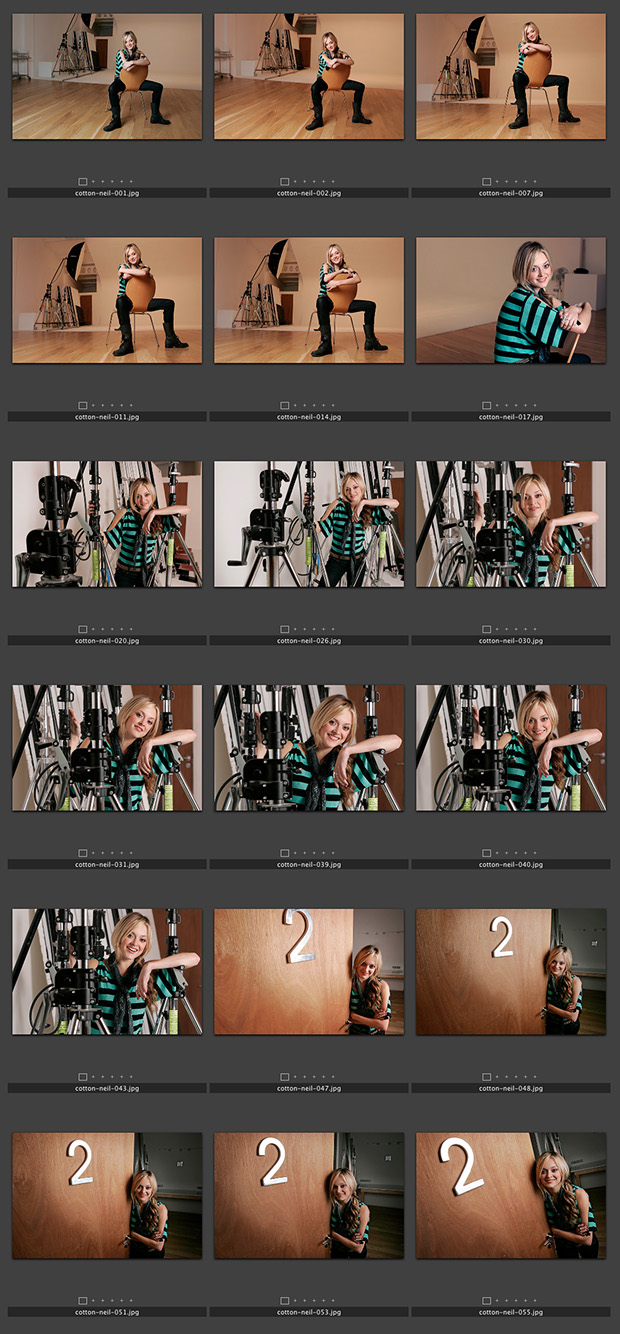
Fearne Cotton – The contact sheet, October 2004.

Back in 2004 Fearne Cotton was enjoying a very rapid rise in her profile and her career was really taking off. The TES Magazine had done an interview with her for their “My Best Teacher” feature and I was sent to a studio in west London to shoot a portrait to go with it.

©Neil Turner/TSL. October 2004, London.

It turned out that it was a hire studio where she had been shot for a BBC magazine earlier in the day and they were (rightly) less than happy about another photographer coming in and piggy-backing onto another shoot. In the end we reached a deal where I shot using all of my own lights in the main studio and in the dressing room as long as I was in and out in twenty-five minutes. I think that the shoot in the studio was over in less than ten minutes and the whole job was completed in fifteen. Fearne had had a long day and the weather outside was dreadful. Neither of us wanted to prolong the job and, even at an early age, she was such a good professional that it was a very successful shoot.

These portraits were shot using a Canon EOS1D camera with 16-35 f2.8L, 24-70 f2.8L and 70-200 f2.8L lenses and lit using a single Lumedyne Signature series flash kit with a 24×32 inch Chimera soft box. The job was shot in the days when I was happy to shoot JPEGs straight out of the camera.

Neil Innes in his pond…

From the days when he provided musical accompaniment to the Monty Python team and had his own hysterically funny television show I had always been a Neil Innes fan. Being called Neil myself I guess that I have always paid special attention to other Neils anyway but Mr Innes didn’t need any of that.

©Neil Turner/TSL. August 1999, Suffolk.

When I got the call to go and shoot his portrait I was delighted – even if the person on the picture desk had no idea of who and what he was. His home, at the time, was in Suffolk and when I arrived he greeted me as if it was him who was getting to meet a long standing hero. We had coffee, talked about all sorts of stuff and when we finally got around to shooting portraits he simply asked me “do you want funny or not funny?” I answered that a bit of each would be cool and we started with some simple head shots.

Within ten minutes “not funny” had become boring and so he grabbed his wellingtons and stepped into a lovely ornamental Japanese style pond in the garden (I believe that his wife was a garden designer and the whole place looked great) where he proceeded to fish with a small net.

It was amusing enough to watch him but if this were a video you’d now be listening to silly squelching noises and a completely bizarre and impromptu song that made sure that I was actually unable to take pictures because of the tears of laughter streaming down my face.

Photographers often write about what a privilege it is to meet some of the people we meet and to go to some of the places we go and I absolutely agree. Every once-in-a-while you also get a little private performance from a truly talented artist that money couldn’t buy and this was one of those priceless days.

Geek stuff: Shot on a Kodak DCS520 digital camera with a Canon 28-70 f2.8L lens, available light, 1/60th of a second at f6.7 on 200ISO. Converted to black and white prior to publication in August 1999.

BMX Rider: Contact Sheet

©Neil Turner. Ringwood, Hampshire. 2011

©Neil Turner. Ringwood, Hampshire. 2011

This was a set of pictures shot on location as part of a “how to do it” technique piece for Photography Monthly magazine. The idea was simple – use flash to make something very cool from some sort of active sport. I was put in contact with the tier, Keegan Walker, through a young photographer that assists me from time to time on commercial shoots and we arranged to shoot at the skatepark near where they both live which is about ten miles from my own home.

I used a couple of Canon EOS5D MkII cameras with 16-35 f2.8L, 24-70 f2.8L and 70-200 f2.8L IS lenses as well as the excellent Elinchrom Ranger Quadra flash system supplemented by a couple of Canon 580exII Speedlights with Elinchrom Skyport receivers triggering them. There were plenty of clamps, gels and light modifiers in use too – including my rather lovely modified beauty dish and the equally great Chimera 24″ x 32″ soft box.

The sky at dusk is my favourite backdrop for all kinds of shoots and the May evening sky provided us with something special to work with. Keegan is pretty good at what he does and I had to ask him several times to actually get less height from the ramps so that my pictures looked better! Two hours on a nice evening messing around and shooting pictures is a pretty good way to make a living. The unfortunate part of this particular commission was that I had to write the words that described exactly what I had done and how I had done it. One day I will get around to reproducing the whole piece for you.

Every picture teaches a lesson

©Neil Turner. Poole, Dorset. September 2008

We all know that “every picture tells a story” but how many people think that, as photographers, every picture teaches us a lesson. Grab a picture – any picture – and really look at it. What’s good about it? What could you improve if you went back and re-shot it? If it’s perfect, why is it perfect?

I spent a lot of time yesterday shooting on mixed light with no real option of lighting the scene (a busy retail mall with dozens of shops and lots of people). Looking back at the best of the shoot this morning I could see that every frame had one major feature: one thing that was the single most important part of the composition and it was obvious that I should always get the white balance right there and let the rest of the scene do what it will. I already knew this but it doesn’t hurt to look and re-affirm what you already know.

Every time you shoot pictures and every time you look at other people’s work you can learn lessons. If you don’t know how something was shot – see if the photographer will tell you.

Look for the big four factors: subject matter, composition, light and technical quality. Work out how those factors come together to create the whole. Work out if the picture still works if one or more of those factors is deficient. It’s amazing how often the most eye-catching images are not perfect in every way and it is equally interesting that some pictures that score full marks in all categories just seem boring and “too good to be true”.

Analysing your own work on a regular basis is a great way to get better. Getting together with others and discussing each others work is great too but, for my money, going over your own work on your own is a fabulous way to find your style and motivate yourself to do better and better.