London

A quick update…

Here I am on another morning train to London Waterloo from Bournemouth and tomorrow marks my fourth Monday morning working at London 2012. Training, preparations, more training and extra preparations would sum up what we have been up to so far. The Main Press Centre on the Olympic Park was the first area to open officially and we have had a few photographers passing through already.

The scale of the operation is impressive and the amount of planning that has gone into getting to this stage is staggering. I’m already excited about the next two and a half months and the nearer we get to the action starting, I can only imagine that the excitement will keep growing.

I’m glad that I decided to get involved…

Three months off from the day job.

It’s Monday morning and I’m sitting on the 06:25 train from Bournemouth to Waterloo for the first of many such trips over the next three months. I have decided to put the ‘day job’ aside and I’ve accepted a contract working in the Main Press Centre at the 2012 London Olympic Games.

When I’ve told people, the mixture of reactions has been very amusing. Ranging from the most common “how exciting!” via a liberal sprinkling of “are you mad?” to the rather predictable “can you get me some tickets?” The answers are, in turn: “I hope so”, “ask me in September” and “NO!”

Like most press photographers, I greeted the news that London was going to host the 2012 Olympics with a mixture of anticipation, horror and fascination. What would it mean for non-sports specialists like me? Would it mean anything beyond endless building works and some even-heavier-than-normal traffic? Until March of this year my only contact with the Games was to photograph a group of children whose school is right next to the Stratford campus in the Spring of 2008. Beyond that, I was expecting to have next to nothing to do with the biggest event to come to the capital in many years.

So what exactly will I be doing for the next 13 weeks? My job title says “Team Leader, Photographers Workroom, Main Press Centre” which is a posh way of saying that I will be there setting up and helping to run the vast work area at the main Olympic site set aside for visiting sports and press photographers. Customer service with a smile and a lot of empathy for the needs and deadlines of the 1800 or so accredited photographers that will be passing through the Olympic and Paralympic Games between now and the middle of September.

I’m excited – albeit in a slightly sluggish way having had to get up at 05:15. I am apprehensive too: this is a new departure for me in a career in photography that started way back in the mid 1980s. I’m genuinely looking forward to the experience and I hope, where possible, to say a few words every now and then about how things are going. If you are working at London 2012 yourself – please come and say “hello”. I expect that you’ll recognize me – I’ll be the one wearing the uniform, spinning plates, juggling press-packs and looking as if they know what they are doing.

My train is approaching London Waterloo and I’ve got to stick the laptop back into the bag for now.

On test: Vanguard Heralder 38 camera bag

When somebody offers me the chance to try out a new camera bag that is winning awards all over the place, I normally jump at that chance. An email from the people behind the Vanguard range of bags arrived in my inbox a few weeks ago and the Heralder 38 arrived at my home shortly afterwards. I have tried so many rucksack bags and been disappointed with the compromises that you have to make in order to get portability and so I keep coming back to shoulder bags – despite the best advice of people who know about back pain.

The Vanguard Heralder 38 camera kit + laptop shoulder bag.

Lets put this bag into some sort of context: I have used a Lowe Pro Stealth 650 as my main “carry everything” shoulder bag for many years now and I am used to it, quite like it and would buy the same again to replace it if Lowe Pro hadn’t done what they seem to love doing – which is to take a perfectly good design and “improve” it. The old Stealth 650 that I have is a good bag but the new Stealth 650 is really annoying!

Anyway, back to the review: The way that I test things is to use them in my everyday work and so the amount of testing depends entirely on what I’m up to at any given time. The last couple of weeks have been relatively quiet but I have had enough days out with this bag to have made a lot of important decisions about it. From my own experience of reading reviews, I know that a lot of people skip straight to the end and because of that there will be a “conclusions” section at the bottom.

Most people want their camera bags to be smaller than they need to be, to weigh less than the total of everything that they want to jam in, have super-easy access, look great and to be a joy to carry for several hours. I guess that’s why nobody has ever found the perfect bag. It’s impossible to make that bag on a commercial level because we all have subtly different needs and so the word compromise rears it’s head AGAIN!

What can you get in the bag?

If this bag is going to become my everyday carry everything bag then it needs to swallow my standard amount of kit: Two Canon EOS5D MkII bodies, 16-35 f2.8L, 24-70 f2.8L and 70-200 f2.8L lenses, two 580exII flash units and all of the bits, pieces and accessories that go to support that kit in the field. I also need to put either a 15.4″ Apple MacBook Pro or an 11″ MacBook Air plus gadgets in from time to time. The good news is that everything fits in and the bonus is that I can just fit the 70-200 standing up with its lens hood in place (I hate having to remove and reverse hoods every time you put a lens away).

The Heralder 38 showing how my standard kit is laid out when loaded into it.

The bag itself doesn’t have too many pockets and hiding places for anything other than relatively small or flat items such as pens (x3), memory cards (x4) notebooks, passes and business cards. What it does have is a removable pouch which holds a couple of spare batteries for the camera, a couple of spare sets of AAs for the flash units and an electronic release for the camera. Because of this pouch and the excellent use of space within the main compartment of the bag the Heralder 38 passes this test rather comfortably – even with a laptop and related accessories on board.

Ease of Access

That less than perfect clip…

Shoulder bags are nearly always nicer to work from that rucksacks or rolling cases. I prefer my bags to have a simple method of closing them whilst working and a more secure method for securing the contents when I am simply travelling. The combination of a zip around the whole lid and a single snap-shut clip on this bag meets that requirement too. I suspect that the designers of this model have looked at the old LowePro Stealth bags and decided that they were on to something before designing their own similar solution.

It’s at this point that I found my first ‘issue’ with the Heralder 38. I like to be able to close the bag in work mode one handed. Every Domke and LowePro I have ever owned has the ability to do this in common and the Vanguard looks as if this wouldn’t be a problem either. So far I have struggled like mad with the plastic snap-shut clip fitted to this bag and I cannot work out why. I cannot seem to line it up as easily as the more square ones on my LowePro or on the Think Tank roller that now carries my lights everywhere. I’m still trying to master this clip and failing.

Beyond that niggle, getting kit in and out of the bag whilst moving is as easy as it has ever been on a bag that I’ve used. If they could source a less trendy looking clip I’d be well on the way to proclaiming this bag a massive success.

Carrying the bag

This is where the Heralder 38 comes into its own. Somehow they have made this a superbly comfortable bag to carry. The strap is excellent and the shape of the back of the bag means that it sits on my hip incredibly well. Vanguard have gone some of the way to fooling me into thinking that I am carrying less dead weight than I actually am and that is a huge advantage for this bag when comparing it to the other bags of a similar size that I have owned and/or tried out. Put simply, this is an easy bag to carry – possibly the easiest I’ve ever used.

Extra features

All bags these days come with clips and straps that allow you to attach tripods, monopods and other large and unwieldy accessories. To be honest I never want to be in a position to have to do that and so the bits an pieces that came with this bag that allowed me to do that were removed (where possible) and put into a cupboard.

The bag features lots of handy labels…

What the bag does have (in common with my old LowePro) is a rain cover tucked away in the back of the bag that can be fitted to keep the contents drier than would otherwise be the case. We are in the middle of a spell of beautiful weather here in the south of England and so I haven’t had a chance to test the rain cover yet but I can tell you that it is fast to fit and easy to pack away again. The great news is that it is detachable too – which is a big tick from me. I have had other bags where the rain cover is permanently attached – which means that when it stops rainy you have to leave it out to dry or pack it away wet.

The bag comes with a very stylish luggage tag and an elasticated end pocket that fits a small bottle of water rather well. As someone who carries his bag on the left shoulder, the elasticated pocket is on the wrong end but that’s just a small niggle and not a deal-breaker!

Looks and construction

I guess that when you design a camera bag you have two choices: you either go down the “it’s a camera bag so it should look like one” route or go the other way and design something that looks like a normal holdall. This bag is squarely in the former camp – to the extent that it would be hard to imagine that it was anything else. The black water resistant materials are of a great quality and the plastic base appears to be pretty tough. The orange colour of the interior may be off-putting for some people and I’d prefer something 18% grey myself (like my old LowePro) but it has the advantage of being very visible from a distance and being the colours of The BPPA.

The quality of the stitching and the fabrics tells me that this bag should last a long time. If they put a better snap-shut clip on the bag I think that they will have the whole construction sorted.

Conclusions

This is a very good bag. It is OK to look at, swallows a lot of kit and is easy to work out of. It appears to be well made and the biggest selling point for me is that it is supremely comfortable to carry. The number of distributors for these bags seems to be growing and a quick search of the internet found the best price is as low as £124.98 at Amazon– which is good value for money as far as I’m concerned.
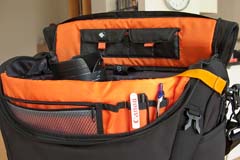
The Vanguard Heralder 38 in use.

So far I only have one real niggle: the snap-shut clip. Beyond that, for the first couple of days I thought that a couple of external pouches would be useful for when I have a few extra bits but I suspect that would alter the superb balance and usability of the bag rather than enhance it.

So that leads me to the big question: “Is this the best bag in its class that I have ever used?” The answer is very close… for portability and comfort of carrying the answer is a big yes. For ease of working is a marginal “no” BUT the bag that I would say beats this one has been modified by LowePro and the new version isn’t as pro’ friendly as the old one and so, if you needed to buy a shoulder bag to carry a decent amount of kit along with a laptop, I don’t know of anything that would beat the Vanguard Heralder 38. I haven’t found the camera bag equivalent of the holy grail yet but there is every chance that it is just a myth anyway.
UK National Symposium on Photography 2012

The fourth National Symposium on Photography takes place this Friday, Saturday and Sunday in London. Timed to coincide with the World Photography Organisation Festival in London, the symposium will feature a very interesting range of debates and events.

I am going to be there, taking part in a panel debate about the future of news photography. The narrative for the debate on the UKNSP website says this:

The ethics of press and public photography, with particular reference to the implications of the Leveson Inquiry. At what stage does photography become harassment? Should there be controls? More broadly, where is the press heading in its use of photography? Should the press, citizen journalists, and members of the public all be treated the same or differently, whether in general or at newsworthy events? This panel discussion features a range of points of view – that of a photographer who gave evidence at the Leveson Enquiry, a leading picture editor and a champion of citizen photography.

It’s going to be a very interesting and maybe even passionate debate. This will be the third time in four years that I’ve taken part in the symposium and I firmly believe that it is developing into and very important event in the UK photography calendar. My fellow panellists are Alan Sparrow, Chairman of the Picture Editors Guild and Executive Picture Editor of Metro UK and Pauline Hadaway, Director of Belfast Exposed Photography and the debate will be chaired by Photographer Andrew Wiard.

The debate starts at 5pm on Friday 27th April at Somerset House in London. Tickets are available from Redeye or from the WPO.

The best lens for portraits?

On a photographers’ forum last week there was a lot of discussion about the best lens for portraits. Can of worms opened. Mac vs PC or Nikon vs Canon style debate well and truly started.

I have written before about portrait lenses and I won’t bore you with repeating my previous post (if you missed it, catch up here) except to say that when people ask this question they normally mean headshots or mug shots where the subjects head and shoulders will fill most of the frame.

©Neil Turner, February 2012. Bournemouth.

This portrait of a local artist was shot using an 85mm f1.8 Canon lens wide open but what lens should you use for this kind of picture. The debate will rage and answers anywhere between 85mm and 135mm (all measured on full-frame cameras) will be given, supported, doubted and even ridiculed. Most arguments that don’t get broad agreement also don’t have a simple answer. Sure there’s something lovely about the feel of a portrait shot on an 85 but what about the degree to which you have to invade the subject’s ‘personal space’ to get the composition? What about those 85mm lenses where the close focus isn’t good enough to get that bit tighter still? With a 135mm lens the personal space issues largely go away and the close focus issues almost always go away too – but is the effect as nice? Can you ever include something of the environment in those pictures? Would you even want to?

The actual answer (as always) is that it depends on you, your technique and your own taste in pictures. A few weeks ago I was looking back at some corporate headshots that I had shot and I had to tell another photographer on the other side of the world how I had shot them so that he could replicate them so that when his pictures and my pictures were printed on the same page nobody (hopefully) could tell that two photographers were involved. One of the things I needed to give him was the focal length of the lens used so I got the pictures, went through the EXIF data and noted it all down. I had used a 70-200 f2.8L lens and so the actual focal length was between 120mm and 130mm.

I was a little surprised that it was that long and so I grabbed a folder of images that I keep on my hard drive of corporate portraits to show prospective clients some examples of what I have done in the past and looked through the EXIF on those. These were pictures that, by definition, I really like and it quickly transpired that the tighter compositions were all shot between 120mm and 150mm on the 70-200. Again, quite a surprise – I had always seen myself as an 85mm lens user!

Well, one thing led to another and I decided to do a quick ‘audit’ of all of my favourite environmental portraits to see what lenses I have favoured. This was less of a shock because in the folder of 120 of my favourites the widest lens used was 16mm (on a 1.3x crop body, so we’ll call that 21mm for the purposes of this exercise) and the longest was a 300mm (on a 1.6x crop body which becomes 480mm in this context). There was a lot of bunching in the 35-45mm area and some more around the 120-150 area but the spread of focal lengths was otherwise pretty even – which pleased me greatly because it confirmed what I always say to others;

“There is no such thing as THE perfect portrait lens”.

This exercise is a bit time-consuming but it could have a lot of uses in professional photography. For example, anyone used to zooms wanting to buy a couple of prime lenses should think about going through the exercise to help them decide which ones would suit their style. Anyone wanting to know what lenses to replace as a matter of priority in these cash-strapped times could also benefit from a focal length analysis. The reverse is also true – a photographer who wants to change the way they do stuff could see what they normally shoot with and deliberately avoid those focal lengths. The possibilities are endless once you start to think and we can all do with a bit of style analysis from time to time. How we choose and use lenses has always been a preoccupation of mine and this exercise has helped me to rationalise that.

Indeed why stop there? EXIF data is amazingly useful and so you could also do an aperture comparison. My quick one revealed that I shoot a surprisingly large amount of pictures using three apertures f2.8, f8 and f22. In my sample, those three apertures accounted for over 50% of my pictures. I’m not sure what to make of it but I will work it out one day.

©Neil Turner/TSL. January 2008, London. 173mm focal length on a 1.3x crop body = 225mm

What started out as a simple answer to a simple question somehow turned into statistical analysis. Many people would say that is the exact opposite (they might even use the word antithesis) of what we, as creative people, should be doing. I have a lot of sympathy for that argument but, in a world where there are tens of thousands of great photographers vying for work, every little advantage we can eek out for ourselves and every piece of information that we have to work with could just be worth it’s weight in fluorite glass.

Capture One Pro and other workflows…

One of the subjects that I teach is workflow. I know that I’ve mentioned that before but I thought that I’d remind you of that when I explain why and how I have been learning all about Capture One Pro – the professional RAW conversion, tethered shooting and image enhancement tool from Phase One. I am on version 6.3.5 (the latest available) and this is the first time that I have seen it since version 4 a few years ago.

Principally designed to make the most of Phase One’s own imaging systems, it also works rather well with the whole gamut of professional file formats. I have been using it for quite a few days now and I thought that I’d post some thoughts on here.

Before I get down to my opinions on Capture One Pro I need to say that every piece of software that I’ve used has needed quite a long time to get used to and anyone who does “full reviews” based on a few hours of use is kidding both themselves and their readers. I also need to make it clear that I paid for this software and that I have absolutely no ties to Phase One.

I have now used Aperture, Lightroom, Photoshop, Photoshop Elements, Canon DPP, Graphics Converter and a few others and Capture One Pro is probably the easiest of the lot to get to like. My knowledge of Adobe Camera RAW in Photoshop has been gained over many years and many thousands of edits and it has only taken me a few days to feel almost as comfortable with Capture One. I’m still learning more and the more that I learn the more I like it. That isn’t always true of new software packages – even if you really want to like them…

The workspace that I'm currently using on a 15" MacBook Pro

I like lots of things about the way it works, about the interface and about how good the customer support and instruction manual are. Every time I think that I’ve found a flaw in the feature set of this software I search the knowledge bank or put a note on Twitter and there it is – the answer that tells me that everything I wanted was there all along. That is great but there seems to be one feature from Adobe Camera RAW that I use all of the time that isn’t there with Capture One Pro – good and accurate profiles of all of my Canon lenses ready to apply corrections.

My first impressions of the user interface centred around my inability to find the tools that I actually wanted. I knew that most were there because the literature told me they were and a very brief exchange on Twitter with the workflow genius that is Nick Wilcox-Brown let me know how to find them and add them to my custom user interface or “workspace” as the application calls it. Better still, you can create a range of custom workspaces and save them alongside the suggested ones for dual monitors, simple workflow, black & white or even a replica of the previous version (5) of the software. Being able to customise the workspace is not unique to this application but I believe that they have implemented it really well.

All of the adjustments and all of the options have easily controlled and finely adjustable controls (mostly sliders) and I found myself easing very quickly into the Phase One way of doing things.

Time for a short list of likes:

  • Customisable user interface
  • Easy to learn how to use
  • Extraordinary range of functions
  • Tethered shooting
  • Fantastic image quality
  • Value for money
  • Web contact sheets
  • Output of files to specific sizes

… and dislikes

  • Cannot find profiles for my Canon lenses
  • The sessions menus
  • Applying adjustment “recipes” seems hit and miss
  • The way that it handles IPTC metadata (I know that the sister app Media Pro does that better)
  • Speed of processing batches of files
  • Not recognising the simple tags that I can apply in camera or by using the ‘tag’ function in Photo Mechanic

That is a short list of dislikes and you have to actually use it to decide if you agree about the sessions menus – the way that Capture One likes to create a virtual time bubble for each job in much the same way that Aperture does by default. I may be doing something wrong when I’m trying to create, save and apply “recipes” which are a great idea (again shared with Aperture and others) that allow you to copy all of the adjustments that you have applied to one image to one or more others as well as keeping that set of adjustments for future use/adaptation. Sometimes the recipes worked and other times they didn’t.

My background is in news and editorial photography and IPTC metadata is a fundamental requirement for me and it forms a big part of my own workflow and the personal workflows of people that I work with when I’m doing coaching. Capture One Pro handles IPTC and is compliant with all of the IPTC fundamentals – it just doesn’t do it very well. The same can be said for quite a few image processing applications and I still love good old Photo Mechanic for the speed, accuracy and flexible way that it handles everything except RAW conversions and long term storage.

My final dislike is the speed when processing batches of files. On a two year old Apple MacBook Pro with an i5 2.4Ghz processor, 8GB or RAM it takes 50-60% longer to process a batch of 36 CR2 images from a Canon EOS5D MkII than Adobe Camera RAW inside Photoshop CS5 does. Individual files are shot through in almost the same time but batches are slower. I tried very hard to be scientific when comparing like with like but I am prepared to be proved wrong on this.

This isn’t really a full review – just some thoughts on an application that I am sure to have to teach very soon. Several people have already asked what advantages Capture One would give them over Lightroom or Adobe Camera RAW in Photoshop and, to be honest, I couldn’t really name any. If you already use and are happy with either Adobe product for processing RAW files then it doesn’t really make sense to spend more money and get Capture One Pro. BUT (and it is a but worthy of being in upper case) if you are looking at designing a new workflow for news and editorial work from the ground up and you don’t already have licenses for anything else I would strongly recommend getting Capture One Pro and using it in tandem with Photo Mechanic. Between the two you have a solid, reliable and well priced set of options that will, without doubt, deliver the goods. That would leave you in need of an archiving option and for that Phase One’s Media Pro might be a good solution. There are those who’d argue that between the two Phase One applications you have everything you’d need and they would be right but there is no getting away from the fact that Photo Mechanic does what it does so well that it is worth the money and then some. The same goes for Capture One Pro too.

Get yourself some defaults

©Neil Turner/TSL. London, May 2005.

Surprise, surprise – yet another blog post in response to a question! I was asked “what one single piece of advice could I give to someone who had already read the previous “one piece of advice” blog post on here?”

That’s a really cheeky and rather good question and, having shot myself in both feet by saying that I was a sucker for people who used please and thank you I felt duty bound to answer.

In three words I’d say “default staring point”. What’s that? you ask… “Good question” I respond. It is the notion that every time you go to do something you have two choices: you can mess about working out where to start and what to do first OR you can go to your default starting point and get stuck in straight away.

In photography this takes a wide variety of forms. For example, when I’m shooting a lot portrait my default position for placing a light is parallel to my subject’s torso – imaging that their chest is one line and the front of my light source is another, those two line would be parallel. Another example is “what gear shall I use today” the answer (if you are lucky enough to have sufficient kit that you need to choose) is my default kit: two 5D MkII bodies with 24-70 and 70-200 f2.8L lenses and a couple of 580exII flashes in the bag with a 16-35 “just in case”.

Every part of the job has a default setting. From the preferences locked into Photo Mechanic and Adobe Camera RAW to leaving my cameras on daylight white balance and 200 ISO. Default starting positions. I know that if I start there I can move away as soon as my imagination starts to flow and as soon as I start to get a feel for the situation. Sometimes the defaults get changed with seconds but it is amazing how often they stay a lot longer.

One photographer I explained this concept to a few years ago compared it to putting his left sock on first, followed by his right sock and then his trousers. No real reason why, it just means that you can concentrate on the interesting stuff safe in the knowledge that you have the basics covered.

When you really start to think about it we all have defaults in every area of our lives. Toothpaste onto wet brush, small amount of cold water onto that and away I go. Why would I do it any other way? Off to shoot a portrait, tightish head shots on a long lens first to avoid spooking the subject and then gradually get closer and wider. It makes sense to me and that’s my default.

I could go on with the list but I’m guessing that you have the idea by now. A default starting position for everything just helps you to organise your thoughts and get stuff done. Good advice?

Adobe Photoshop CS6 Beta

Like half of the photo geeks around the world, I have downloaded and started to play with the public beta version of Adobe’s latest version of Photoshop: CS6. This is a major revision of the software in terms of the interface which looks a lot more like Lightroom than ever before and is also a lot less “freestyle” than those used to versions such as CS3 and earlier would be familiar with. We now have a fixed window rather than the floating elements of previous versions and this will take quite a bit of time for me to get used to. It isn’t that I don’t like it, it’s just that it is a change.

Screen shot of the main window


To be honest, my main use of Photoshop is Adobe Camera RAW. I use it to convert the RAW files that I shoot into whatever file format the job requires, fine tuning the colours, composition and various other elements as I go. At first sight Camera RAW 7 is very little changed from Camera RAW 6xx that I use every day in Photoshop CS5. At least that’s what I thought until I used it in anger on a proper edit.

Screen shot of Adobe Camera RAW 7


If you look closely at the main adjustments palette to the right of the window, you suddenly see what the changes are and what they will mean for every day workflow. Gone are the labels such as Recovery, Fill-light and Brightness to be replaced with a set including Highlights, Shadows and Whites. So far, they seem to perform very similar functions when used on every day files but I have only edited two sets of pictures (neither of which have been “live” jobs) and so it may well be that I have missed something. Here are the two palettes side by side:

Adobe Camera RAW adjustments palettes from CS5 (ACR6) on the left and CS6 beta (ACR7) on the right.


I will continue to play with CS6 and ACR7 as long as the beta phase continues and I’m sure that I will come up with plenty more observations. I only use Photoshop as an optimisation tool and I don’t do any serious retouching or image manipulation with it so don’t expect an in-depth assessment of layers, filters and content aware fill from me – there are plenty of other photo geeks out there who will be able to blog about that kind of stuff!