work

Fun picture: stray apostrophes, London.

When the news broke that UK booksellers Waterstone’s were going to drop the apostrophe from their logo to “make things simpler” the story was greeted with a mix of horror, outrage and cynicism. I was part of the cynical camp: what better way to get your company on the news than to pull a stunt like that? Leak a story that you might be about to do something and then sit back and watch it go viral and, more importantly, go viral amongst the very people who would be your core market. It was either brilliant, fortunate or (the least likely in my view) a genuine story.

©Neil Turner/TSL | London | October 2003

I was reminded of the last time that I was involved in a “stray apostrophe” outrage story. Back in 2003, yet another report on the use of punctuation in grammar singled out signs and posters for special criticism and so I was asked to go and find some examples. For a city reputed to have “thousands” of examples I struggled and it wasn’t until I was in the second hour of driving around looking that I finally found this gem on a secondhand video, DVD and CD shop near King’s Cross. The shop was on a one way system with almost no chance of stopping and very little parking nearby but I was desperate and so I went around again, found a parking meter and shot some pictures of the sign. The cafe next door was also the perfect place to have a quick coffee and send my pictures. Job done.

Keeping it simple

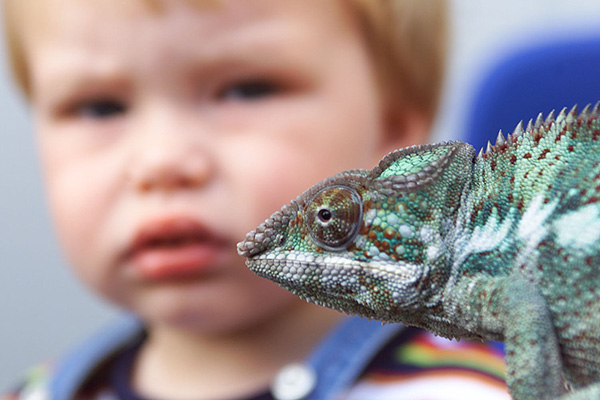
The text books will all tell you that there are a number of rules for composing a photograph (or a painting for that matter) and it isn’t a bad idea to follow these rules 90% of the time. Working on a newspaper has taught me that simple compositions often work the best and that there are several ways of keeping it simple. One of my favourites is to work with a small depth of field. The human eye will always be drawn to the subject that is in sharp focus with a simple out of focus background. Usually this will mean that the background doesn’t contribute to the image, but every so often an out of focus background forms a really important part of the image.

©Neil Turner/TSL | Southampton | August 2001

This picture of three year old boy at a nursery school learning about some creatures that had been brought into the school is a perfect illustration of how throwing the background out of focus gives an enormous boost to the composition and helps to tell the story of the image. The chameleon is in focus, but because the lens (180mm on a 70-200 f2.8 zoom) was wide open at f2.8 the boy becomes an interesting blur. The added 1.6x focal length multiplication brought no change in the depth of field but narrowed the angle down to a 35mm equivalent of 288mm. On this particularly sunny day that meant a shutter speed of 1/4000th of a second on 200 ISO.

Techniques are there to be used, altered, modified and adapted. This one should become really useful to you once you have mastered it. When you are struggling to make an interesting composition it’s always worth considering narrowing your depth of field.

Objects of desire

One of the great joys of being a photographer is the wonderful array of gear, technology and toys we get to use on a daily basis. It is also one of the curses of being in business. If I went out and bought every new camera, every new lens, every new application and every new computer that I fancied I would have no home, no car and no life.

That doesn’t stop me looking. The CES show in the USA has thrown up lots of new “I want one of those” moments and a quick calculation says that I would make a £20,000 hole in my finances if I went and bought it all. The serious point here is that for many photography is a hobby and buying new gear is a matter of “I want it, I’m going to have it”. For professional photographers there is a simpler test which asks “will that piece of kit pay for itself, pay my bills and work how it’s supposed to work?”

I’ve said many times that a lot of my clearest thinking comes from teaching and I’m currently updating my notes for teaching some business studies to my NCTJ Photojournalism group at Up To Speed Media in Bournemouth. In many ways the formula is simple: A. you need to take the cost of purchasing the item, insuring and servicing it and divide that by B. the number of days you work in an average year. Dividing A by B gives you C. To get the final figure D. You decide how many years the item might remain useful (longer for lenses, less time for camera bodies, computers and software).  Finally, you divide C by D and that figure is the cost of that piece of kit per working day.

An example: Telephoto zoom lens

  • A. price paid is £1,400 and it adds £20 a year to your insurance and a further £30 a year to service. That’s a total of £1,450
  • B . working 3 days a week on average over a 52 week year. That’s a total of 156 days
  • C. that’s 1,450 ÷ 156 = £9.29
  • D. lenses last on average 3 years

The final figure for owning that particular lens is £3.09 per working day IF you shoot for 468 days over three years. The cost goes down if you work more and it goes up if you work less. Of course one lens isn’t much use without the rest of the kit and so you can go through your whole stash of gear and do the same calculation for each. I tend to go for 2 years for camera bodies and computers, 3 years for heavy use lenses, 5 years for light use lenses and only 1 year for software including upgrades.

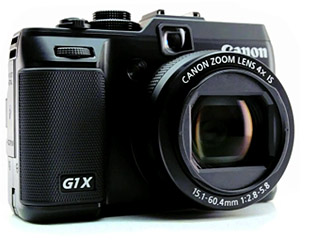
How depressing was that? Let’s end on a lighter note: objects of desire… well… the Canon G1X looks very, very cool, as does the limited edition all black Fujifilm X100. Of course the Canon EOS1DX has to go on the list and I’d love to give the Nikon D4 (and a kit of lenses) a spin. The list is actually a lot longer but nobody reads this far down… do they?

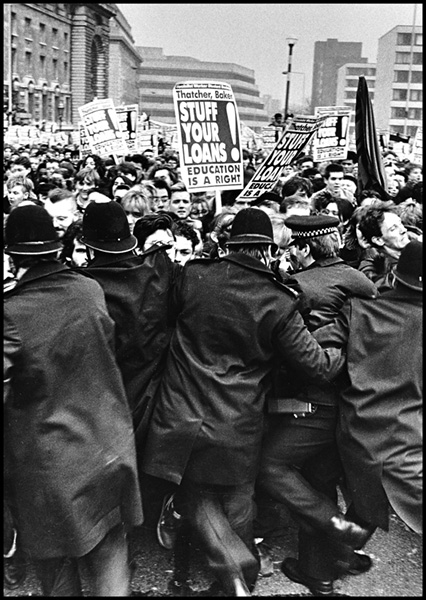
Archive photo: Student demo, London, November 1988

On the day that I got my very first mobile phone I was sent to photograph a student anti-loans demonstration in London. Nobody was expecting anything other than a march by angry students on a very grey day in London. Part of the way through the march there was a large break away group that decided to head for Parliament – which was not on the agreed route. By the time they had broken away and reached the west side of Westminster Bridge the Metropolitan Police already had a cordon across with vans, horses and a large number of officers. Scuffles, charges and fights ensued but the police line held and the students never made it to Parliament – less than 200 metres away.

Photo: © Neil Turner | 24 November 1988

Contrast this photo with the student riots of 2011: the police are wearing no special clothing, no high visibility jackets, no shields and there was no overt photographing or filming of the students either. No buildings were ransacked, damaged or invaded and the whole thing felt relatively civilised. It did feel weird to be able to talk to reporters, other photographers and even the picture desk on the phone in the middle of a mini-riot: my phone was a Motorola 8000s which was known as the “City Brick” because it was so big and bulky.

Unfortunately, the story doesn’t have a happy ending (apart from two front pages and a ‘congratulations’ from the editor). A few years before, I had broken a toe playing cricket and during the demo I had the same toe re-broken when a police horse moved backwards and trapped me between it and a van, crushing my toe. As a freelance, I couldn’t afford any time off so I limped from job to job over the following three or four weeks to Christmas. I also had a lens damaged and wasn’t properly insured so my old 35mm f2.8 Nikkor was replaced with a newer 35mm f2.

The camera and lens combo here was a Nikon FM with a 35mm f2.8 Nikkor using Kodak Tri-X film.

Archive photo: Special needs school, March 1990

Following on from the March 1990 Conductive Education picture that I posted earlier in the week I remembered another special needs picture that I shot a short while later. As it turns out, exactly four weeks later. This shot isn’t as technically sound or as well composed as the previous picture but it does mean a lot to me – because there is a real story to go with it.

© Neil Turner | 30 March 1990 | Southampton

This boy had a target of learning to do up his own zip and was determined to succeed for the camera. I was touched by him and his determination and so I stayed with him whilst he kept trying. After nearly ten minutes he succeeded and I was very nearly in tears. One of the staff had been watching and she was in tears. I have never forgotten that moment.

For the geeks out there, the camera was a Nikon F3P, the lens was a 24mm f2 Nikkor and it was shot on Kodak Tri-X film.

Folio photo #11: Sir Paul Stephenson, February 2009

Sir Paul Stephenson at New Scotland Yard. ©Neil Turner, February 2009

This portrait was made when Sir Paul Stephenson had been in post as the Commissioner of The Metropolitan Police for less than two hours. He had been acting Commissioner but this was taken when he was actually given the job. This frame was right at the end of the session where I had already shot quite a wide variety of pictures in the time allotted. Having packed 90% of my gear away I was told that I still had a couple of minutes and so I did this picture with a press officer holding a Canon Speedlite off to my left with the head zoomed in to create this pool of light effect. Sir Paul has now left the post but this picture is staying in my folio. Shot using a Canon EOS5D MkII with a Canon 24-70 f2.8L lens and a single 580exII flash triggered by a Canon ST-E2 transmitter.

In praise of Photo Mechanic

Every software package has its fans, its designers and its detractors. If we all loved the same system then there would be no choice. I wanted to blog about Photo Mechanic and to say how much I like it. That isn’t to say that the others are rubbish – that would childish and purile – just that I find this one application suits me and what I do extremely well. So what is Photo Mechanic? I thought that the description on the company’s own website was hard to beat:

Photo Mechanic is a standalone image browser and workflow accelerator that lets you view your digital photos with convenience and speed. Photo Mechanic displays your “thumbnails” in a familiar “contact sheet” display window. Photo Mechanic helps you find the best photo amongst several similar shots in a preview display that lets you flip through a group of selected photos at high resolution.

Photo Mechanic’s super fast browsing enables you to quickly compare multiple images and select the best ones from a sequence. Its powerful batch processing, full support for image variables, IPTC and Exif metadata, make it the perfect tool for any digital photographer.

Before this becomes an advert and a love-in, there are a few tiny issues with the current (4.6.8) version that I’d love to get sorted. The trouble is that we quickly revert to the “love-in” because the team at Camerabits who design, code and sell Photo Mechanic are second-to-none when it comes to listening to the views, issues and suggestions of their customers. Got a problem? Email Camerabits and nine times out of ten they sort it the same day and the other one out of ten times sees a resolution in the next upgrade.

Screen grab of a Photo Mechanic "contact sheet" window.

Anyway, what do I use it for? Photo Mechanic is the package that I use to import RAW images from my memory cards, edit out the bad pictures, IPTC caption, batch rename, edit again and then send the selected RAW files to my RAW converter of choice (which happens to be ACR in Photoshop CS5.5 but that isn’t important right now). Once the files are converted there they are right back in Photo Mechanic where I can save them to a separate folder, create HTML web galleries, burn discs, FTP or email images to clients or pretty much whatever I might need to do with photographs.

I can hear people saying that there are plenty of packages that can do all or some of the above and even ones that remove the need for a separate RAW converter – all true, but that misses the point. I want my workflow to be fast, repeatable, adaptable and generally hassle free. I want to rely on the trackpad or the mouse as little as possible and have a good, strong set of keyboard shortcuts instead. Bingo – that’s what I get from Photo Mechanic.

In an earlier post I talked about how teaching helps you to get your own practice right and this is very true with using software. If I had to work without Photo Mechanic tomorrow I have a good knowledge of Apple’s Aperture and a very good knowledge of Lightroom and I would never try to dissuade anyone from using those packages. Having had to buy and learn other software has made me appreciate what I have.

The Camerabits website says that version 5 of the software is due in the early part of 2012 and that there will be a separate but interconnected cataloguing application available too. That’s two things from my wish list sorted out – all we need now is a version of Photo Mechanic for the Apple iOS and that would be another thing ticked off that list.

Chicken or egg? Workflow or mess…

Which came first… the Chicken or the egg, digital imaging or workflow?

One of the rather brilliant side effects of teaching is that you had to look very long and hard at your own practice to make sure that it will stand up to the examination of younger and more eager minds. I have taught workflow on and off for a few years now and I have come to the conclusion that all photographers should get theirs checked every once in a while to make sure that they haven’t fallen into the bad habits trap.

It doesn’t take much time and going through what you do and why you do it with an experienced teacher of these things is a great idea. I have also discovered how useful having a go at a proper edit of someone else’s pictures can be. Photographers are rarely their own best editors and it is a brilliant exercise to do an edit of a job where you give no attention to including pictures just because were hard to take or to pictures that you really like but don’t help tell the story. Captioning should also be part of that exercise because we all make assumptions when we do our IPTC that a disinterested party wouldn’t make. All in all, I thoroughly recommend these exercises to you.

In a rather tongue-in-cheek reference to the Alcoholics Anonymous “Twelve Step Plan” to beat addiction, I developed the photographers 12 step plan to get a good, dependable and repeatable workflow. It doesn’t matter that you can cut twelve steps down to seven or eight if you need to work fast and it really doesn’t matter that step twelve was “relax and put your feet up” anyway. What actually matters is that you have a tried and tested way of getting your valuable pictures from the camera to the client and back them up without making silly mistakes that cost you time, image quality and (worst of all) money.

For years I have been “quoting” the Hippocratic oath that Doctors and other medical folks take when they take up their calling. I have put “quoting” in inverted commas because it turns out that the phrase I have always used isn’t part of the oath at all – it’s just a line from a film!

Anyway I’ve been saying this; “First, do no harm”. It works for medicine and it certainly works for photographer workflows because the idea is that you never damage the original file – always working on a copy. Of course, with Jpegs that have had anything more than very light compression applied that means that you have already sacrificed some quality – but I don’t want to go down the whole RAW Vs Jpeg road again.

At some point in the future I will publish an updated version of the photographer’s 12 step plan with a step-by-step explanation of how my own workflow works but for now I wanted to just outline it. Remember that this can be edited down so that you have fewer steps if needs be:

  1. INGEST/IMPORT – get the images and any supporting files from the camera into the computer. Applications designed to ingest or import files look inside folders and sub-­folders on the memory card in a way that you might not be able to do by simply copying files from the card yourself. It’s important to note that this is one of the easier steps to cut out if you are in a real hurry.
  2. FIRST EDIT – make an initial selection of the images that you are interested in. At this stage you can dispense with very badly exposed frames, pictures where the focus has been missed, where important people have their eyes closed or pictures that are just not very good.
  3. COPY – move a copy of the selected images to a new folder.
  4. RENAME – give the selected pictures a new name. Some clients will have a formula that they want you to follow but otherwise try using a simple word identifier, followed by a six‐digit date and then a sequence number. All good software has the ability to batch rename and sequentially number files. A set of portraits of Tony Blair shot on the 3rd of April 2011 might be blair-­110403-­001 through to blair-­110403-­204. The exact formula that you pick isn’t as important as having one that works for you. The filenames that the camera assigns are not good enough and not unique enough for professional use.
  5. CAPTION – using the IPTC metadata fields to add information about what is in the picture, when and where it was taken and by whom it was taken. This is the best way to insure that your pictures can be found again – all image archiving and storage systems work with metadata.
  6. SECOND EDIT – narrowing the selection of images down to those that will make it into the final edit or the selection that will be delivered to the client.
  7. CONVERT – taking the RAW images from the final edit, making adjustment to colour, exposure, brightness, contrast etc using a RAW converter and then saving the toned images to the required file format.
  8. RETOUCH – opening the images into Adobe Photoshop or a similar application to remove dust spots, make subtle (but ethical) changes that cannot be made in the RAW converter, which, these days, are very few.
  9. SAVE – the final stage before sending to the client is to save the edit in the format that the client requires either JPEG or TIFF are most likely.
  10. DELIVER – most images these days are delivered using the internet. FTP is the most efficient but you may also be asked to email pictures, create web galleries, upload to third party viewing sites or simply burn everything to a disc and put them in the post.
  11. ARCHIVE – make sure that you back up copies of everything that you may need again. External hard drives, cloud storage systems and op?cal discs are the most common options. Multiple back ups are the best way to avoid losing your images due to the ageing of materials or the failure of drives.
  12. RELAX – that’s the end of the process!