opinion

Elinchrom Ranger Quadra – 32 months on…

Most of the camera equipment reviews that you read are written after using the kit for a few days – or even a few minutes in extreme cases. I know. I’ve done several two or three day reviews myself. I was looking at my kit the other day and thought that it would be very useful to write a few lines about my Elinchrom Ranger Quadra system which I have been using for very nearly three years and which has been used on hundreds of assignments.

Build Quality:

When I wrote my first “mini-review” about the system in June 2009 I had only been using it for a couple of weeks but, after years of using the similarly specified Lumedyne Signature and Classic outfits, I can safely say that the Elinchrom fitted straight into my way of working very quickly. Back then I decided to talk about build quality first:

MAY 2009: The first point is to re-emphasise just how small and light this kit is compared to most other portable flash equipment – even Canon and Nikon Speedlights with external battery packs aren’t that much bigger or heavier.

The second point is that being small and light doesn’t appear to make this gear any less robust or well made than anything else. As a long time user of Lumedyne kit I can vouch that the combined weight of a Lumedyne Signature pack and head is almost identical to the Elinchrom Ranger Quadra. The Elinchrom pack, however, seems infinitely more robust with it’s rubberised edges and properly weather resistant control panel whilst the head is both simple and tiny. Connecting the two is a sensible and nicely made piece of cable with easy to use fittings. I have just been and tried the “heavy winter gloves test” and can report that it is very easy to attach and detach the cable with them on.

At this point I had better introduce a small criticism, lest anyone think that I’m doing a PR puff for the manufacturers. I like to attach my packs to the stand to give a bit more stability in the wind and the Lumedyne packs had very functional ‘D’ rings at either end that allowed you to attach a strap and anchor the pack to the stand. The Elinchrom Ranger Quadra pack has well made but small eyelets through which you have to slot either a large split ring or the small karabiner type ring that was supplied with my kit. Neither is a good solution and I will be on the lookout for a better way of attaching a small strap.

Whilst I’m doing the criticism thing, I have an admission to make: I wasn’t all that keen on the battery catches when I first got the kit. I found them to be stiff and not easy to use. Something has happened and I’m now completely fine with them. Maybe they have loosened off a touch or I have just worked out my technique. Probably a bit of both, but the end result is that the batteries come on and off nicely now and I withdraw my earlier criticism.

Now in 2012, to be completely honest, my opinion has barely changed. The battery clips have eased a little more and the ‘D’ rings still bug me. The screw caps that cover the two power lead sockets have survived all this time and still work very well and are still attached. I know that Elinchrom have made a few design changes since I got my kit but these three things have not changed at all.

The size and weight of the heads was flagged up as a potential issue by a couple of early reviewers but I can honestly say that 32 months on I have not had any problems other than a bad drop of a head which buckled the small ‘spill-kill’ reflector to the extent that I had to replace the reflector. No damage to the head, the flash tube or the modelling light. I had early reservations about the strength of the stand adapter on the heads and for a while I chose to remove the swivel completely and replace it with a brass stud which then fitted into a Manfrotto Light-Tite. In the end, my worries abated and I went back to the original tilt mechanism.

Not long after buying the kit I experimented with ways of attaching a soft box without buying the Elinchrom adapter. You can see my best attempt in the picture to the left. It was a complete fluke that the spill-kill reflector wedged directly into a blank Photoflex Speed Ring and I still use this IF I need two soft boxes on a single shoot. In the end I gave in and bought it and I now feel rather silly that I didn’t do it straight away. The adapter is a decent option and it works very well with my Elinchrom and Chimera soft boxes.

Thirty-two months down the line and the kit still looks great and works like new. I have looked after it, kept it in decent bags and cases and always put it away properly. The few times that I have used it in the rain, I have used plastic covers made from heavy duty PVC and freezer bags to keep the rain off. There are a few bits of paint missing on the pack and the batteries. The one exception, and the main reason that I chose to write this now, is that the two batteries are starting to lose power. I have no idea how many charge cycles they have been through but it is a large enough number for me to start to think about replacing them. Three years is a good life for this kind of batteries and I’m not going to hold any loss of capacity after that time against Elinchrom. The cables are tough and well made and all of mine are still OK.

In Use:

After a few months I fed some thoughts back to Elinchrom via the folks at The Flash Centre in London and those were:

  1. that the digital display was hard to see in bright light
  2. that lining up the power leads with the sockets was difficult in low light
  3. that the Skyport triggers needed a locking ring so that they didn’t keep popping out of the camera’s hot shoe.

I wasn’t the only person making these suggestions and in an upgrade they fixed the display issue and the Skyport trigger issue as well. But what else did I think back 32 months ago?

MAY 2009: That’s the construction out of the way. What about actually using them? I have read through the manuals for the head, pack and Skyport remote trigger system and it is all pretty logical. If you buy this kit, I would strongly recommend that you go through a few practice sessions before going live because some bits of the menu system are not too obvious without the book. Changing stuff like the duration of the beep that signifies that the pack has recharged or whether the readout is in f-stops or watt/seconds isn’t too much of a problem but switching Skyport channels for the first time isn’t all that easy. Getting the hang of how the asymmetrical flash output works with two heads attached to one pack isn’t something is obvious either.

The manual is well written and it doesn’t take long to master these functions once you know what goes where and which button to press first. It isn’t second nature yet, but that will come soon. Much excitement has been generated by the LED modeling light and the idea that it can double as a video light. I have a pair of Canon EOS5D MkII bodies and am starting to shoot some video with them. The amount of fill light that these LEDs put out is very useful and I would argue that they give the Elinchrom a really strong market advantage over other systems. The real joy of this system is the light that it puts out.

The light quality is great in every measurable way. Every flash at a given setting gives out an identical amount of light and the colour of the light doesn’t change when you dial the power up or down. The colour temperature of the tubes seems to be about 5300K and so I have set up a custom balance on my cameras for that. The only light modifier that I’ve used with it so far has been an Elinchrom 40″ (100 cm) shoot through umbrella and my gut feeling is that I will use this combination a lot over the next few weeks. The maximum power output is 400 w/s and for my money that figure is accurate. More importantly, it seems to be more than 1 f-stop more powerful than my old Lumedyne 200 w/s outfits. There could be any number of reasons for this but the outcome remains that I have more power at my disposal than I had before. Having the audible charge indicator is great and being able to turn it off is also a bonus. I have already made use of that function on more than occasion. The recycle time is a little slower than the Lumedyne 200 w/s kit and I found on the first couple of shoots that this was a possible issue. It has gone away now and I am getting used to the extra half second delay – especially when using the audible indicator.

The final point that I wanted to make was about the Skyport system. The pack has a Skyport receiver built-in as well as a synch socket (3.5 jack) and an optical slave. My kit came with a single skyport trigger and I have bought a second one along with a receiver that will work with either a Canon speedlight or one of my old Vivitar 285s. The system seems to work very well and I am not missing my Pocket Wizards enough to get them out of the boot and connect them up. My only criticism of the Skyports is that the transmitters don’t lock into your hot shoe and can be knocked out relatively easily. I’d like to see a transmitter with a lever style lock on the market from Elinchrom so that the system is foolproof rather than just very good.

In practice, 400 watt/seconds is quite a lot of power. Whether it is enough for every eventuality is debatable but in 32 months I have only found it wanting (by a stop or two at most) on two occasions and even then I made it work. Most of my work is portraiture and most of that is lit with this system and I have a real confidence in the kit that makes doing my job a lot easier.

If I were designing this system from scratch I would probably have not bothered with the complete miniaturisation of the heads. I think that I would have gone for a larger head with the standard Elinchrom bayonet fit and a stronger tilt mechanism. Of course that is based entirely on the way that I work and what I use the kit for. I have got used to the tiny heads and, for me, it would make sense for Elinchrom to bring out a version of the head built into the larger Ranger housing as well as this small version. That would eliminate any issues with adaptors as well as maximum umbrella size. It would also remove the need to only use Elinchrom’s own narrower shafted umbrellas.

The newer version of the Skyport trigger solved one problem and introduced a different one. It now stays in the shoe nicely but the words are now moulded in instead of being painted on which makes actually changing some settings quite tricky in low light. I’d also prefer a slightly larger version of the trigger with easier to change channels, a battery level indicator, AA or AAA batteries and at least 50% more range.

In my 2009 review I was confident that I would learn all of the functions and not need to bring the manual with me. I was WRONG. I have never completely mastered the menu system and I have a paper version of the instructions in the case as well as a PDF version on my iPhone. I don’t need to consult it often but when I want to do something in the menu it is helpful to have the manual there with me.

Conclusions:

In May 2009 I was “a happy bunny”. Not much has changed there. Actually, nothing has changed there.

I have some minor niggles but I still love using the Elinchrom Ranger Quadra and I would still advise any photographer in the market for a portable battery powered system to strongly consider it. In value for money terms, it is hard to beat. In light quality terms it is excellent and it passes the most important test of all – it is portable enough to actually take with you, even if you are a photographer working alone and a long way from the car.

If the folks at Elinca came to me with their notebooks and asked me to advise them where to take this system next, I’d be very happy to talk to them. This is a 9/10 product for the kind of work that I do. I have even used my own kit a dozen times when teaching location lighting courses with groups of six to eight people and nobody has managed to break it. I’m glad that the version two pack is better than my nearly three year old one which makes it even easier for me to recommend. There are half a dozen accessories that I would find useful – ranging from an adapter to be able to use a Canon or Nikon Speedlight with the Elinchrom bayonet mount accessories to a properly fitted rain jacket for the pack and a mains AC battery eliminator for when I am using the kit indoors for long periods.
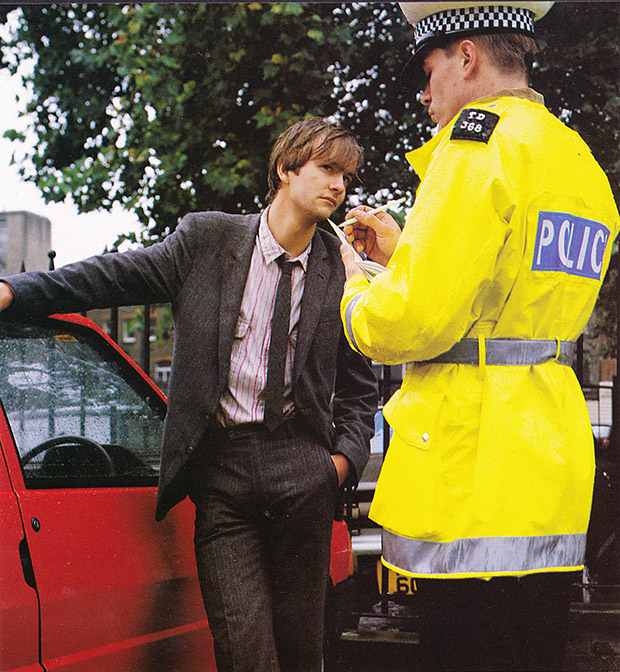
Posed by model – my revenge…

Jez Coulson is a great photographer and he is one of my oldest friends in the industry. We went to college together, shared a house and even started a business together – you get the picture, we are friends. A few days ago he was obviously looking through some old pictures and stumbled across one of me that he shot for a brochure. I was “posed by model” playing the part of a young, upwardly mobile, business type talking loudly on his old Motorola mobile phone on a train back in either 1987 or 1988. You can read his blog post here.

The thing is that we often acted as models for each other’s commercial shoots – which was a good way to put a few pounds in each other’s pockets when we were starting out. It happened all of the time and we used a lot of other friends and colleagues for the same purpose. We didn’t really do it on editorial shoots (unless the pictures were captions “POSED BY MODEL”) and definitely not on news jobs.

Anyway, Jez posted a picture of a twenty-something me in a suit so I thought that I’d do the same. This was a brochure for an insurance company who covered employees against legal issues and this picture shows Jez leaning on a car that happened to be parked outside our office (no idea whose it was) being given a good talking to by another friend, Peter Anderson, wearing a rented traffic police uniform. Enjoy…

©Neil Turner. London, March 1988

©Neil Turner. London, March 1988

Geek stuff: Shot on 5″x4″ colour transparency Fuji RDP film on an Arca Swiss View camera with a 150mm Rodenstock lens, available light.

BMX Rider: Contact Sheet

©Neil Turner. Ringwood, Hampshire. 2011

©Neil Turner. Ringwood, Hampshire. 2011

This was a set of pictures shot on location as part of a “how to do it” technique piece for Photography Monthly magazine. The idea was simple – use flash to make something very cool from some sort of active sport. I was put in contact with the tier, Keegan Walker, through a young photographer that assists me from time to time on commercial shoots and we arranged to shoot at the skatepark near where they both live which is about ten miles from my own home.

I used a couple of Canon EOS5D MkII cameras with 16-35 f2.8L, 24-70 f2.8L and 70-200 f2.8L IS lenses as well as the excellent Elinchrom Ranger Quadra flash system supplemented by a couple of Canon 580exII Speedlights with Elinchrom Skyport receivers triggering them. There were plenty of clamps, gels and light modifiers in use too – including my rather lovely modified beauty dish and the equally great Chimera 24″ x 32″ soft box.

The sky at dusk is my favourite backdrop for all kinds of shoots and the May evening sky provided us with something special to work with. Keegan is pretty good at what he does and I had to ask him several times to actually get less height from the ramps so that my pictures looked better! Two hours on a nice evening messing around and shooting pictures is a pretty good way to make a living. The unfortunate part of this particular commission was that I had to write the words that described exactly what I had done and how I had done it. One day I will get around to reproducing the whole piece for you.

Every picture teaches a lesson

©Neil Turner. Poole, Dorset. September 2008

We all know that “every picture tells a story” but how many people think that, as photographers, every picture teaches us a lesson. Grab a picture – any picture – and really look at it. What’s good about it? What could you improve if you went back and re-shot it? If it’s perfect, why is it perfect?

I spent a lot of time yesterday shooting on mixed light with no real option of lighting the scene (a busy retail mall with dozens of shops and lots of people). Looking back at the best of the shoot this morning I could see that every frame had one major feature: one thing that was the single most important part of the composition and it was obvious that I should always get the white balance right there and let the rest of the scene do what it will. I already knew this but it doesn’t hurt to look and re-affirm what you already know.

Every time you shoot pictures and every time you look at other people’s work you can learn lessons. If you don’t know how something was shot – see if the photographer will tell you.

Look for the big four factors: subject matter, composition, light and technical quality. Work out how those factors come together to create the whole. Work out if the picture still works if one or more of those factors is deficient. It’s amazing how often the most eye-catching images are not perfect in every way and it is equally interesting that some pictures that score full marks in all categories just seem boring and “too good to be true”.

Analysing your own work on a regular basis is a great way to get better. Getting together with others and discussing each others work is great too but, for my money, going over your own work on your own is a fabulous way to find your style and motivate yourself to do better and better.

Observational, interactional and ‘dictational’ photojournalism

If you believe the old saying, “there is more than one way to skin a cat” and if you want to carry that thought over into photographic journalism there is definitely more than one way to shoot a story. If you listen to some debates about photojournalism you would find that hard to believe but regular readers of my opinion pieces about photography will know that I am a big fan of the ‘black to white, left to right theory of just about everything’.

©Neil Turner. Bournemouth, Dorset. 11 minutes past 11 on the 11th of the 11th 2011

The idea goes like this: imagine a line from one side of a page to the other and that one extreme of something is placed at the left hand end of that line. Now imagine that the opposite extreme is placed at the right hand end of that line. For illustrative purposes, let’s make those two extremes black on the left and whit on the right. What have you got in between? Every tone of grey that you could imagine. You can have one smooth gradient or you can have it in steps – it really doesn’t matter but what you will have is a smooth transition from one extreme to the other. Salt to sweet. Short to tall. Narrow to wide. It really doesn’t matter.

So how does this translate to different ways of shooting photographs? We are talking about photojournalism here and so I’d like to place “observational” at the left hand end of our imaginary line and “interactional” in the middle with dictational at the other end. That’s the easy bit. What exactly are these three approaches and what else sits along our line?

Observational photography can be defined as a ‘fly-on-the-wall’ approach where the photographer is an almost ghost like figure who tries to have little or no impact on the situation and their subject matter. Some types of street photography where the photographer tries their best to remain unseen and unnoticed are classic examples of observational photography. Some would argue that a lot of sports photography fits these criteria too – after all, the cameras are there but nobody is changing their behaviour for them for 90% of the event. By definition observational photojournalists don’t seek any meaningful contact with their subjects whilst they are shooting and most would eschew contact once they have finished taking the pictures either.

Good photojournalism is nearly always accompanied by good and accurate captioning – which is easy if you are photographing a Manchester United game or the Olympic 100 metres final because the participants have names and/or numbers on their kit and they are all famous athletes. If you are taking pictures of people running from an approaching storm then you would like to know who they are and where they are heading but the only way to find that out is to ask. I can remember a number of occasions where I’ve shot lovely street photos whose value as works of curiosity is pretty high but whose value as a piece of photojournalism is a lot lower because I didn’t have the details of the people in the pictures. When I was young and keen I regularly followed people and plucked up the courage to get their name. These days I tend not to shoot the picture if having no details for the caption devalues the image.

So that’s observational photojournalism dealt with. What about it’s interactional cousin? This is where I’m happiest. Shooting pictures with the full knowledge and either permission or acquiesence of my subjects in ways that allow me to interact with them whilst maintaining the integrity of the pictures is, for me, the gold standard. You can tell stories, relay passions and miseries and generally get under the skin of people. Interesting people. By interacting with your subject the nature of your pictures changes and they will have a lot more of you and a lot more of your subjects soul in them.

Back to that pesky scale… you have observation at one end and interaction in the middle and dozens of shades of whatever you would call it in between. Then there’s the final form of getting the pictures: dictational – where you tell your subjects what you want them to do and then shoot it but I’d find it hard to label that as photojournalism at all. I’ve put it there on our scale miles away from observation and a fair distance from interaction too.

Let’s say that observation is the black on our scale and ‘dictatorial’ is white. What colour is interaction? 18% grey of course! (photographer joke – if you don’t get it, I apologise)

The anguish of editing your own pictures

©Neil Turner. London, January 2011

I’ve written about this kind of thing many times but it seems to come to the forefront of my photographic consciousness over and over again so I hope that you will forgive me if none of this is new.

There are a lot of great reasons why photographers have to edit their own work. They are the only ones who truly know what was shot, why it was shot that way and how well the pictures reflect the situation. For news photographers the idea of someone else doing their edits is, largely, a far-fetched and even unwelcome notion. It is happening more and more though.

Some of the big wire agencies and more progressive newspapers are using direct wireless transmission from cameras to editors on big sports and news jobs where the time between shooting the pictures and getting them to market is absolutely critical.

If, however, time is not quite so much of an issue photographers like to sit down and go through their own pictures, make their own selections, add their own captions and prepare the files for delivery. That’s how I’ve worked for the last fifteen years or so and even before then I was often in charge of my own edits because that was how things were done.

Every once in a while (mostly on commercial shoots) someone else edits my pictures. I find it both liberating and scary in equal measure. The liberation is that I get to concentrate on shooting pictures and the scary bit is that someone else gets to see everything – the good, the bad and the downright indifferent. What if they miss the subtlety of that amazingly constructed picture on the second memory card? What if they don’t appreciate the ultra-shallow depth of field that I grafted so long and hard to realise?

There’s a good counter-argument to that of course: If a professional editor doesn’t get what I was trying to do, neither will the client, neither will the designer and neither will the viewer. There are some pictures that you take on almost every shoot that are there for you and for you alone. That is true but every once-in-a-while those pictures do get used. Every once-in-a-while somebody else gets your vision and loves the ‘weird one’ as much as you hoped that they would.

Editing your own work is a tough thing to do. Try editing a full set of someone else’s pictures and you will realise just how easy it is to be dispassionate and just how readily you are able to discard pictures that don’t work. Editing your own work can be a minefield. Every step can bring a very tricky decision. What about the pictures that you have a personal emotional connection with? What about the pictures that you have overcome huge technical challenges to secure? What about the pictures that don’t actually add to the edit or make sense as part of a set?

Taking a shoot and making sense of the pictures from that shoot is a skill that very few photographers ever truly get right. Those that do are blessed and really lucky because they avoid the regular pain and anguish of having to ignore their own ‘babies’.

I have four things that come into my mind every time I am struggling to decide about a single frame: light, composition, subject matter and technical quality. If all four are right the picture goes in. If three out of four are right it will probably make it too. Less than three and that’s where the anguish begins…

Think Tank Hydrophobia

Ever since I managed to soak one of my Canon EOS5D MkII cameras at an outdoor event last summer where it rained hard and non-stop I have been meaning to get my hands on a Think Tank Hydrophobia rain cover. I finally managed to get around to it just as one of the longest dry spells (work and weather) hit but I have finally given it a run out. The job actually meant using a tripod quite a lot and, whilst the Hydrophobia wasn’t actually designed for this, it all worked out well.

As predicted, I got a proper soaking (cold, wet rain) and I got very cold but my camera stayed dry and kept on working. The version that I have is designed to be used with a 70-200 f2.8 sized lens and it has small sleeves for your hands to fit inside the cover. There’s an option to have a flash unit attached too on the version that I have and so this is a very well designed piece of kit.

A word of caution

Even the best designed kit has a few features that you need to be aware of. The Hydrophobia does a great job and it worked flawlessly but I’d love to see a big sign included in the package telling you to have a few practice goes at fitting the cover before trying to use it on a job in front of clients and/or other photographers. Fitting it for the first time was a fairly frustrating process. Happily I had the sense (too many bad days with soft boxes and tents) to try it first in the warm and dry confines of my kitchen. The second time was in the car and it was actually my third go at fitting the cover when I had to do it in the dark and the rain in front of others. I was still a little ham-fisted but fitting it for the fourth time today so that I had a few pictures to accompany this piece was a (relative) breeze. Practice does indeed make perfect.

What else you can actually say about a piece of kit that is essentially designed to keep your gear dry than “it kept my gear dry” is beyond me. If it came in a tin, it would do exactly what it said on that tin!

So… marks out of ten? For doing its job it gets 10 but for ease of use I’d give it a 5 out of the packaging rising to 7 after four uses and an even higher mark with lots of practice.

Fifteen minutes of low level fame

To be entirely honest it was actually thirty-four minutes rather than fifteen but Andy Warhol’s observation that everyone will be famous for fifteen minutes is a gift of an opening and it’s so much punchier than thirty-four!

The half an hour plus four minutes in question was the time that I spent giving evidence to The Leveson Inquiry into the culture ethics and practice of the British press on behalf of The British Press Photographers’ Association. If you didn’t already know, I am very proud to be one of the two Vice-Chairmen of The BPPA – an organisation that supports and promotes news photography in the United Kingdom.

I have written a short blog about my experiences and there is a link to actually watch a Flash (boo!) video of me in action. This isn’t about self-promotion, its about the important message that I was given the honour of presenting to this important inquiry. Did it go well? Go to The BPPA’s blog site and find out…