technique

Compose the picture and then wait

I have a folder full of images on my hard drive that I use for teaching. They aren’t always my best work but they help to illustrate a point better than others from my portfolio. This is a perfect example of that idea.

Sometimes you can see the potential for a picture but the picture isn’t happening. This is a common issue for news photographers who have to shoot pictures to go with stories about something quite specific but aren’t allowed to set a lot of shots up. This picture was to go with a very small story about an art exhibition that had been put on by some young female artists on a very tight budget. The venue was a shopping centre (mall if you are from the USA) and I could see that some human interaction with the work was the best way to cover it. I grabbed a tripod from the car and stuck my camera on it. Composing the frame was pretty easy and all I had to do was wait for the right people to walk past and look at the work. People came along and I tried various shutter speeds to get some blur in order to keep the ‘focus’ of the story on the art. Soon I was happy with my plan (1/10th of a second at f4.5 on 200 ISO) and I waited, shooting frames as people came past in ones, twos and threes.

©Neil Turner/TSL | London | October 1999

I could see these two women with very similar pink in their outfits coming. I could see that they were in perfect step and so the plan went from the occasional frame to a full burst (about 3 frames a second in those days) and got this shot. Of course I did a few more but the deep joy of those early digital SLRs was that you had great confidence in what you saw on the rear LCD.

The idea remains one that I use over and over again. I see pictures and I compose them around what’s there and then I just have to be patient and wait for someone or something to come along and complete the photograph. You can see the same idea here in an old post about walking with speed lights which has pictures taken a lot more recently!

For those who love detail, this was shot with a Kodak DCS520 camera (1.9 megapixels of class) and a Canon 17-35 f2.8L lens at the 35mm end of the range perched on a Manfrotto 055 tripod (which I still use).

Keeping it simple

The text books will all tell you that there are a number of rules for composing a photograph (or a painting for that matter) and it isn’t a bad idea to follow these rules 90% of the time. Working on a newspaper has taught me that simple compositions often work the best and that there are several ways of keeping it simple. One of my favourites is to work with a small depth of field. The human eye will always be drawn to the subject that is in sharp focus with a simple out of focus background. Usually this will mean that the background doesn’t contribute to the image, but every so often an out of focus background forms a really important part of the image.

©Neil Turner/TSL | Southampton | August 2001

This picture of three year old boy at a nursery school learning about some creatures that had been brought into the school is a perfect illustration of how throwing the background out of focus gives an enormous boost to the composition and helps to tell the story of the image. The chameleon is in focus, but because the lens (180mm on a 70-200 f2.8 zoom) was wide open at f2.8 the boy becomes an interesting blur. The added 1.6x focal length multiplication brought no change in the depth of field but narrowed the angle down to a 35mm equivalent of 288mm. On this particularly sunny day that meant a shutter speed of 1/4000th of a second on 200 ISO.

Techniques are there to be used, altered, modified and adapted. This one should become really useful to you once you have mastered it. When you are struggling to make an interesting composition it’s always worth considering narrowing your depth of field.

Space makes you think

In general I am a fan of tighter compositions, but there are some subject matters that are just crying out for space. A large area of foreground or background can lend an enormous amount of emphasis to an image. Placing a small subject in a large space helps you to tell a story. If you place a person in one of the bottom corners you might suggest loneliness or vulnerability, whereas placing them at the top may well imply the opposite.

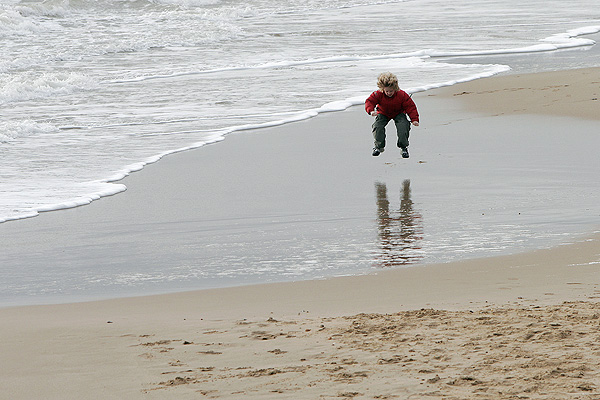
©Neil Turner | Bournemouth | January 2005

This photograph of a child playing on the beach in the winter suggests that he is really enjoying his freedom. The photograph was taken from quite a height (maybe 25 feet) to isolate the sand from the confusing background and the fact that he is nearer the right of the frame suggests that he has a lot more room to head into. The oldest rule about composition – the rule of thirds – is being observed.

If the space around the child in the photograph was full of details then the impact of the composition would be lost. You would inevitably give the image more than one subject and spoil the simplicity which is the real secret of the picture. Of course if the child’s mother was in another area of the otherwise empty frame then that would give another message altogether, the space would still be making you think – but differently.

Cluttered photographs are much harder to pull off, simple images are often more effective and this image proves that simple doesn’t necessarily mean tight.

Advice for UK freelancers

Yesterday and today have been largely spent doing accounts. Three months worth of VAT return and my tax return for 2010/2011 (year 3 as a freelance this time around). I feel pretty confident that I have got the numbers right thanks to a combination of decent invoicing software (Billings), some easy to use spreadsheets (Numbers) and a very nice calculator that was a free gift from Canon a few years ago (thanks Canon UK). All of this software and hardware is great but the one piece of advice that I would give to anyone starting out as a freelancer here in the United Kingdom is to book yourself onto as many of the free workshops and seminars that Her Majesty’s Revenue and Customs lay on as you can.

When I was having a month off between leaving my staff job and starting out as a freelancer I managed to get myself onto three of these very handy courses. The first was led by a former Tax Inspector and the theme of the seminar could have been subtitled “how to avoid getting a visit from one of my former colleagues”. The other people on the course were a couple of cab drivers, eBay traders, a golf teacher, a musician and a freelance administrator. Put simply, it was a half day course on the basics of being self-employed:

  • What records to keep
  • How to invoice people legally
  • What you could set against tax
  • What you couldn’t set against tax
  • The pros and cons of using a bookkeeper
  • What an accountant can do for you

A very useful day and at the end of it we were given the business card of the HMRC seminar leader so that we could ask him follow-up questions.

The second course was all about VAT and VAT registration. If you aren’t from the EU and you are wondering what VAT is, well it is Value Added Tax – similar to US sales tax I guess. The seminar leader on this one went through the advantages and disadvantages of registering voluntarily for people whose business turnover is below the limit at which you have to become registered as well as the various different schemes for calculating how much you have to pay the Government four times a year. There were people on the course who had no intention of registering unless that were forced to but the course is still useful because we all pay VAT on everything we buy and knowing how the system works is a big advantage.

The final course that I did was about how to fill in your annual tax return. These forms are legendarily complex and half a day spent with an expert gives you a fair amount of confidence that you can do it. Of course the other angle is that knowing about the form makes it easier to deal with an accountant if you use one. Again, the various options are covered and I left that course wanting to use the on-line systems for everything I do with HMRC.

You can get a couple of the course handouts here and you can book courses at your local tax centre on the telephone. Three half-days doesn’t make you a bookkeeper or an accountant but what they do provide is a sound basic grounding from which it is a lot easier to move forward. The vast majority of photographers that I know are, or have been, self-employed and almost all of them would have benefited from doing these seminars.

Two portraits, one poet and a fifteen year gap…

Working as a photographer you often shoot pictures of people before they become famous and then get to shoot them again once they have “made it”. I don’t know if you can really categorise a poet as ‘famous’ but the British Poet Laureate is about as famous as you can get for poetry. In 2008 and towards the end of his term as Laureate, I photographed Andrew Motion at his London home but this wasn’t my first “one-to-one” with him. Back in 1992 when he was already established as a poet, and just ahead of the publication of his biography of Phillip Larkin, I had taken pictures of him at a different London home.

©Neil Turner/Insight | London | 14th September 1992

A lot of people are a lot more accommodating and easier to photograph before they become famous. They are often friendlier, more likely to offer you a cup of tea and are generally easier to work with. That wasn’t the case with Mr Motion. Back in 1992 I had caught him on a bad day – or at least a day when he had far more pressing matters to attend to than getting his picture taken whereas fifteen and a half years later he was well used to being photographed and had developed an easy manner when dealing with people like me. It could be that I was also fifteen and a half years older and more able to handle myself but whatever the reasons, shooting him in 2008 was a lot easier.

©Neil Turner/TSL | London | 28th March 2008

Of course the technology had moved on: in 1992 I was shooting with Nikon F4S cameras and some lumpy f2.8 Nikkor zoom lenses (35-70 f2.8 and 80-200 f2.8) on black and white film. By 2008 I was onto Canon EOS1D MkII and 20D cameras with some lovely L series Canon lenses and shooting digitally. The quality difference is also very noticeable and I wouldn’t want to shoot film on a job like this again.

Archive photo: Special needs school, March 1990

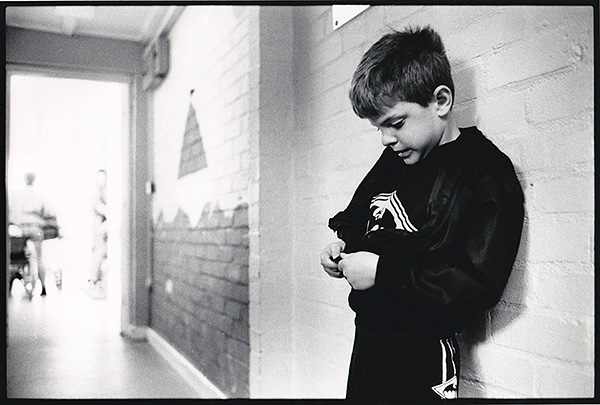
Following on from the March 1990 Conductive Education picture that I posted earlier in the week I remembered another special needs picture that I shot a short while later. As it turns out, exactly four weeks later. This shot isn’t as technically sound or as well composed as the previous picture but it does mean a lot to me – because there is a real story to go with it.

© Neil Turner | 30 March 1990 | Southampton

This boy had a target of learning to do up his own zip and was determined to succeed for the camera. I was touched by him and his determination and so I stayed with him whilst he kept trying. After nearly ten minutes he succeeded and I was very nearly in tears. One of the staff had been watching and she was in tears. I have never forgotten that moment.

For the geeks out there, the camera was a Nikon F3P, the lens was a 24mm f2 Nikkor and it was shot on Kodak Tri-X film.

Folio photo #11: Sir Paul Stephenson, February 2009

Sir Paul Stephenson at New Scotland Yard. ©Neil Turner, February 2009

This portrait was made when Sir Paul Stephenson had been in post as the Commissioner of The Metropolitan Police for less than two hours. He had been acting Commissioner but this was taken when he was actually given the job. This frame was right at the end of the session where I had already shot quite a wide variety of pictures in the time allotted. Having packed 90% of my gear away I was told that I still had a couple of minutes and so I did this picture with a press officer holding a Canon Speedlite off to my left with the head zoomed in to create this pool of light effect. Sir Paul has now left the post but this picture is staying in my folio. Shot using a Canon EOS5D MkII with a Canon 24-70 f2.8L lens and a single 580exII flash triggered by a Canon ST-E2 transmitter.

In praise of Photo Mechanic

Every software package has its fans, its designers and its detractors. If we all loved the same system then there would be no choice. I wanted to blog about Photo Mechanic and to say how much I like it. That isn’t to say that the others are rubbish – that would childish and purile – just that I find this one application suits me and what I do extremely well. So what is Photo Mechanic? I thought that the description on the company’s own website was hard to beat:

Photo Mechanic is a standalone image browser and workflow accelerator that lets you view your digital photos with convenience and speed. Photo Mechanic displays your “thumbnails” in a familiar “contact sheet” display window. Photo Mechanic helps you find the best photo amongst several similar shots in a preview display that lets you flip through a group of selected photos at high resolution.

Photo Mechanic’s super fast browsing enables you to quickly compare multiple images and select the best ones from a sequence. Its powerful batch processing, full support for image variables, IPTC and Exif metadata, make it the perfect tool for any digital photographer.

Before this becomes an advert and a love-in, there are a few tiny issues with the current (4.6.8) version that I’d love to get sorted. The trouble is that we quickly revert to the “love-in” because the team at Camerabits who design, code and sell Photo Mechanic are second-to-none when it comes to listening to the views, issues and suggestions of their customers. Got a problem? Email Camerabits and nine times out of ten they sort it the same day and the other one out of ten times sees a resolution in the next upgrade.

Screen grab of a Photo Mechanic "contact sheet" window.

Anyway, what do I use it for? Photo Mechanic is the package that I use to import RAW images from my memory cards, edit out the bad pictures, IPTC caption, batch rename, edit again and then send the selected RAW files to my RAW converter of choice (which happens to be ACR in Photoshop CS5.5 but that isn’t important right now). Once the files are converted there they are right back in Photo Mechanic where I can save them to a separate folder, create HTML web galleries, burn discs, FTP or email images to clients or pretty much whatever I might need to do with photographs.

I can hear people saying that there are plenty of packages that can do all or some of the above and even ones that remove the need for a separate RAW converter – all true, but that misses the point. I want my workflow to be fast, repeatable, adaptable and generally hassle free. I want to rely on the trackpad or the mouse as little as possible and have a good, strong set of keyboard shortcuts instead. Bingo – that’s what I get from Photo Mechanic.

In an earlier post I talked about how teaching helps you to get your own practice right and this is very true with using software. If I had to work without Photo Mechanic tomorrow I have a good knowledge of Apple’s Aperture and a very good knowledge of Lightroom and I would never try to dissuade anyone from using those packages. Having had to buy and learn other software has made me appreciate what I have.

The Camerabits website says that version 5 of the software is due in the early part of 2012 and that there will be a separate but interconnected cataloguing application available too. That’s two things from my wish list sorted out – all we need now is a version of Photo Mechanic for the Apple iOS and that would be another thing ticked off that list.