technique

Not the DSLR, I’m having fun

© Neil Turner, March 2014. Shadows on the pavement as a pedestrian passes along Tottenham Court Road.

© Neil Turner, March 2014. Shadows on the pavement as a pedestrian passes along Tottenham Court Road.

Question: Why are so many professional photographers using mirrorless cameras, micro 4/3rds format cameras and experimenting with pretty much anything that isn’t a DSLR?

It’s a tough question and without conducting some sort of major survey I can only give an answer based on my own experiences and those of close friends and colleagues. DSLRs have been my main cameras for over sixteen years now and they have become an extension of me when I’m working. They do what I need them to do with no real fuss, the quality has moved from “acceptable” back in 1998 to “extremely good” and they allow me to do the day job without having to worry about my gear very much. But, and there’s always a ‘but’ – they have become a little bit boring and little bit ‘too good’.

When I’m shooting pictures for the joy of it (and despite doing this for a living since 1986 I still do that) I want to feel something different. Elegant competence isn’t enough any more. (more…)

Hard light portrait

©Neil Turner/TSL, September 2007.

©Neil Turner/TSL, September 2007.

Not long after I took redundancy from my staff job at The Times Educational Supplement I spent several days putting together a collection of possible portfolio pictures. I was a long task as I’d been there for over fourteen years and when I eventually published my folio on line I had cut a couple of hundred photographs down to thirty. Whilst I was looking for something else today I came across that folder of 223 pictures and had a good root through.

Like most adventures down memory lane it reminded me of things that I’d forgotten and the story behind this picture immediately jumped into my mind. The lady in the portrait is a blind sculptor originally from Iran who was by this time married to a British teacher and living in south-west London. I have posted a portrait of her on this blog before when I discussed two surprisingly similar portraits that I’d made. This frame from the set has some of the harshest lighting that I’d ever used and it jumped out at me when I was looking today because I rarely use that kind of light any more. I guess that’s partly due to the nature of the clients I work for now – PR and corporates who don’t want anything as edgy as this was – and partly because my first instinct isn’t always to get the lights out any more. Even when I do light portraits I don’t mess around with the light as much as I once did. This goes with my Twitter #PWOTD which is TESTING

Techie stuff: Canon EOS1D MkII with a 70-200 f2.8 L IS lens at 70mm. 200 ISO 1/250th of a second at f8. Lumedyne flash.

Pools of light technique from 2008.

Every time I post one of my old technique examples I get a massive spike in the visitor figures for this blog. Despite some of them being fifteen or more years old they still seem to attract quite a bit of attention. This one is being re-posted after a specific request from a reader and I’ve added a second photograph at the bottom for a little ‘added value’.

©Neil Turner/TSL, May 2008

©Neil Turner/TSL, May 2008. 1/180th of a second at f4, 200 ISO

I was inspired to share the “how” for this picture because of a comment from a colleague who said that I had been “lucky to find such a nice pool of light”. I was amused, annoyed and complimented all at the the same time because I created this light and he obviously thought that it looked as if it was a natural effect. Much of the best lighting looks as if it were not lit… so how was this one achieved?

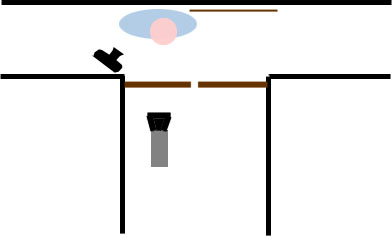
I had been asked by the picture editor to get a good range of portraits of this man who is the Vice President of a company that handles examination papers. The logo was needed in some frames and this plate screwed to a wall in a corridor was the only one on offer. The layout was like this..

Single flash the other side of the door

Single flash the other side of the door

The brown lines that you can see on the layout are fire doors – big heavy wooden doors with three small square glass panels in each one. The Lumedyne flash unit with a Pocket Wizard receiver on was placed outside the door and the door was closed. The subject was lit entirely by the hard, un-modified flash coming through those three glass panels. Lining up exactly where the light will fall is very easy – if the subject can see the flash head, then it can see them. After that it is just a question of shooting a couple of frames and judging on the camera’s LCD screen where the light is falling and then raising, lowering or moving the flash accordingly.

In this case the flash is about ten degrees above the subject’s eye line and he is looking almost directly at it. This allowed me to get the nice hard shadow behind his head and still have a reasnably flattering light on his face. I also tried to do a few rames where the ambient light in the corridor (see below ) was making the shadows softer but I much preffered the hard treatment.

©Neil Turner/TSL, May 2008

©Neil Turner/TSL, May 2008. 1/10th of a second at f4, 200 ISO.

Technical Stuff: Canon EOS1D MkII with a Canon EF16-35 f2.8L lens.

Another ‘classic’ technique posting from the old site

The idea here is to have two separate lighting set-ups for one interview portrait without having to constantly move around the room adjusting lights. This interview was with a senior businessman who chairs a body that decides how much teachers’ pay rises will be each year. The reporter wasn’t all that comfortable with me shooting through the interview but it was what the picture editor wanted, so that’s what I did. This job required a bit of quick thinking so that I could get two different set-ups in place.

©Neil Turner/TSL, April 2008.

©Neil Turner/TSL, April 2008.

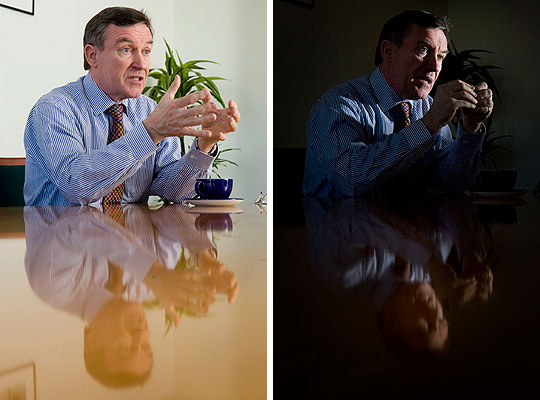
The picture on the left was lit using a single Lumedyne head at 50 joules bounced off of a wall almost in front of the subject. The image on the right was lit by a single Canon 550ex flash gun with a Honl Photo snoot attached aimed directly at the subjects face and set further away from the camera.

Both flash units were fitted with Pocket Wizard receivers set on different channels from each other. The idea here is that by simply switching between channels on the transmitters I could switch between two very different lighting styles without moving.

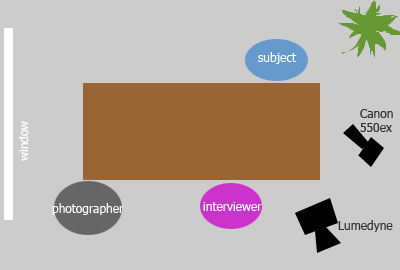
The left hand image is far more evenly lit. The large expanse of off-white wall made a very good and large light source. The exposure here was 1/60th of a second at f5.6 on ISO200. There was some available light play – without flash the scene would have been two stops under exposed with that amount of flash. You can see from the diagram below how the room was laid out and the flash head was positioned at about 10 degrees above the subjects eyeline.

The right hand image is far more starkly lit. The exposure was 1/250th of a second at f13 on ISO 200. There is almost no available light in this picture and the lighting effect is dramatically different. The very narrow angle of the light offered by the Honl snoot makes it difficult to always get the subject right in the centre of the small pool of light and so you need to be careful when aiming it to centre it on where the subject is most likely to be.

The layout of small conference room where the interview took place.

The layout of small conference room where the interview took place.

The point of this technique is that you can arrange more than one style of lighting and then switch between them at will simply by selecting a different channel on the trigger. I find that I use the Honl snoot a lot more than I had imagined that I would. It fits into a bag very easily and it is simple to use. When you are in complete control of the lighting, it’s very easy to achieve dramatic results. This style of light might not be to every picture editor’s taste and so the evenly lit alternative is a very good idea.

A fourteen year old technique post

Between May 1999 and June 2008 I posted a large number of technique examples on the original http://www.dg28.com taken from my daily work to show how I used light in an era where digital cameras were pretty poor at ISOs over 800 or even 400 in the case of the venerable Kodak DCS520. These days flash is a creative choice rather than a technical necessity but the techniques still stand up. From time to time I re-post one of these old examples just to remind myself how life used to be. This one was first posted fourteen years ago and for a very long time it was amongst my favourite pictures that I had posted.

©Neil Turner/ TSL, November 2000.

©Neil Turner/ TSL, November 2000.

At the time it felt as if I spent every evening answering follow-up questions about the pictures and techniques that I’d described. These days there are thousands, if not tens of thousands, of people publishing ‘how-to-do-it’ photography blogs but back then there were only a small number of us. It was such an exciting time in our profession. Anyway, here’s the post as it appeared back in November 2000:

Arriving at the job is usually the best times to start having ideas about locations for a portrait. Buildings often have features that lend themselves to use in a photograph, and the grounds can be just as inspirational.

When I arrived at the Suffolk farmhouse of journalist and author Simon Barnes, he and his wife were busy chasing one of their horses around the yard. By the time the mare was back in one of the stables it was all but dark, but I had seen just how wonderful the other stable looked lit by the 60 watt bulb inside it. 

This image called for the mixing of available light and fifty joules of Lumedyne flash. The flash head had it’s diffuser cap over the standard reflector at an angle of 60° from the lens axis and at a height of about six inches above Simon’s eye level. I had to use the flash a lot lower than I would have done because I wanted him to keep his hat on and the if the flash had been higher his face would have been in shadow from it’s wide rim.

Cut down to it’s minumum 50 joules at a distance of seven feet the flash reading on 200 ISO was still f6.7, which was a lot more than I would have liked. At f6.7 the inside of the stable needed an exposure of about 1/3rd of a second, and the sky needed 1/2 of a second to get some detail in the lighter areas. The discrepency between the two exposure requirements was only half a stop, so I went with the longer exposure because a little over exposure inside the stable would be fine. 

With a 28-70 f2.8L series lens on a DCS520 I started shooting pictures of the upper half of his body and a little of the stable roof and sky. Without changing the exposure I changed lenses to the 17-35 f2.8 and moved back. As I moved back the sensor floodlight came on and the light shining into the lens gave some strange pink flare (bottom right) and the floodlight made an excellent element in the composition. By this time I was hand holding the camera at 1/2 second, which meant that there would be some camera shake so I shot about twenty frames at the same exposure in the hope that a few of them would be still enough to work. 

I shot some safer images as well with the inside of the stable lit by another Lumedyne head complete with a warm up filter to simulate the tungsten glow. The image worked really well, and I am more than happy with it. It shows that light and location are the most important factors when planning a location portrait.

Footnote: Immediately after this job I started to carry a sheet of -2 stop neutral density gel in my bag. I have learned lots of lessons the hard way since the beginning of my career in 1986 and, whilst they are fewer and farther between, I still learn plenty of things that way.

Zooms Vs Primes

©Neil Turner, October 2014. Shooting my own shadow with a 28mm f1.8 lens.

©Neil Turner, October 2014. Shooting my own shadow with a 28mm f1.8 lens.

Talking and writing about photography on the web seems to have become a whole series of two sided contests. Sometimes it is interesting and a genuine dichotomy (Nikon Vs Canon, Mac Vs PC) where there are absolute direct comparisons to be made and a range of technical and personal preferences to be considered. At other times they are silly (film Vs digital, DSLR Vs mirrorless) where it is comparing bananas with pineapples. Somewhere in the middle of these two extremes sits the Zoom Vs Primes debate. Everyone has their own views and everyone’s work is different.

An amazing 14 years ago (and 14 years into my professional career) I wrote a short piece about choosing lenses and why you might like zooms for some jobs and then have the ability to choose a focal length for others. It wasn’t all that long before then that I’d had to use primes all of the time because zoom lenses weren’t up to the job in terms of quality. For me it all changed in 1995 when I switched to Canon EOS for the first time and the original 70-200 f2.8L and 28-70 f2.8L lenses which, along with the auto focus on the EOS1N, changed everything for me. For ages the only Canon primes I had were the 20mm f2.8 and 300mm f2.8L and the vast majority of my work was shot between 28mm and 200mm.

I’ve spent a lot of my career in press pens and fixed positions where I cannot move and where it made sense to use zooms lenses to compose but weighed against that I’ve also done a lot of work where I have a lot of freedom to move around and can position myself so that I don’t need to use a zoom to fill the frame – I’ve been able to “zoom with my feet”. Here’s what I said in 2000:

There are two ways that you can choose which of your lenses to stick on the camera:

  1. You can say “there’s my subject and here I am, let’s see which focal length on my zoom works best”.  Sometimes at sports matches and political events you have your position and that is that, or…
  2. You could say “I want the effect that my experience tells me a 28mm lens will give me so I’ll select that focal length and move to the right position to make that happen”.

Either of these could be a valid option and, in many cases, the first is decided for you by circumstance. Most news photographers use zoom lenses because it makes sense to have fewer lenses when you are never quite sure what kind of work you will be doing on any given day.

Personally, I use a combination of both approaches. If a position forces me to choose a certain lens then I’m with option 1. Given complete freedom to shoot what I want I’d go with 2. More often than not I’ll go with, say a 24-70mm lens intending to shoot at the 24mm end and get in a position to shoot that way. I will shoot several frames and then start to move around, zoom in and out and shoot a variety of similar images, each with subtle differences. I try to make a point of shooting with just about every focal length available to me on every job. Sometimes I am right about lenses first time but often I’m not. What had seemed like an obvious task for the 28mm ends up being a spectacular 200mm shot and vice-versa but the result is that you often end up with images that are just that bit better.

I nearly always shoot on location so I cannot preplan every detail. Going equipped with a range of lenses is vital. Your choice of lens will depend on so many questions running through your mind. How is this image going to be used? Big, small, upright, horizontal, front page? Double page, back page, website, magazine or newspaper? Is it going to have copy running over it? Will it have more than one usage?

If I cannot answer any or all of those questions, then I’ll shoot every variation I can. Shall I start with a long lens, if it’s a portrait then being further away may relax the subject and I’ll get in with the wide when they are more comfortable. Background, what’s behind them? Can I use a change of lens get rid of a poor background?

Answering self-set questions and making compromises is the key to news photography. Choosing the right lenses helps to reduce the number of technical compromises that you are forced to take, giving you more time to make the creative compromises that you want to make.

So has anything changed in the intervening years to make me come back and have another look at this debate? Yes – several things:

  • The resolving power of the camera chip is now so great that lenses need to be sharp to get the most out of that resolution
  • The amount of pixels crammed onto a chip means that you can “zoom by cropping” in a far more aggressive way that you could ever do before and still end up with a file easily large enough for a wide range of uses
  • Zoom lens quality has improved
  • The choice of super-high quality prime lenses has become far wider
  • The quality of digital images means that how a specific lens renders out of focus parts of the frame has become an issue for a lot of people
  • Photographers are constantly seeking ‘an edge’ and to challenge themselves to see their work differently in an era where we all have much the same gear

This debate has raged and it has ebbed and flowed. I’m not necessarily talking about how the worldwide photographic communities have seen it here, I’m talking about my own psyche and what happens every time I pack a bag to go and shoot some pictures. I love the discipline and the way that having three or four prime lenses in a bag makes me think but I have the it when I have primes and cannot move around as much as I’d like to. Short of taking three zooms and four primes on every job (I don’t have an assistant and my fifty year old spine would buckle under the weight) it is always going to be a compromise. Today I’m shooting an editorial portrait where I have plenty of time and it will be just me and the woman that I’m photographing so I’ve packed the primes. Yesterday I was at a job where moving around wasn’t an option and I went with just two zooms.

My internal debate doesn’t end there though. I am always looking back through my work and being self-critical and, if I’m being entirely honest with myself, I am probably a better photographs with zoom lenses. There, I’ve said it. Much though I love using a 135mm f2 I shoot better pictures eight times out of ten with a 70-200 f2.8. The same goes for the 28 and 50 against the 24-70. How can I ever hold my head up in the company of some of my favourite photographers who never use zooms now? Luckily they are all people who don’t care what you use as long as you get the pictures and the rest of my favourite photographers are shooting 99% of the time with zooms anyway.

It turns out that this is a silly debate after all because we are photographers whose goal is to produce the best and most interesting, creative, exciting work that we can within the bounds of what is possible and what is required. I’m going to persevere with my little bag of primes because I want to. When in doubt it will always be the zooms for me – aren’t I the fortunate one to have the choice?

You learn something new every day

It is one of the universal truths of photography that you never stop learning. Almost every time you pick a camera up something happens that you squirrel away in your memory banks that will make a difference to how you shoot something else at some time in the future. Normally these are small things but this week I was shooting the wonderful Talvin Singh performing at an arts festival and something happened that made me scratch my head because I’d never experienced anything quite like it.

©Neil Turner, October 2104

©Neil Turner, October 2014

The two pictures above were taken within a fraction of a second of one another under ‘exactly’ the same lighting without flash and with identical settings (manual everything apart from focus) on the same camera with the same lens and have been processed through Adobe Camera RAW identically. So why are they different? The answer seems to be LED stage lighting. You might conclude that both pictures are ‘quite nice’ and move on but that’s not really an answer when you are shooting something that has a moment that you absolutely have to capture. I’ve had issues with un-balasted HMI lighting and of course strip lights but this was in another ‘issues league’ entirely.

It appears that these brand new lights installed in a state-of-the-art theatre are an absolute nightmare for stills photography. Now that I’ve experienced this, I have been reading up on it and it seems to be a known phenomenon where the lights cycle between the red, green and blue LEDs in the light at a speed that the human eye chooses not to detect but that a camera shooting at shutter speeds of 1/125th of a second or higher has a real problem with. The higher you go, the worse it gets. Of course you could shoot at 1/60th of a second and all would be reasonably well – apart from any movement being a little/lot blurred.

Being a complete anorak I decided to shoot a series of tests at an even higher shutter speed (having first racked the ISO up a way) to see what happened:

©Neil Turner, October 2014

©Neil Turner, October 2014

That makes shooting under these lights at the kind of shutter seeds you need to freeze action nigh on impossible. Once I had realised that there was an issue I dropped down to 1/100th of a second and then to 1/80th and shot lots of frames. The first five frames above were shot at 1/400th and the last one was at 1/100th – what a difference.

Most of what I have read about LED stage lights concerns white balancing – well that was the least of my worries here. It was almost as if shooting with shutter speeds in excess of the cameras maximum flash synch speed (the highest speed at which the entire chip is exposed at the same moment) was part of the problem. The LED stage lights in this theatre were effectively pulsing or flashing and the only way to get a consistent image was to work with that pulsing and use shutter speeds below the maximum flash synch. I have read something on what appeared to be a well-infomed website which implies that this only happens when the lights are dimmed – which makes some sense. I haven’t got enough experience with this to work out whether the speed thing is a coincidence or whether it is directly related but I now know how to shoot in this one venue with these lights.

Shooting with shutter speeds that are a long way below “ideal” some of my pictures were sharp and many weren’t – but the job got done. Constant reference to the screen on the back of the camera is frowned on by a lot of people but this case proves that there are times when it is exactly the right thing to do. Imagine having had to shoot this on film with no LCD…

Presumably more and more theatres and venues will use these lights and the problem will grow. Maybe there’s a solution out there already?

©Neil Turner, October 2014.

©Neil Turner, October 2014.

Techie stuff: Canon EOS5D MkIII with a 70-200 f2.8L IS Canon lens. 1/100th of a second at f3.2 on 2000 ISO. WB set to daylight but adjusted in Adobe Camera RAW removing quite a bit of magenta and adding a small amount of yellow.

Tonality – the black & white conversion app

Screen grab from Tonality 1.1.1

Screen grab from Tonality 1.1.1

I was intrigued by a recommendation that I read from a colleague for Tonality. I rarely go outside Adobe Camera RAW these days, even for black and white conversions, but I was tempted to have a go at something new and so I went to the Apple App Store and bought it. After a few attempts at fiddling with it I dismissed it as a very interesting application that I would master one day when I had the time. A few days ago I was asked by a client to convert a lot of images supplied to them as colour Jpegs into mono Jpegs with a slight tone over them. In the past I would have gone straight back to the RAW files and started again but I had the idea of giving Tonality a go.

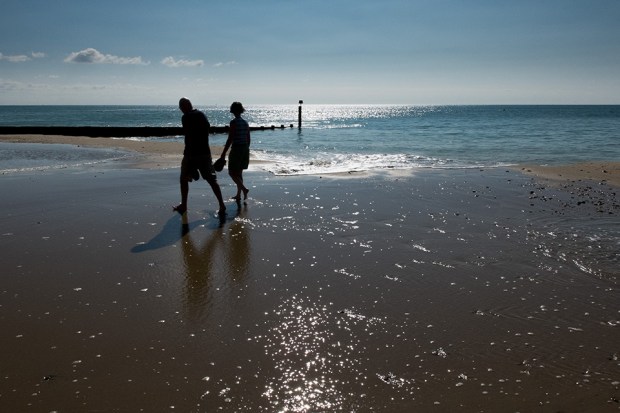
Like so many of the corporate jobs I shoot, the client would rather I didn’t show they images on my personal blog and so I grabbed some other interesting pictures from my ongoing personal work and applied the same sort of presets to them. It had taken me less than five minutes to become familiar with the sliders and controls and probably another five minutes to create the ideal and very subtle split toning effect that the client had been asking for. The two versions of a photograph taken on the beach at Bournemouth that you see below were a quick test for this blog post. The colour image is a Jpeg converted from a Fujifilm X20 RAW file in Adobe Camera RAW and the black and white version underneath was converted into black and white using the “adaptive exposure” auto setting in Tonality from that Jpeg.

©Neil Turner, September 2014. Bournemouth.

©Neil Turner, September 2014. Bournemouth.

©Neil Turner, September 2014. Bournemouth.

©Neil Turner, September 2014. Bournemouth.


I don’t know what you think but I am really impressed by the job that the auto has done and, whilst I could fiddle and get it even better, I am more than happy with it. I can hear you saying that this is also easy to do in Photoshop (and quite a few other apps and plug-ins) but the point is that it was done in Tonality and it was really easy. The application is capable of a lot of good stuff as well as a lot more completely over the top special effects that I wouldn’t touch with a barge pole.

When I get more time, I’m going to get right under the skin of this application. Until then, it will be used on my personal project work. If a client asks for toned mono images again, I will definitely look as using Tonality for that too.

The UK price is £13.99 – which is a little bit dearer than most Apps that I would buy just to have a play. It’s a very simple app that achieves its goals.