camera

On test: Vanguard Heralder 38 camera bag

When somebody offers me the chance to try out a new camera bag that is winning awards all over the place, I normally jump at that chance. An email from the people behind the Vanguard range of bags arrived in my inbox a few weeks ago and the Heralder 38 arrived at my home shortly afterwards. I have tried so many rucksack bags and been disappointed with the compromises that you have to make in order to get portability and so I keep coming back to shoulder bags – despite the best advice of people who know about back pain.
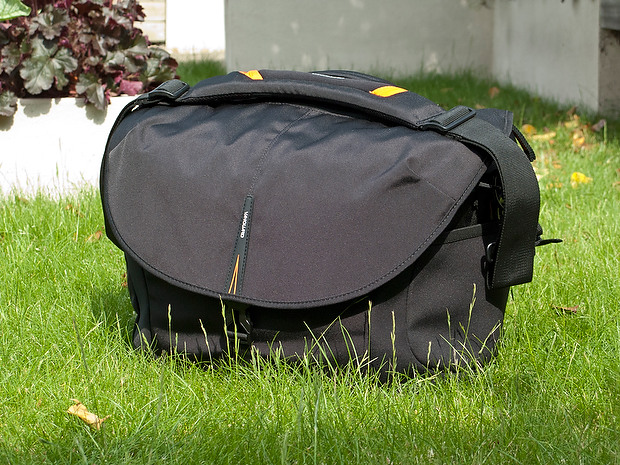
The Vanguard Heralder 38 camera kit + laptop shoulder bag.

Lets put this bag into some sort of context: I have used a Lowe Pro Stealth 650 as my main “carry everything” shoulder bag for many years now and I am used to it, quite like it and would buy the same again to replace it if Lowe Pro hadn’t done what they seem to love doing – which is to take a perfectly good design and “improve” it. The old Stealth 650 that I have is a good bag but the new Stealth 650 is really annoying!

Anyway, back to the review: The way that I test things is to use them in my everyday work and so the amount of testing depends entirely on what I’m up to at any given time. The last couple of weeks have been relatively quiet but I have had enough days out with this bag to have made a lot of important decisions about it. From my own experience of reading reviews, I know that a lot of people skip straight to the end and because of that there will be a “conclusions” section at the bottom.

Most people want their camera bags to be smaller than they need to be, to weigh less than the total of everything that they want to jam in, have super-easy access, look great and to be a joy to carry for several hours. I guess that’s why nobody has ever found the perfect bag. It’s impossible to make that bag on a commercial level because we all have subtly different needs and so the word compromise rears it’s head AGAIN!

What can you get in the bag?

If this bag is going to become my everyday carry everything bag then it needs to swallow my standard amount of kit: Two Canon EOS5D MkII bodies, 16-35 f2.8L, 24-70 f2.8L and 70-200 f2.8L lenses, two 580exII flash units and all of the bits, pieces and accessories that go to support that kit in the field. I also need to put either a 15.4″ Apple MacBook Pro or an 11″ MacBook Air plus gadgets in from time to time. The good news is that everything fits in and the bonus is that I can just fit the 70-200 standing up with its lens hood in place (I hate having to remove and reverse hoods every time you put a lens away).
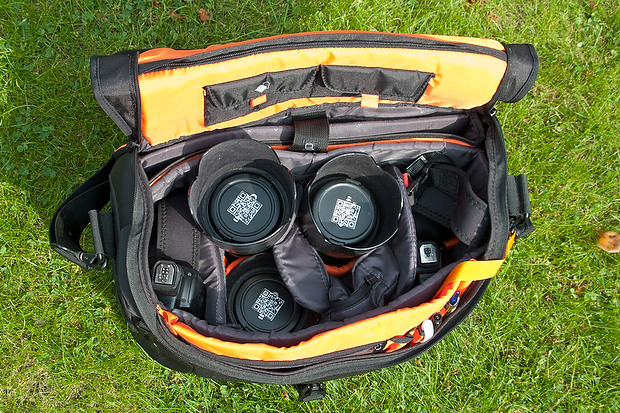
The Heralder 38 showing how my standard kit is laid out when loaded into it.

The bag itself doesn’t have too many pockets and hiding places for anything other than relatively small or flat items such as pens (x3), memory cards (x4) notebooks, passes and business cards. What it does have is a removable pouch which holds a couple of spare batteries for the camera, a couple of spare sets of AAs for the flash units and an electronic release for the camera. Because of this pouch and the excellent use of space within the main compartment of the bag the Heralder 38 passes this test rather comfortably – even with a laptop and related accessories on board.

Ease of Access
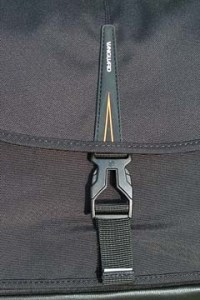
That less than perfect clip…

Shoulder bags are nearly always nicer to work from that rucksacks or rolling cases. I prefer my bags to have a simple method of closing them whilst working and a more secure method for securing the contents when I am simply travelling. The combination of a zip around the whole lid and a single snap-shut clip on this bag meets that requirement too. I suspect that the designers of this model have looked at the old LowePro Stealth bags and decided that they were on to something before designing their own similar solution.

It’s at this point that I found my first ‘issue’ with the Heralder 38. I like to be able to close the bag in work mode one handed. Every Domke and LowePro I have ever owned has the ability to do this in common and the Vanguard looks as if this wouldn’t be a problem either. So far I have struggled like mad with the plastic snap-shut clip fitted to this bag and I cannot work out why. I cannot seem to line it up as easily as the more square ones on my LowePro or on the Think Tank roller that now carries my lights everywhere. I’m still trying to master this clip and failing.

Beyond that niggle, getting kit in and out of the bag whilst moving is as easy as it has ever been on a bag that I’ve used. If they could source a less trendy looking clip I’d be well on the way to proclaiming this bag a massive success.

Carrying the bag

This is where the Heralder 38 comes into its own. Somehow they have made this a superbly comfortable bag to carry. The strap is excellent and the shape of the back of the bag means that it sits on my hip incredibly well. Vanguard have gone some of the way to fooling me into thinking that I am carrying less dead weight than I actually am and that is a huge advantage for this bag when comparing it to the other bags of a similar size that I have owned and/or tried out. Put simply, this is an easy bag to carry – possibly the easiest I’ve ever used.

Extra features

All bags these days come with clips and straps that allow you to attach tripods, monopods and other large and unwieldy accessories. To be honest I never want to be in a position to have to do that and so the bits an pieces that came with this bag that allowed me to do that were removed (where possible) and put into a cupboard.

The bag features lots of handy labels…

What the bag does have (in common with my old LowePro) is a rain cover tucked away in the back of the bag that can be fitted to keep the contents drier than would otherwise be the case. We are in the middle of a spell of beautiful weather here in the south of England and so I haven’t had a chance to test the rain cover yet but I can tell you that it is fast to fit and easy to pack away again. The great news is that it is detachable too – which is a big tick from me. I have had other bags where the rain cover is permanently attached – which means that when it stops rainy you have to leave it out to dry or pack it away wet.

The bag comes with a very stylish luggage tag and an elasticated end pocket that fits a small bottle of water rather well. As someone who carries his bag on the left shoulder, the elasticated pocket is on the wrong end but that’s just a small niggle and not a deal-breaker!

Looks and construction

I guess that when you design a camera bag you have two choices: you either go down the “it’s a camera bag so it should look like one” route or go the other way and design something that looks like a normal holdall. This bag is squarely in the former camp – to the extent that it would be hard to imagine that it was anything else. The black water resistant materials are of a great quality and the plastic base appears to be pretty tough. The orange colour of the interior may be off-putting for some people and I’d prefer something 18% grey myself (like my old LowePro) but it has the advantage of being very visible from a distance and being the colours of The BPPA.

The quality of the stitching and the fabrics tells me that this bag should last a long time. If they put a better snap-shut clip on the bag I think that they will have the whole construction sorted.

Conclusions

This is a very good bag. It is OK to look at, swallows a lot of kit and is easy to work out of. It appears to be well made and the biggest selling point for me is that it is supremely comfortable to carry. The number of distributors for these bags seems to be growing and a quick search of the internet found the best price is as low as £124.98 at Amazon– which is good value for money as far as I’m concerned.
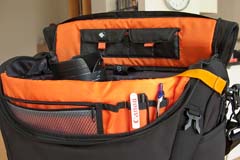
The Vanguard Heralder 38 in use.

So far I only have one real niggle: the snap-shut clip. Beyond that, for the first couple of days I thought that a couple of external pouches would be useful for when I have a few extra bits but I suspect that would alter the superb balance and usability of the bag rather than enhance it.

So that leads me to the big question: “Is this the best bag in its class that I have ever used?” The answer is very close… for portability and comfort of carrying the answer is a big yes. For ease of working is a marginal “no” BUT the bag that I would say beats this one has been modified by LowePro and the new version isn’t as pro’ friendly as the old one and so, if you needed to buy a shoulder bag to carry a decent amount of kit along with a laptop, I don’t know of anything that would beat the Vanguard Heralder 38. I haven’t found the camera bag equivalent of the holy grail yet but there is every chance that it is just a myth anyway.

Beach huts in the winter

A few months ago I wrote about shooting a magazine feature about “walking with speed lights” and promised to say a bit more in time. well, a promise is a promise…

There are days when I just want to go out and take pictures. Most of the time it really doesn’t matter what I’m shooting – as long as I can get my teeth into making the pictures as good as they can be. Winter in the United Kingdom can be pretty un-inspiring and if, like me, you love shooting people outdoors it can be a tough job getting people interested in being out in the cold – especially when there’s a strong chance of getting wet and probably having to be wrapped up in unflattering bad weather gear. A few months ago, in preparing a ‘technique” piece for a photography magazine I decided to go for a walk. The thing that made this an unusual walk is that I took some flash gear with me – nothing too heavy, a couple of Canon Speedlights and a couple of lightweight stands in a simple sling bag – and I decided to shoot anything that I thought would look better with the addition of some off-camera flash.

©Neil Turner, November 2010 – Bournemouth, Dorset.

I tried lots of different pictures but it was this composition that made me happy. One of my favourite spots growing up was a small headland between Bournemouth and Christchurch called Hengistbury Head where there is a nature reserve and a path to some of the coolest beach huts on the planet. On a wet winters day you meet plenty of people walking their dogs and some very hardy bird-watchers.

Great locations are nice but I could have chosen to do this walk almost anywhere in the country and it would have been possible to take interesting pictures. When I’m in London I often walk the canal toe-paths or wander through Epping Forest to see what I can see. Location isn’t as important as the attitude that “something is going to catch my eye”.

The wooden chalets that line the spit are all painted in different colours and no two are alike. What I had wanted to do here was to use flash to make one hut stand out even more from the rest and so I walked along until I saw a very nice one in a muted yellow.

The “normal” exposure here would have been 1/200th of a second at f5.6 on 200 ISO but the skies would have been washed out and I couldn’t achieve my self-set goal. The trick here was getting enough power from two Speedlights to give me a flash exposure of f11 so that I could let the background and sky go two f-stops under exposed.

I found this hut with something right next to it where I could hide a flash. Just along the beach was a freshly painted blue hut that had its own tuft of grass – which was perfect cover for a couple of speedlights. With two flash units simply sitting in plastic bags on the sand and on ¼ power each I played around with composition and with angling the two flashes at different angles before coming up with one of my favourite images of the day. The exposure was 1/200th at f14 on 200 ISO and that allowed me to pick out the single hut better because the flash units were so close to it. The rules of flash fall-off mean that if something is two metres from the light source, and perfectly exposed, anything else that is four metres away will be exactly two f-stops underexposed which plays directly into the hands of anyone being creative with light.

Selling my EOS7D + BG-E7 grip

Selling great condition Canon EOS7D body + BG-E7 grip for £900.00 inc VAT

I am selling my Canon EOS7D body complete with BG-E7 grip. It has been a third/fourth body since new and has had light use because of that. The lure of the EOS5D MkIII is strong and I will be upgrading my MkII bodies later this summer. If you are interested in knowing more about this camera get in touch.

The selling price is £900.00 and that includes VAT. I have the original strap, instruction manual, charger and a single battery included with the camera or you can opt for the Op-Tech strap that I have been using it with. No boxes, no discs and no other cables I’m afraid.

The camera is in Bournemouth but I am regularly up and down the M3 on jobs and so may be able to make other arrangements.

The best lens for portraits?

On a photographers’ forum last week there was a lot of discussion about the best lens for portraits. Can of worms opened. Mac vs PC or Nikon vs Canon style debate well and truly started.

I have written before about portrait lenses and I won’t bore you with repeating my previous post (if you missed it, catch up here) except to say that when people ask this question they normally mean headshots or mug shots where the subjects head and shoulders will fill most of the frame.

©Neil Turner, February 2012. Bournemouth.

This portrait of a local artist was shot using an 85mm f1.8 Canon lens wide open but what lens should you use for this kind of picture. The debate will rage and answers anywhere between 85mm and 135mm (all measured on full-frame cameras) will be given, supported, doubted and even ridiculed. Most arguments that don’t get broad agreement also don’t have a simple answer. Sure there’s something lovely about the feel of a portrait shot on an 85 but what about the degree to which you have to invade the subject’s ‘personal space’ to get the composition? What about those 85mm lenses where the close focus isn’t good enough to get that bit tighter still? With a 135mm lens the personal space issues largely go away and the close focus issues almost always go away too – but is the effect as nice? Can you ever include something of the environment in those pictures? Would you even want to?

The actual answer (as always) is that it depends on you, your technique and your own taste in pictures. A few weeks ago I was looking back at some corporate headshots that I had shot and I had to tell another photographer on the other side of the world how I had shot them so that he could replicate them so that when his pictures and my pictures were printed on the same page nobody (hopefully) could tell that two photographers were involved. One of the things I needed to give him was the focal length of the lens used so I got the pictures, went through the EXIF data and noted it all down. I had used a 70-200 f2.8L lens and so the actual focal length was between 120mm and 130mm.

I was a little surprised that it was that long and so I grabbed a folder of images that I keep on my hard drive of corporate portraits to show prospective clients some examples of what I have done in the past and looked through the EXIF on those. These were pictures that, by definition, I really like and it quickly transpired that the tighter compositions were all shot between 120mm and 150mm on the 70-200. Again, quite a surprise – I had always seen myself as an 85mm lens user!

Well, one thing led to another and I decided to do a quick ‘audit’ of all of my favourite environmental portraits to see what lenses I have favoured. This was less of a shock because in the folder of 120 of my favourites the widest lens used was 16mm (on a 1.3x crop body, so we’ll call that 21mm for the purposes of this exercise) and the longest was a 300mm (on a 1.6x crop body which becomes 480mm in this context). There was a lot of bunching in the 35-45mm area and some more around the 120-150 area but the spread of focal lengths was otherwise pretty even – which pleased me greatly because it confirmed what I always say to others;

“There is no such thing as THE perfect portrait lens”.

This exercise is a bit time-consuming but it could have a lot of uses in professional photography. For example, anyone used to zooms wanting to buy a couple of prime lenses should think about going through the exercise to help them decide which ones would suit their style. Anyone wanting to know what lenses to replace as a matter of priority in these cash-strapped times could also benefit from a focal length analysis. The reverse is also true – a photographer who wants to change the way they do stuff could see what they normally shoot with and deliberately avoid those focal lengths. The possibilities are endless once you start to think and we can all do with a bit of style analysis from time to time. How we choose and use lenses has always been a preoccupation of mine and this exercise has helped me to rationalise that.

Indeed why stop there? EXIF data is amazingly useful and so you could also do an aperture comparison. My quick one revealed that I shoot a surprisingly large amount of pictures using three apertures f2.8, f8 and f22. In my sample, those three apertures accounted for over 50% of my pictures. I’m not sure what to make of it but I will work it out one day.

©Neil Turner/TSL. January 2008, London. 173mm focal length on a 1.3x crop body = 225mm

What started out as a simple answer to a simple question somehow turned into statistical analysis. Many people would say that is the exact opposite (they might even use the word antithesis) of what we, as creative people, should be doing. I have a lot of sympathy for that argument but, in a world where there are tens of thousands of great photographers vying for work, every little advantage we can eek out for ourselves and every piece of information that we have to work with could just be worth it’s weight in fluorite glass.

A nice request for a picture

A few weeks ago I received a lovely email from the widow of a philosopher that I had photographed back in 1996. She had been looking through some of his papers and found a cutting from the Times Higher Education Supplement that had an interview with him along with my portrait of him. She saw the tiny 8 point byline and knowing that search engines are wonderful things she tracked me down. Emails went back and forth and today I got a photocopy of the cutting in the post.

I don’t have much of the work that I did between 1994 and 1998 but her luck was in and I had a Kodak Photo CD with some half decent scans from the job in my loft. It was an easy enough task to find the CD, grab the relevant image from it and get it ready to send to her. The old Kodak Photo CDs used an unusual and proprietary format that Photoshop doesn’t recognise so if anyone else comes across this issue I can confirm that the old Graphics Converter application will happily handle the format and convert your files into useful formats such as PSD, TIF or JPG.

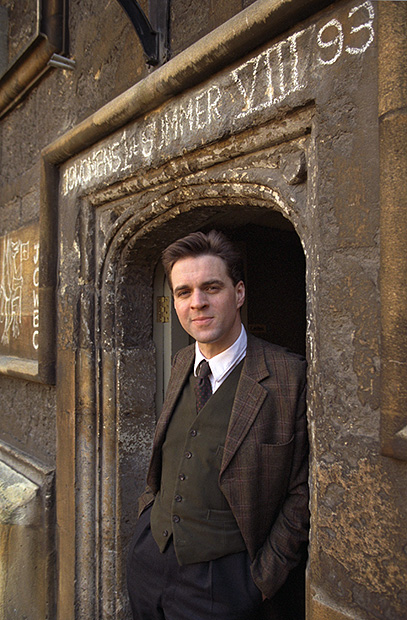
Like most photographers I get regular requests for ‘free’ pictures and I am always wary but somehow a hand-written note from the widow of a very nice man where the words “please” and “thank you” chased away my cynicism rather easily. The portrait is of philosopher and Oxford Professor Bernard Williams (he became Sir Bernard a while after I shot the picture) and here it is…

©Neil Turner/TSL. Oxford, October 1996

Geek footnote: I was using a pair of Canon EOS1n bodies with Canon 28-70 f2.8L and 70-200 f2.8L lenses at the time and this was almost certainly shot on the 70-200. The film was Fuji 200 ISO colour negative scanned on a Kodak RFS scanner.

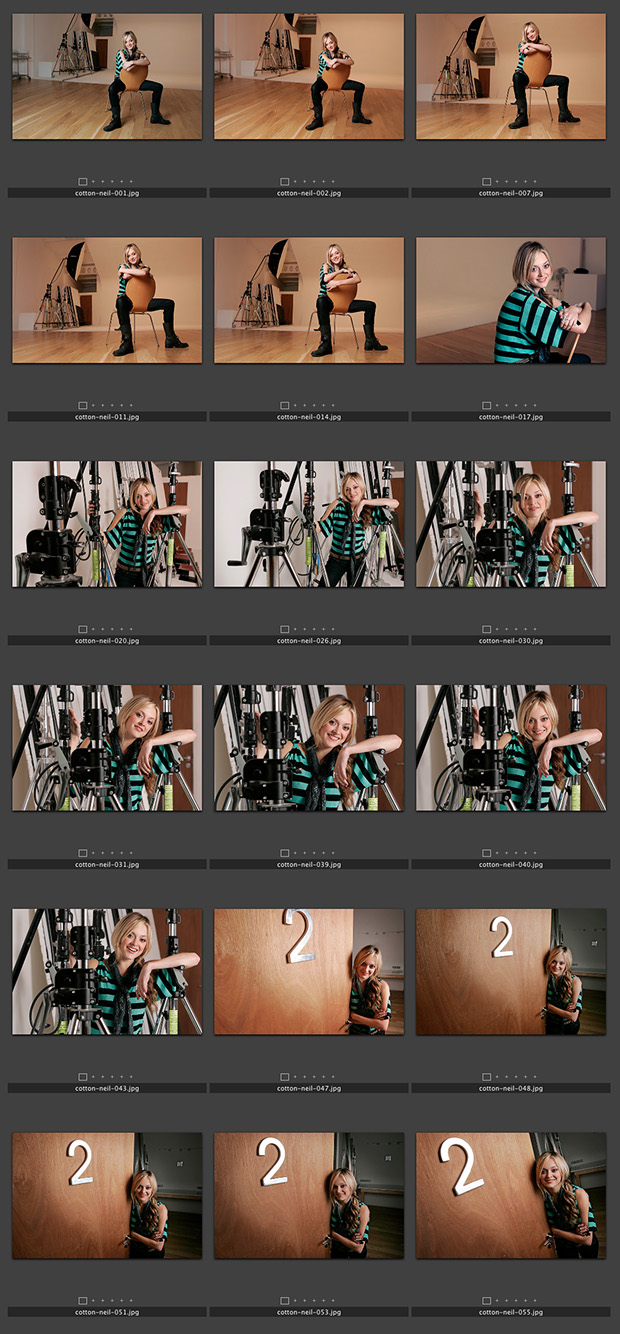
Fearne Cotton – The contact sheet, October 2004.

Back in 2004 Fearne Cotton was enjoying a very rapid rise in her profile and her career was really taking off. The TES Magazine had done an interview with her for their “My Best Teacher” feature and I was sent to a studio in west London to shoot a portrait to go with it.

©Neil Turner/TSL. October 2004, London.

It turned out that it was a hire studio where she had been shot for a BBC magazine earlier in the day and they were (rightly) less than happy about another photographer coming in and piggy-backing onto another shoot. In the end we reached a deal where I shot using all of my own lights in the main studio and in the dressing room as long as I was in and out in twenty-five minutes. I think that the shoot in the studio was over in less than ten minutes and the whole job was completed in fifteen. Fearne had had a long day and the weather outside was dreadful. Neither of us wanted to prolong the job and, even at an early age, she was such a good professional that it was a very successful shoot.

These portraits were shot using a Canon EOS1D camera with 16-35 f2.8L, 24-70 f2.8L and 70-200 f2.8L lenses and lit using a single Lumedyne Signature series flash kit with a 24×32 inch Chimera soft box. The job was shot in the days when I was happy to shoot JPEGs straight out of the camera.

Niall Ferguson, 1997 portrait.

When an email from Channel 4 television landed in my in box with an advertisement for an upcoming and very interesting looking) new programme “China: Triumph and Turmoil” presented by a gentleman called Niall Ferguson. I knew that I’d photographed him before. A quick trawl through my catalogue confirmed that I had indeed shot a portrait of him in 1997 when he was an up and coming star of academia – a professor of History at Oxford University at the age of 32. He was actually born in the same year as me and I was amused at the time by the way he was dressed in the academic uniform of tweeds.

©Neil Turner/TSL. Oxford, January 1997.

I can very clearly remember shooting this portrait. I had driven to Oxford to do another story and the picture desk had rung me and asked me to drop what I was doing, dash across Oxford to do the portrait and then go back to the feature shoot in a primary school. That was the one and only time that they ever asked me to do this and I remember thinking that this must be one important guy if I was being asked to do that.

Since then, he has written yet more books, starred in yet more TV programmes and been seen as a talking head on dozens of television shows. He is clearly still a star of the academic world and obviously a clever chap. His website came up on a quick Google search saying “Niall Ferguson endorses Mitt Romney for President”. Hmmm?

Geek stuff: Portraits shot using two Canon EOS1Dn cameras with 28-70 f2.8L and 70-200 f2.8L lenses on Fuji 200 ISO colour negative film scanned using a Kodak scanner onto a Kodak Photo CD. The software for extracting the PCD format images doesn’t seem to be available any more but Graphics Converter does a wonderful job of extracting a TIFF or a JPEG from the old files.

Note: I need to start wearing my glasses more. The web page for the Channel 4 programme says ” … apparatus” referring to the Chinese state but I read it as “… vast asparagus” – I am getting old!

Neil Innes in his pond…

From the days when he provided musical accompaniment to the Monty Python team and had his own hysterically funny television show I had always been a Neil Innes fan. Being called Neil myself I guess that I have always paid special attention to other Neils anyway but Mr Innes didn’t need any of that.

©Neil Turner/TSL. August 1999, Suffolk.

When I got the call to go and shoot his portrait I was delighted – even if the person on the picture desk had no idea of who and what he was. His home, at the time, was in Suffolk and when I arrived he greeted me as if it was him who was getting to meet a long standing hero. We had coffee, talked about all sorts of stuff and when we finally got around to shooting portraits he simply asked me “do you want funny or not funny?” I answered that a bit of each would be cool and we started with some simple head shots.

Within ten minutes “not funny” had become boring and so he grabbed his wellingtons and stepped into a lovely ornamental Japanese style pond in the garden (I believe that his wife was a garden designer and the whole place looked great) where he proceeded to fish with a small net.

It was amusing enough to watch him but if this were a video you’d now be listening to silly squelching noises and a completely bizarre and impromptu song that made sure that I was actually unable to take pictures because of the tears of laughter streaming down my face.

Photographers often write about what a privilege it is to meet some of the people we meet and to go to some of the places we go and I absolutely agree. Every once-in-a-while you also get a little private performance from a truly talented artist that money couldn’t buy and this was one of those priceless days.

Geek stuff: Shot on a Kodak DCS520 digital camera with a Canon 28-70 f2.8L lens, available light, 1/60th of a second at f6.7 on 200ISO. Converted to black and white prior to publication in August 1999.