technique

Three important things

Many, many years ago I started to post technique examples and opinions on my website. By 2002 I had about fifty articles on the site and over the last couple of years I have been recycling many of them because I still thank that they are worth reading. None of it is unique wisdom and much of it can be found in the form of YouTube videos by other people. I like to think that I was marginally ahead of the curve back then at least. Here is one of my favourites…

There are many things that help make a great photograph – a good photographer, the right equipment and luck can all play a part but there are three things that, in different proportions, are absolutely essential.

  1. Light: Possibly the most important element to making an ordinary photograph into a good one.
  2. Composition: Getting all the right elements in the right places.
  3. Subject Matter: It’s true that what you are photographing can very easily make the difference between good, very good and great pictures.

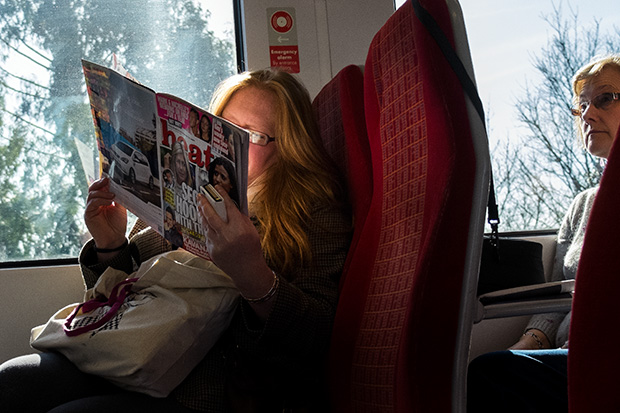
Light: You not only need the right quantity of light, but the right quality and direction of the light are vital too.

  • Too much light can be just as much of a problem as too little. A picture that relies on shallow a depth of field for it’s impact will be hard to achieve if there is too much light to work with wide open lens. Of course if there is too little light to freeze the action when that’s vital to the picture, that’s also a problem.
  • Many pictures rely on hard shadows and extreme contrast for their effect and others need even and soft light to make the photograph work.
  • What direction the light is coming from in relation to the subject matter is important. Strong backlight will be perfect for some subjects and ninety degree side light will do it for others.

Composition. Whatever else is going on in the picture, this is the element of the total package over which you have the most control.

  • What lens you use is an absolutely critical decision to take in terms of the composition. What you can see through the viewfinder is utterly controlled by this decision.
  • Where you position yourself in relation to the subject is another crucial decision.
  • Confusion is the greatest enemy of clarity! How successful you are in keeping extraneous details out of the photograph has an enormous bearing on the final result.

Subject Matter: All great photographs tell their own story, and that’s just as true for a product shot of ball bearings as it is for Pulitzer prize winning documentary images.

  • If what you are photographing tells it’s own story, then you need to strip the content down so that the story isn’t confused.
  • Some things aren’t that interesting, so you need to add content. Telling the story sometimes requires the photographer to set the context.
  • Photographs don’t always need to be great art. Sometimes subject matter is all, and nothing else matters. If there is only one picture of a vital news event and it’s out of focus and taken from video it may well qualify as a great picture.

Three elements that go together to make great pictures. Sometimes light takes the lead and other times the composition is the most important. It doesn’t matter if one element is dominant, but photographs where all three are well balanced and well done then the image is guaranteed to be a winner.

There is, however, one extra element that you can’t legislate for. Magic. Like many things in photography, you know it when you see it but you cannot measure it or define it. Well composed and lit pictures that have great subject matter are (relatively) easy to come by, but once in a while they have magic too.

Working other people’s files

From time to time I work with teams of photographers as an editor. It’s part of the ‘rich portfolio’ of roles that I have these days. 80% or more of my work is still shooting pictures and that’s great but for the other 20% of my working life I enjoy doing some other photo-related stuff. I’ve written before about teaching and running workshops and one of the workshops that I do is about sharpening up your workflow. For me the best way to help others improve their workflow is to sit down with them and go through how they work and then refine what they already do rather than to throw everything out and start again.

Editing other people’s work is a whole other matter. Imagine being in a deadline driven environment where you have several photographers all shooting RAW and where you have to occasionally grab their memory cards and do some of their edits for them. On one recent job I handled CR2 files from Canon EOS1DX, EOS5D MkIII and EOS5D MkII cameras as well as NEF files from Nikon D4S, D4, D3S, D3, D800 and D610 cameras over a two week period. Some of the cameras were left on factory settings and others had been set up by their owners to the point where none of the settings were left unchanged. RAW files obviously allow you to return the completely unchanged state but I am a believer in the idea that you trust the photographer to have made changes on purpose and to respect those changes wherever possible as you come to edit their files.

The old, old Nikon Vs Canon debate morphs into a NEF Vs CR2 debate. As a long-time Canon user myself I thought that I’d find the CR2 files far easier to work with and I was ready to spend far more time getting NEFs right. The biggest shock was that it was entirely the other way around. Files from the latest Nikon cameras can be easy to work with. Really easy. I realised after only a few hours that, as long as the in-camera settings weren’t eccentric, NEFs from the D4, D4S and the D800 were not only easy to work with (requiring relatively few adjustments) but that the quality was uniformly high. In contrast the imported CR2 files from all of the Canons looked a lot less impressive as they landed in Photo Mechanic and then in Adobe Camera RAW. On average, it took more clicks of the mouse (maybe 50% more) to get the CR2s looking as good as they should.

Needless to say, this was quite a revelation. It isn’t as if I hadn’t worked with other people’s files before but this was the first time that I had seen the results of so many different people’s work from so many different cameras in such a compressed space in time. The pictures were all coming from top class photographers and the end results were largely indistinguishable from one another but the route to get there was certainly different. There are way too many variables to draw any definitive conclusions from this but I can say the following;

  • Any reservations that I might have once had about the NEF file format are long gone
  • The results achievable from both NEF and CR2 full-frame cameras are on a par with one another
  • The idea that the colours rendered by Nikons and Canons are inherently different has a small toehold in fact
  • The RAW files from all of these cameras are incredibly versatile and you can get the desired results from either
  • Given the choice I’d go with the NEF from a well set up D4S as the file from other people I’d prefer to work with

Since that event where I worked all of these files side-by-side I have also had a long play with NEFs from a D810 and a D800E. They both require careful handling because of the absence of a low-pass filter over the chip. This gives greater apparent sharpness and a degree of “pop” that is hard to describe but on the flip side it is much easier to mis-handle the files and introduce noise and chromatic problems when using a RAW converter or Photoshop itself. To get around this you find yourself constantly switching between degrees of magnification on the screen to check the effects of any changes to contract, highlight, shadow, saturation or sharpening that you apply. I found this to have a significant slowing effect on my workflow but I also loved the quality of the images produced. The D810 is a camera that I’d happily add to my list of those producing desirable files to work with.

So, NEF Vs CR2? Out of the blocks the NEF files that I’ve worked with over the last few months streak into an early lead but the CR2s catch up along the back straight and they are neck and neck at the line. For now…

Image rescue software

sandsk_rescue_proI just thought that I’d post a very quick note about the free one year licenses that I got with two new Sandisk compact flash cards that I bought today. As someone who relies on their cards for a living it’s great practice to replace and update your cards so every few months I buy a couple of new ones.

Since I went freelance and got to start making my own purchasing decisions almost six years ago I’ve been buying ever larger and ever faster Sandisks. I don’t always buy the fastest or biggest but they tend to be faster and/or bigger than the last batch. Anyway, you get the idea.

This time it was a couple of 16 gigabyte 120 mbps CF cards that work nicely with the Canon EOS5D MkIII cameras each of which came with a one year license for the Rescue Pro Deluxe software. I was prompted to get a couple of new cards because my last one year license for the software expired a week or so ago. It struck me that this is quite a good way for Sandisk to keep me loyal and for me to keep up to date with the software. Every twelve months I need to buy at least one new card and by doing so I keep the software running. By buying two new cards, I now have two computers with valid licenses!

Everyone is a winner.

The joke here is that I haven’t ever had a Sandisk card go wrong on me. I have rescued a card belonging to a colleague (Transcend Card) and I have had some fun ‘rescuing’ a few very old and very small retired cards of my own.  Earlier today an ancient Lexar 512 Mb card threw up some images shot on a Canon EOS1D in 2003 and some more shot on a 1D MkII in 2005. A 2GB Sandisk card went through the process a few minutes later and that had some personal stuff from 2008 along with a couple of jobs from the same year. If I can find the right card reader in the loft, I also have a PCMCIA card dating from 1998!

This could become addictive…

Stage two of the RAW argument

Ten years ago the “should I shoot RAW” debate was raging between all kinds of photographers. Slowly but surely the vast majority of us have moved over to the RAW camp having realised that you not only get better quality but can also save time if your workflow is good enough. OK, so you only get 300 images on an 8 gigabyte memory card but memory is cheap these days and all of the other advantages of shooting Jpegs (unless you are offloading files straight from the camera) have disappeared one by one.

So that’s stage one of the RAW argument out of the way.

Screen Shot 2014-07-17 at 10.39.41

So far, stage two has appeared to be a whole series of “my RAW converter is better than your RAW converter” arguments played out endlessly across social media. Proponents of one system produce videos that “prove” their point of view on YouTube and then those links are posted on Facebook, Twitter and who knows where else until someone else comes along and “proves” the exact opposite. Some of them even try to sell you expensive and largely pointless plug-ins and actions that promise to take your photos and turn them into masterpieces in a single click of a mouse. Is it all valid comment or is it just hot air? I’m leaning heavily towards the latter.

Buying, learning and mastering every single quality converter would be expensive and mind-numbingly dull. Few of us use any software to anywhere near its limitations and some of the claims for various applications go largely un-challenged.

A few years ago people started to talk excitedly about Capture One as being a gold-standard amongst RAW converters. It would have been around version four that I persuaded my then employer to send me on a one-day course to learn the basics of the workflow. It was good. It was actually very good and I bought it (well, my employer bought it for me). Fast forward to version six and I wrote glowingly about it on this blog saying that I really liked it despite a few flaws. Well of course that was comparing it to Adobe Camera RAW in Photoshop as it was then. Both applications have upgraded since then as have Aperture, Canon DPP, Nikon Capture, DxO and a range of others. Each of them has advantages and disadvantages that skilled users of each piece of software can and will point out to anyone who will listen. Those skilled users can also get the very best out of a file using their chosen converter. Capture One Pro 7 is wonderful but so is Adobe Camera RAW 8.5 and so are lots of others.

And here is the first major conclusion – as long as you have the RAW file, you can endlessly go back and rework those files with every new and supposedly better application you try or buy. For the record, I don’t believe that there is anything other than a tiny difference between the best of them when it comes to image quality if the person doing the work has the skills and experience to get the most out of the files or the software. The old “this application is better at recovering highlights” comment that you hear so often is not only subjective but largely a thing of the past. As new versions come out and as new cameras present us with new variants of the RAW formats then differences do become apparent. A quick upgrade to your chosen application and those problems go away again.

Here is the second major conclusion and the principle piece of wisdom that I want to impart: It’s all about the interface. How you interact with the application has a greater influence on what you get out at the end than anything else. Application A does a great job but so do Applications B and C. If you are comfortable with B then choose B and don’t stress about the relative merits of A or C until such times as B can no longer deliver the quality from your files that you and your market demand. Changing workflow and moving to a new RAW converter is painful, time-consuming and throughly depressing (unless you are a geek like me). My heart goes out to the Aperture users who are facing having to do just that at some time in the near future now that Apple have announced that they are stopping development.

As software gets better, the files we process through that software gets better and our workflows become more embedded someone, somewhere will do some “testing” and pronounce that they have the perfect workflow and Groundhog Day will be upon us for the zillionth time.

I sometimes end up working with other photographers files and the difference between types of files is astounding. Canon 5D MkII files next to Canon 5D MkIII files require different handling but the difference between those and something like a Nikon D4S file is astonishing. Not better, not worse but different. Different to the point that you have to tweak your technique. Using the exact same software, workflow computer and set-up the two types of file react very differently to the same treatment. This, ladies and gentlemen, is my third and final major conclusion from stage two of the RAW debate – Not all RAW files are created equally so don’t assume that you can work the same way with them.

Bring on stage three please.

Where does the work come from?

It has been a little while since I last posted on this blog; apologies for this but sometimes life gets in the way of blogging! Anyway, I thought that those who are interested in the business side of photography might be interested in something that came into my thinking on a long drive back from a job listening to a business programme on BBC radio. When I got home I produced a couple of reports from my invoices using the wonderful Billings Pro application on my Mac. The one that caught my eye was one that gave me the raw data to work out how the bulk of my work (based on turnover) in the last six years as a freelance has come in.

Conventional wisdom says that a photographer gets out there with their folio after making cold calls and arranging appointments with potential clients. When I say ‘conventional wisdom’ I mean ‘what they taught me in college’. It is the classic sales tactic: research potential customers, show them what you have to offer and then (hopefully) close the deal at a mutually acceptable price. 99% of photographers and probably 88% or all businesses will probably tell you that it is neither that simple or that straightforward.

I started by working out some categories for the way I have initially got the work:

  • Cold calling and portfolio viewings
  • People finding me via the web
  • Referrals from family and friends outside the photography business
  • Referrals from other photographers
  • From colleagues I knew before going freelance
  • Sub-contracted work via other photographers
  • Other odd sources

I then quickly added up how much work (monetary value) each of those six sections accounted for and got the following results:

monetary_value


The monetary value for each client is based on that initial method of contact. Some high value clients have been very loyal to me and I hope that I have, in turn, given them the photographs that they need to keep those excellent two-way relationships going. On the flip side, most of the work that has come via the web has been one-off jobs for clients who don’t have a lot of work to commission.

Now I don’t know about you, but I found that to be quite a shocking set of results. Only 5% of my income has been generated by getting out there and trying to make sales in what you would call a ‘traditional’ way yet more than twice that figure came from referrals from other photographers. The sub-contract figure at 27% is also a lot higher than I thought that it would be but the biggest surprise is how low the figure for income generated via work from pre-freelancing colleagues. In my first year as a freelance that figure was considerably higher but it has been eclipsed by the friends and family percentage which, at 44%, is somewhat higher than I would have thought. People finding me through the web includes not only those who have found my website through searches but also the various social media platforms that we all spend so much time working on – 4% isn’t a great return on all of that effort either.

If I had the time, I’d like to work out how different the chart would be if I based the figures on the amount of time spent on the jobs rather than the money invoiced. My strong suspicion is that the cold calling and portfolio section would be a fair bit bigger as would the one for pre-freelancing colleagues because those are both news and editorial biased sections whereas the friends and family one is far more corporate and commercial.

So what conclusion should I draw from this? Maybe I should spend less time trying to generate work from cold-calling and spend a lot more time with family and friends? I suspect that the true answer is that I need to change my targets for the cold calling to more corporate and commercial ones simply because they have a higher value per job.

One that didn’t make the folio

©Neil Turner/TSL. June 2008, Hertfordshire.

©Neil Turner/TSL. June 2008, Hertfordshire.

When I was putting a massive “long-list” of photographs that I was considering putting into one of the galleries on my portfolio website I looked at this picture and couldn’t make my mind up one way or the other. I was aware that I already had a lot of images from schools – which isn’t surprising when you consider that I have worked in over 3,500 of them in 15 different countries – and that it didn’t add anything to the mix.

I like this picture a lot because it is simple, demonstrates the use of good composition and shallow depth of field as well as reminding me of the kind of work that still makes me want to get out of bed in the morning and go and shoot pictures. These days most of my school based work is shooting for their prospectuses and websites with the odd news story thrown in from time to time but this remains the kind of picture that has a lot of uses and draws the most comment from those who are commissioning the work.

The truth is that almost anyone could take an acceptable picture of primary school children on a scavenger hunt in an enclosed copse. I hope that it also proves that it takes a lot more to produce as good as this on a miserable and rainy day early in the morning when the light is awful and the gear is getting wet. I have kept a few photographs that didn’t make it to one side and I intend to publish a few of them here on the blog with a bit of the background to why I like them along with a bit of the story.


Techie Stuff: Canon EOS1D MkII with a 16-35mm f2.8L lens at 16mm. Canon CR2 RAW file 640 ISO, 1/90th of a second at f2.8 on daylight white balance and converted using Adobe Camera RAW in Photoshop. At the time it would have been ACR in Photoshop CS3 but the file was re-worked using ACR in Photoshop CC.

Space makes you think – part 2

©Neil Turner, March 2013. Family enjoying an early spring afternoon near Fisherman's Walk in Bournemouth, Dorset.

©Neil Turner, March 2013. Family enjoying an early spring afternoon near Fisherman’s Walk in Bournemouth, Dorset.

A very long time ago when I was studying photography at the Medway College of Design I was surrounded by like-minded and equally obsessive photography students who all wanted to unlock the many ‘secrets’ of great photography so that we could all some-day be someone. We were only a very short distance along the journey (it was the first term of the first year) when we were set a project to shoot an object against a background where the object would be very small and still have great composition and make sense. It was a lesson that I will always remember for two reasons:

  • The first is that I loved it and actually shot four or five entirely different pictures – ranging from a damp and golden autumnal leaf on a grey path to a red balloon against a bright blue sky.
  • The second reason is that during a group critique someone (and I have no memory who) said “space makes you think”.

Space makes you think has stuck with me to this day and as a short and snappy phrase it appears in my thinking and in my discussions on a very regular basis. From the day I learned that lesson and then learned to leave space in my compositions for mastheads, strap line, type and headlines I have always looked for pictures with space. Cropping images really tightly is a great way to shoot some subjects and I remember another phrase from my student days which sums that up too “if an element doesn’t add to the composition then it detracts from it”. That’s also true and that, ladies and gentlemen, is why photography is so enthralling, confusing, infuriating and rewarding. Two ‘rules’ that appear to directly contradict one another that form the basis of one of those secrets that we as students of the art/science/profession spend our lives trying to grasp and the interpret in our own ways.

Rules are there to be obeyed most of the time and broken often enough to make sure that we remain creative in our thinking. That was true back at Medway College, it still is and I hope it always will be.

* Those other “obsessives” included Jez Coulson, David Chancellor, Bill Green, Richard Gosler, Mike Cooper, John Baxter, Richard Ansett and Andy Eaves who, I am delighted to tell you, are all still as obsessed as they were! There were 28 photographers in our year and I’m sure more than those listed above are still plying the trade.

The light on the train

March 2014. Passenger on the train between Bournemouth and London Waterloo reading HEAT magazine as the train passes through Woking. ©Neil Turner

© Neil Turner, March 2014. Passenger on the train between Bournemouth & London Waterloo reading HEAT magazine.


Every once in a while I take the train to London for meetings and the occasional job where I don’t have to carry half a ton of cameras, lights and computers. One of my favourite ways to pass the time is to do a bit of train photography and yesterday’s journey gave me a few nice frames where the light was good. Normally I just bung them from the camera (in this case my adorable Fujifilm X20) via an Eye-Fi card onto my iPhone or iPad and then straight to Twitter or EyeEm. I rarely give them a second glance when I get home but I wanted to post this picture because of the light. The sun was coming at just the right angle to reflect a lot of light back into the woman’s face from the pages of Heat Magazine at exactly the same time as the woman sitting behind her appeared to be getting interested in the page through the small gap between the seats. I have no idea if she was actually looking at the page or whether it was a happy coincidence – either way, the light made me do it!

This frame was taken about five minutes after I’d posted a similar but inferior one on EyeEm so I kept it and decided that it would make a nice “just because” picture on this blog. I’m sure that I’ll get around to writing something more serious soon…