The caption that goes with these photos simply says “Badminton England takes to the streets to celebrate ‘Smash Up!’ a new way to play in schools, featuring music and text message breaks.” The client , Badminton England, asked me to go along and get a range of stills at a video shoot which would be the basis for a campaign to promote “Smash Up!” The idea was simple: take a few of the best young badminton players in the country to a skate park in east London and get them to hang out, play a few rallies and generally have fun.
This presents a couple of challenges that a lot of working photographers would be familiar with:
- Fitting shooting stills around a video crew who have limited time and a lot to do
- Taking pictures that can be used for promotional materials and not just interesting and creative ones
Experience really helps here but so do people skills and it took me a few minutes to work out who was who and what my best options were. There were a lot of skateboarders and BMX riders at the park and they were dressed much the same as the very young video crew. The folks from Badminton England were a bit easier to spot and my plan quickly evolved into one of keeping out of the way when they were shooting the wider video shots and then to get stuck back into the general image grabbing when the video guys were reviewing their work or setting up their next shots.
Very near the beginning of the morning they were shooting some sequences with two of the young badminton stars and three cameras and so I needed to be out of the way. Next to the skatepark is a railway arch with some decent graffiti and so I went with one of the other players and a BMX rider with my lights to see what we could get.
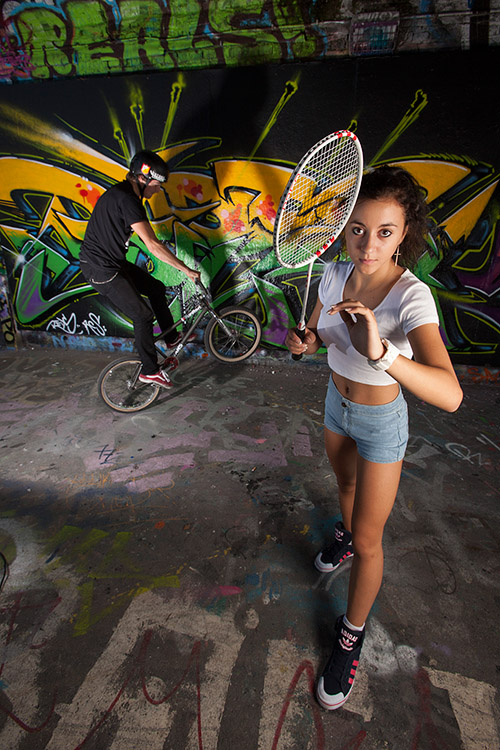
©Neil Turner, August 2013. Young badminton champion and BMX rider in the railway arches.
And this is one of the frames selected by Badmiton England to be released with the video. Reasonably simply lit with a 24″ x32″ soft box on an Elinchrom Ranger Quadra from the right hand side of the picture, the player stands as if she is about to receive a serve whilst the BMX rider who was lit by a second Elinchrom Ranger Quadra with no diffusion messed around in the background. We shot versions of this with both of them in action but this was the better shot for the purposes of publicity. There was almost no ambient light in the tunnel and so the whole shot is lit by the the two flash heads (running from a single pack). The camera was a Canon EOS5D MkII with a 16-35 f2.8L lens at 1/125th of a second f9 on 200 ISO.

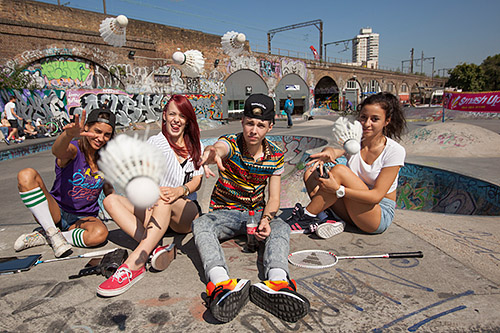
© Neil Turner, August 2013. Rally taking place next to the skatepark bowl.
Most of the morning was spent shooting action as it happened – either staged by the video crew or as it really happened. It was a case of hanging around with three cameras each with a different lens (16-35, 24-70 and 70-200 f2.8L series Canon lenses) and making pictures. The whole shoot was around two hours and I sent the client just over 90 pictures – 70 of which were these grabbed shots and the other 20+ were staged and lit images.
© Neil Turner. August 2013. Messing about at the end of the shoot.
As fun shoots go, this was right up there. A client happy for me to shoot what I wanted and a video crew who understood that we both had a job to do under interesting conditions and with a very strict time limit. The campaign goes live very soon and I hope that badminton gets the boost in young players that it deserves.