Like most photographers I’m always looking at new ways of showing my portfolio. I’ve saved the presentation version of my editorial portraits folio as a QuickTime movie and posted it here. Please let me know what you think. If you look at it without going for the full-sized version the captions are a bit small but, apart from that, I quite like it!
light
Location flash workshop – June 22nd

For anyone who remembers that far back, my dg28.com website started out as a vehicle for me to post updates about the work that I was doing along with some technique examples that I rather pompously called “photographer education”. Well, that was in 1999 and a couple of years later I started doing occasional workshops and lectures about my use of portable flash on location. I have done a lot of talks over the years but, because of my commitments at the London Olympic and Paralympic Games I didn’t take part in any workshops last summer. That is about to change.
In conjunction with the team at Up To Speed we are going to be running a lecture and workshop on Saturday 22nd of June right here in my hometown of Bournemouth. There are two options for anyone wanting to come along: there’s a half day morning session which will be classroom based where we will explore some theory, go through some of the basic techniques and generally talk the talk. For anyone wanting to make it a full day (smaller number of places) we then go off to a nearby park for the afternoon and put some of what we have discussed into practice with a model and some of my gear. You can bring your own kit as well if you want to get better acquainted with what you use – your choice.
- Morning only £80.00 inc VAT
- Full day £120.00 inc VAT
- Some group discounts are available
- Discounts for members of The BPPA and NUJ
I’m happy to answer any questions that you might have or you can get in touch with Up To Speed on 0800 121 6818 or by email rcarr@uptospeedjournalism.co.uk
No two workshops are alike because we can never know what the British weather is going to give us; the good news is that cloudy days are just as much fun as shooting against the sun. The workshop is aimed at three groups:
- Professionals wanting to develop their skills
- Serious amateurs who want to get more from their passion
- Photography students wanting to supplement their knowledge
I hope that this will be the first of many that we run in Bournemouth. Remember that you can always dump the rest of the family off on one of our rather good beaches and join them for the last swim of the day…
Dogs on the beach – a personal obsession
I have a bit of an obsession when shooting pictures for fun. Dogs on the beach have featured in my personal work for many years and when I was out for a stroll the other day I shot this on my Fujifilm X20.

©Neil Turner, April 2013. Alum Chine, Bournemouth.
I haven’t got a great deal to say about the picture but I have to say that I really enjoy shooting with the Fuji compact. There is something about the way it handles and about the very satisfying click that the artificial shutter sound makes that makes me want to take pictures. Professional photographer, keen amateur or camera novice – it doesn’t matter as long as you get that “I want to take some pictures” feeling every once-in-a-while.
1/1000 sec; f/9; ISO 100
Lighting gels… the best in VFM?
Almost all photographers spend money on accessories, gizmos, gadgets and photo-related odds and sods. Sometimes we waste our money but I wanted to put in a brief plug for the things that constantly amaze me by the amount of “bang for the buck” I get from them. I’m talking about lighting gels. They cost a few pounds each and they last for years if you look after them even reasonably well.

Screen grab from Swatch App
The reason that I am writing this today is that last week I was shooting a job and was slightly embarrassed that the pieces of gel in my lighting kit were looking a bit tatty. I realised that some of them were bought as shared sheets (ie I only had half of a 52 x 61 cm sheet of each) when I was at college in the mid 1980s. I might have added a few more colours and strengths since then but even the newest gel in my bag is five years old. The beauty is that you don’t need to look after them that well really – even a scrunched and screwed up gel is still the same colour and will work. Of course they don’t like extreme heat and they aren’t partial to liquid damage either but at under the boiling point of water and kept dry they are very durable.
When I decided that I needed some new gels I phoned The Flash Centre and they arranged for Rosco to send me some. I have been playing with the iPhone Swatch app for about eighteen months now and it made ordering the new gels rather easy. They arrived rapidly in a strong cardboard tube and all I had to do was cut them down into the right sized pieces to fit into a pocket in my Think Tank rolling case.
This time around I ordered various grades of CTS – that’s Colour Temperature Straw, the gel that changes the light coming out of my flash units to varying degrees of Tungsten right up to the Full CTS which does a very good job of making the Elinchrom Ranger Quadra flash tube into a Tungsten light that very closely matches the Tungsten setting on a Canon EOS DSLR. I also got some ND (Neutral Density) gels and a sheet of a diffuser called ‘tough spun’. I didn’t need to get any effects gels – the purple, orange, red, blue and green gels that I have in the case are fine even if they are old enough to buy alcohol by now.
Comparing the cost of this big batch of new gels to some of the money that I have literally thrown away on rubbish gizmos over the last 30 years I feel very smug. I know that after one single use I will have justified the (tiny) expense and that after the 50th use it will get embarrassing how smug I feel about the VFM (value for money) that you get from quality lighting gels.
Philippa Gregory – the contact sheet
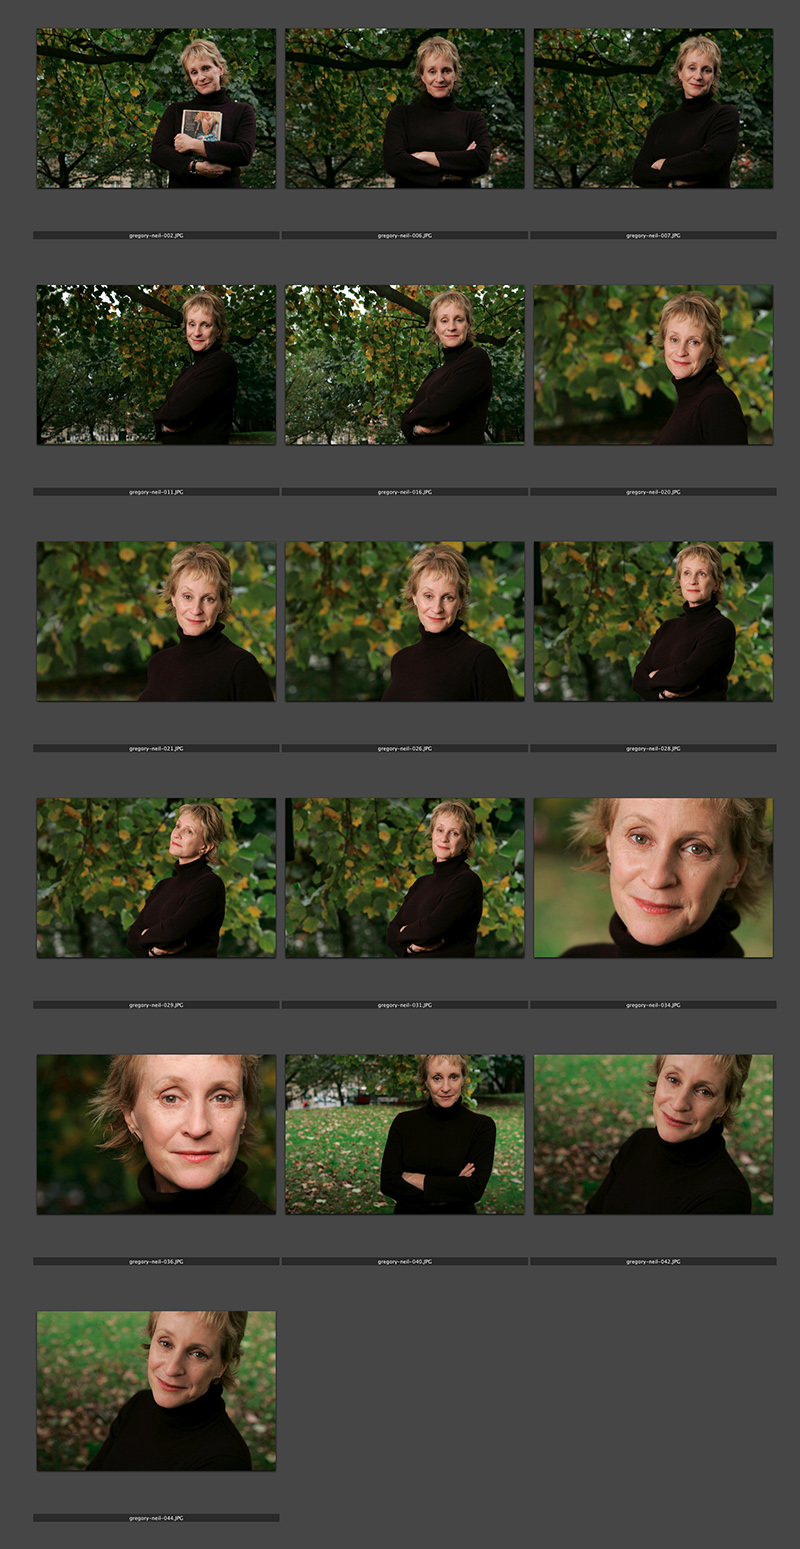
© Neil Turner/TSL. Philippa Gregory, October 2004
I haven’t done one of these contact sheets for a long time and I thought that this set was an interesting example. I submitted this set of sixteen pictures and they are all landscape in orientation. That’s because the slot they were shot for was across two pages and always a squarish landscape image. As I said in the previous post, the whole thing was done in ten minutes on a dull Autumn (fall) day in Hyde Park. That time included setting up and breaking down the Lumedyne light and chatting to the subject. Note that she is clutching her novel in the opening frame. I find that it’s always a good idea to do that if their publicist insists so that you can then go on to get the pictures that will actually get used.
Elinchrom Ranger Quadra Update
What do you call it when something that was already very good gets quite a lot better? Well I guess that would be an upgrade. That’s exactly what happened yesterday when I changed to the new Lithium Ion batteries on my Elinchrom Ranger Quadra kit.

New lithium ion on the left and the old lead gel on the right.
From the picture above, you can see that there is an appreciable size difference – which is always handy but there’s no way that I would have swapped them out just because of that – after all, they weren’t exactly huge to start with. There are four real reasons that I swapped:
- My old batteries were over four years old and had stopped holding a full charge – especially in the cold weather
- Elinchrom claim a higher capacity of up to 320 full-power flashes per charge for the new battery compared to only 150 for the old ones
- Faster recycle times. I’m going to have to believe Elinchrom and my own gut feeling here because you cannot compare brand new batteries to four year old ones in any meaningful way but at full power the recycle time appears to have halved to just over 1.5 seconds
- They weigh a lot less – 892 grammes less each. The new battery is 784 grammes compared to the old one which was 1,676 grammes. With two batteries in my kit I have saved a massive 1,792 grammes
Less weight, even in a rolling case, has got be a good thing 99% of the time and I am really looking forward to having to carry less. Of course I have always loved using the pack and battery to weight the base of the lighting stand down when working outdoors. I might have to find a few rocks and bricks lying around to supplement the pack more often that I used to but that’s fine by me.
I’ve only managed to shoot two small jobs with them so far and the speed of the recycling is great – even with my four year old Ranger Quadra pack and S heads. Some portraits yesterday afternoon shot indoors and on a lower power setting had the kit recycling in a fraction of a second which made the job go very smoothly indeed.
I have yet to try out the new Quadra Hybrid pack which promises all sorts of extras that I don’t think that I need. Elinchrom offer an upgrade to packs as old as mine to get the brighter display but my purchasing decisions these days are made on a perceived need rather than on wanting the shiniest and newest kit.
I’ve blogged about this Elinchrom kit before. The first time was in May 2009 when I’d only had the kit a short while. 32 months later I blogged again and, in what has become my most popular posting ever, I gave my considered review of the kit. One of the first comments on that posting alerted me to the new batteries being on their way. It’s taken me twelve months to get around to getting the new batteries and having the small modifications done to the S heads and I’m a happy man.
In the “32 months on” review I mentioned a few other things that I’d like to have seen produced to go with this kit. In the last six months I have become less and less pleased with the Skyport remote system that comes with the Ranger Quadra. The original triggers were prone to falling out of the hot shoe and the controls on the mark two version are tough to see in low light. I know that the whole raison d’être of this system is to be small and lightweight but they went too far with the Skyport transmitter – so much so that I’ve gone back to using Pocket Wizard Plus III transceivers a lot of the time at the expense of being able to remotely control the power.
So, Elinchrom – I hope that some senior managers are reading this… if you really want to make my happiness complete, can you please produce a transmitter that works with the EL Skyport receiver built into my Quadra pack that takes AA batteries, is about the size and weight of the Pocket Wizard Plus III unit with a digital display that has all of the functionality of the small Skyport transmitter but that is easy to use in subdued light, doesn’t require a tough-to-find button battery and that stays in the hot shoe properly. Pretty please?
Getting colour right on four year old cameras
Back in June 2010 I wrote a blog post about getting the colours to match on multiple Canon digital camera bodies. Ever since then I have tried really hard to keep my cameras synchronised for colour and contrast as well as making sure that the clocks are set to identical times. What has become obvious to me is that as cameras get older they shift their colour balance and the shift seems to accelerate a little. What has also become obvious is that the clocks built into Canon digital cameras get out of synchronisation far too quickly.

WB Shift on a Canon EOS5D MkII
Getting the clocks the same is a simple task: you can either do it in the menu on the camera or synchronise the clocks when the camera is connected to the computer using the very useful Canon EOS Utility software – a simple task that I find needs to be checked at least every four to five weeks. When I did the synch’ this morning two Canon EOS5D MkII bodies were nearly fifteen seconds different.
Moving on to the much trickier question of colour, I suggest that you read the old post before actually doing any work. Getting two cameras to match takes a while and getting three to match when one of them has a significantly different chip is even harder. This time I was simply wanting to get my two four-year-old 5D MkIIs to give me the same colour rendition as each other. I had started to notice that one required quite a bit more magenta removal than the other and so I put my 70-200 lens on a tripod, connected the first camera (which was giving me some fairly magenta images) to the laptop and mounted the body onto the lens. I built myself a little still life with a cereal box and a grey card, lit it with a reliable flash on manual power output and shot a frame or two.

My makeshift test target
The images were brought into Canon’s EOS Utility software and then into Photo Mechanic on the calibrated computer screen and I had a look. The grey was noticeable pink and the whites on the cardboard box were too and so I adjusted the white balance shift (WB SHIFT/BKT in the camera menu) from it’s starting position of B1,G2 to B1,G4 and took a couple more frames. Much better, but still a tiny bit magenta. I shifted it to B1, G5 and took another picture and the grey was finally grey and the white was finally as white as it could get.
That was the first camera sorted. All I had to do was to get the second one to match it. Leaving the lens on the tripod I simply swapped the bodies over, matched the exposure and fired a couple more frames. This body was on B0, G1 and, after a bit of fiddling, I got the colours to match by eye on B1 G2. Comparing the frames shot on the two cameras showed that one was a tiny amount more contrasty than the other and so I simply adapted the Picture Style “standard” that I habitually use for RAW files to get the contrast between the two cameras to match as well.
All-in-all it took about thirty-five minutes to set the kit up and get the results that I wanted (including synchronising the clocks). On my shoot today everything was the right colour as soon as I dragged it into Adobe Camera RAW from both cameras and I saved myself a fair amount of computer time – which is important because in the editorial markets where I make most of my money nobody pays for the time you spend in front of the screen and adjusting images from two different cameras can take quite a bit of time.
For me, this kind of techie stuff is vital. A lot of people just plough on and shoot without ever calibrating or changing anything but I am sure that thirty-five minutes work once every few weeks will save an enormous amount of time in between and time is, they say, money!
Bouncing balls, hosepipes and shadow puppets.
This is not an attempt to secure higher rankings by filling the title full of potential seedy euphemisms. I came up with the title when I was teaching a flash workshop this morning and I was trying hard to come up with ways of explaining some very basic concepts regarding the best way to think about how best to use light.
We all know what bounce flash is and most of us use it from time to time. It isn’t a difficult concept to explain either but I have always referred to school science lessons (Physics in my case) when explaining the best way to angle a flash to get the optimum effect. That drew a couple of blank stares today and I had to come up with an alternative (and it appears better) way to explain it. I’m convinced that this isn’t an original concept but I came up with the bouncing ball; simply put, if you stand two people three metres apart (or 2.8 metres for anyone who has ever been to one of my seminars) and one of them wants to bounce a ball to the other and have it reach them at the same height it left at then the optimum point for the bounce is 1.5 metres from the thrower or 1.5 metres from the receiver or exactly half way. The same goes with flash; point the flash at a midway point and you will get the greatest amount of light.
Of course that doesn’t tell the whole story… and thats where the hosepipe comes in. It is entirely possible that bouncing the light at the half-way point isn’t desirable because there is a chance that the angle of the reflector on the flash means that some light will actually hit the subject without having been bounced – light from the very edge of the flash. If you imagine a powerful hosepipe and pointing the stream of water at the wall the water will mostly bounce in the same way that a rubber ball might but the spray of the water will fan out in the same way that flash light does. If your object is to soak the subject, you aim the hose directly at them. If you have to bounce it, then you pick the halfway point. If you want to get them wet without the water going where you don’t want it to go then you pick an aiming point which might not provide the greatest amount of water but will allow you the most control. Obviously, the same goes for light. Direct flash might give you f16 and the halfway point bounce might reduce that to f8 but the nicest light might be a couple of f-stops weaker still at f4 but that might not actually matter.

©Neil Turner, October 2010. Bouncing flash off of a warm-toned brick wall.
Put simply we are talking about the difference between quantity and quality of light. By deliberately avoiding using the most efficient bounce we often end up with a more pleasing light quality. I often bounce off of walls and surfaces six, seven, eight or more metres away and for that you need to make the bounce as efficient as you can but when the wall is only three or four metres away you have many more options. Suddenly efficiency isn’t the main concern and you can often sacrifice some quantity in favour of quality.
One of my favourite ways of teaching bounce flash is to pick very unlikely surfaces such as wood panelling or brick walls and bounce the flash off of those. Of course you often get a colour caste but a good bit of RAW shooting and/or custom white balancing will sort that out pretty quickly. Above is a sample of a picture shot bouncing the flash off of some yellow-coloured medium toned bricks. It was taken at a University a couple of years ago when I was working on a project with some very cool students.
So what about shadow puppets? Well, we were also talking about creative options and casting deliberate shadows in all sorts of shapes and the best way that I could demonstrate was to throw shadow puppet type shapes in front of the digital projector onto the screen. You can make all sorts of cool shapes from card, through venetian blinds, through windows and doors and even through the back of a wooden chair. If you get the light right, you can do some very creative stuff and all with a basic flash unit off camera.
During lighting workshops I talk about a lot of other stuff but I was amused that in one day I came up with three new ways (new to me that is) of explaining techniques and concepts – techniques and concepts that I normally have no problem describing by referring the school science lessons. Maybe they aren’t teaching science in the same ways that people my age remember any more.
