camera

The light on the train

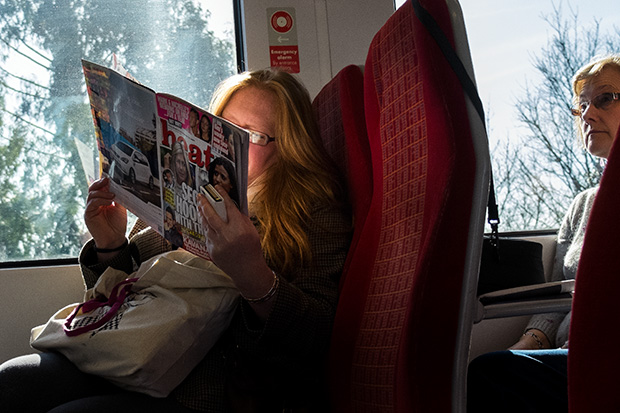
March 2014. Passenger on the train between Bournemouth and London Waterloo reading HEAT magazine as the train passes through Woking. ©Neil Turner

© Neil Turner, March 2014. Passenger on the train between Bournemouth & London Waterloo reading HEAT magazine.


Every once in a while I take the train to London for meetings and the occasional job where I don’t have to carry half a ton of cameras, lights and computers. One of my favourite ways to pass the time is to do a bit of train photography and yesterday’s journey gave me a few nice frames where the light was good. Normally I just bung them from the camera (in this case my adorable Fujifilm X20) via an Eye-Fi card onto my iPhone or iPad and then straight to Twitter or EyeEm. I rarely give them a second glance when I get home but I wanted to post this picture because of the light. The sun was coming at just the right angle to reflect a lot of light back into the woman’s face from the pages of Heat Magazine at exactly the same time as the woman sitting behind her appeared to be getting interested in the page through the small gap between the seats. I have no idea if she was actually looking at the page or whether it was a happy coincidence – either way, the light made me do it!

This frame was taken about five minutes after I’d posted a similar but inferior one on EyeEm so I kept it and decided that it would make a nice “just because” picture on this blog. I’m sure that I’ll get around to writing something more serious soon…

A very different kind of photography

©Neil Turner February 2014. Low level Aurora activity over a frozen lake, Inari County, Finland

©Neil Turner February 2014. Low level Aurora activity over a frozen lake, Inari County, Finland

Just a week ago I was standing on a frozen lake in northern Finland with my Wife and a dozen other people watching and waiting for the Aurora Borealis to charm us with its dancing and colours. We were in Finland because it was my fiftieth birthday and my Wife had spoiled me with a trip to see if we could see the Northern Lights. Being an obsessive photographer I wanted to shoot some nice pictures of some amazing skies but it was this frame which shows some light pollution and very low levels of activity that I love the most.

This kind of photography is a million miles away from what I do best and this is the first time that I’ve ever seriously tried to photograph a night sky in this way. It was dark (three hours after sunset) and it was cold and it was magical. As you can see from the image below, we went on to shoot some much prettier Auroras but there’s something about this frame that makes me want to go back and try again.

©Neil Turner February 2014. Medium level Aurora activity near Ivalo, Finland

©Neil Turner February 2014. Medium level Aurora activity near Ivalo, Finland

Techie stuff:  Exposures varying from 10 to 30 seconds at between f2.8 and f4 on 2000 ISO. Canon EOS5D MkIII with a 16-35 f2.8L lens on a Manfrotto 055 tripod

Dogs on the beach and the Fujifilm X20

My addiction to taking pictures of dogs walking on the beach with or without their owners shows no signs of abating and neither does my joy at shooting pictures with my Fujifilm X20. When I get to shoot bon the beach with the X20 my photographic life is almost complete (laughs ironically there). So, once again, for no other reason that I loved taking and editing the picture here is a photograph taken last Saturday at Boscombe Manor during a break in the foul weather that the whole of the country has been getting.

© Neil Turner, February 2014. A couple walk their dog on the beach between storms.

© Neil Turner, February 2014. A couple walk their dog on the beach between storms.

To the north of us was the wreckage of broken beach huts, to the east was an area closed off to the public and to the west was the only stretch of the beach where you could walk with reasonable safety. Happy days.

Out Walking

Ever since I started using the EyeEm photo sharing site I have been trying to shoot more pictures “just for the fun of it”. The platform allows you to add your pictures to albums and one of my favourites is entitled “Out Walking”. I often shoot with my Fujifilm X20 with and Eye-Fi card in it, convert the RAW fils to Jpeg using the neat film simulation modes before uploading them to my iPhone and going through the process I described in my Eye-Fi Workflow post a week or so ago. I also vowed a while ago to get better at black and white. I’m not sure that’s going quite so well but I often combine the two. It’s great fun and even mildly addictive!

Anyway, for no other reason that I want to share them, here are some of the images.

© Neil Turner, January 2014. Man holding sign offering tattoos an tattoo removal touts for business on the pavement just outside one of main areas of Camden Market

© Neil Turner, January 2014. Man holding sign offering tattoos an tattoo removal touts for business on the pavement just outside one of main areas of Camden Market

© Neil Turner January 2014. Cold and bored stall-holder selling keep calm t-shirts at Camden Market.

© Neil Turner January 2014. Cold and bored stall-holder selling keep calm t-shirts at Camden Market.

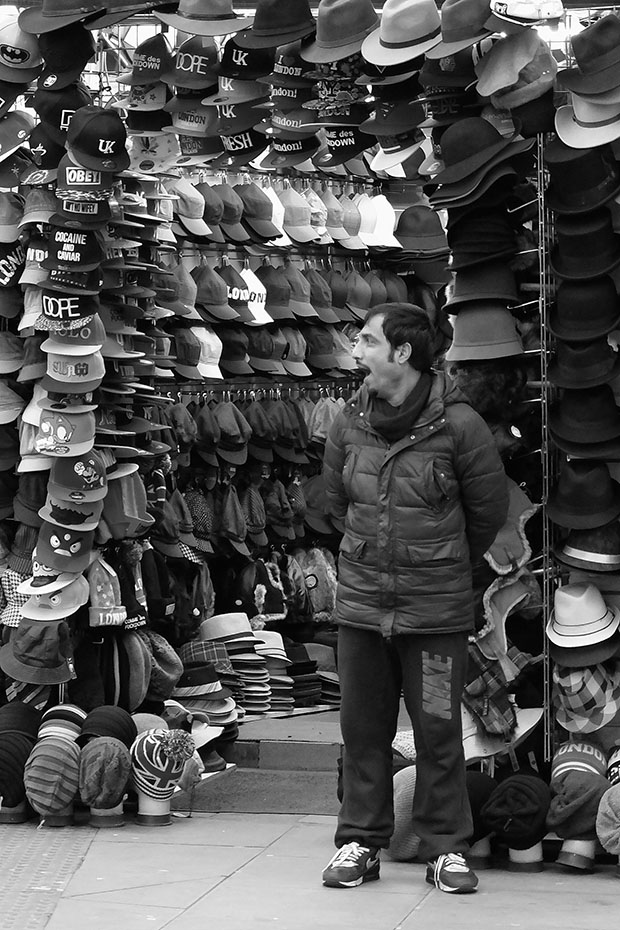
© Neil Turner, January 2014. Bored shop keeper outside his open hat shop just outside one of main areas of Camden Market

© Neil Turner, January 2014. Bored shop keeper outside his open hat shop just outside one of main areas of Camden Market

Eye-Fi card workflow

eye-fi_cards When I was rounding up 2013 I mentioned that I had a lot of success using an Eye-Fi card to wirelessly transmit pictures from my cameras (Canon EOS5D MkIII and Fujifilm X20) to either my iPhone, iPad or laptop where I can do a quick edit and caption before sending them to clients. Inevitably I got a couple of emails using the “ask me anything” feature of this blog asking me to describe my workflow. It is similar between an EOS5D MkIII and the Fujifilm X20 except that the former has twin card slots (one CF compact flash and one SD secure digital) whereas the latter only has the SD slot. I like to shoot RAW which means that in the X20 I have to do an in-camera RAW conversion to create a Jpeg to send out. I have two cards (shown left) – an Eye-Fi branded 8Gb Pro X2 and a Sandisk branded 4Gb one. In practice, they both do much the same job but the orange Eye-Fi one has more options should you want to work differently. Without further ado, here is how it all works on the Canon…

Getting the the settings on the card, your camera and your phone/tablet/computer right is the key to getting everything working well:

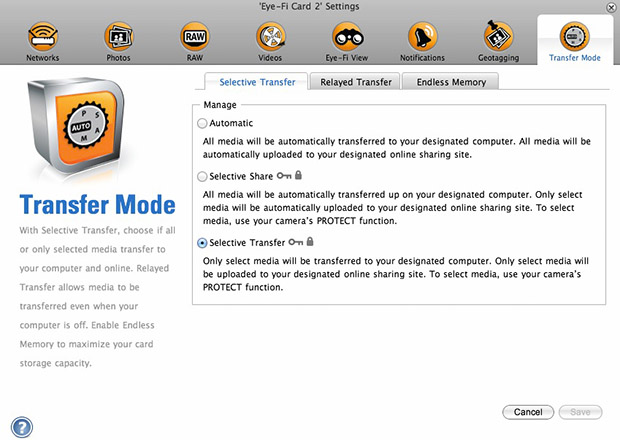
  1. Setting up the Eye-Fi card. When you get the card it should come with an SD card reader and by far the best way to set things up is to use that reader to load the card into a computer. There are lots of options that will appear once you have loaded the supplied “Eye-Fi Centre” application. This workflow is all about working in what the manufacturer calls “direct mode”. I choose to only transfer the files I want to my iPhone and so on the card I have selected “Selective Transfer” via the Eye-Fi Centre application. This means that only images that I have protected in the camera menu get transferred. On the Canon I have assigned the “rate” button to protect images for speed. It is also useful to add a couple of wifi networks and to define which file formats to transfer using the application whilst the card is in the computer because it isn’t possible to alter some settings once the card is in the camera. This whole process takes a few minutes and if you get it right, the whole thing test a lot easier from here on in.eye-fi_screenshot
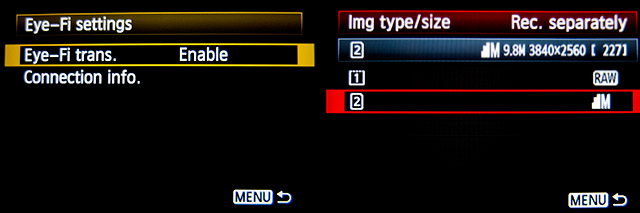
  2. Setting up the camera. In the EOS5D MkIII menu there are three things that I’d recommend you do. The first is to assign the “rate” button to protect selected images. The second is to get the camera to write RAW files to the CF card and medium size Jpegs to the SD (Eye-Fi) card. Finally, you need to enable Eye-Fi transfer from the camera menu. This way you can use the review function with card 2 (the SD slot) and then every time you protect an image written to the Eye-Fi card it will automatically look to transfer that file to the device you have nominated.
    eos_screens
  3. The receiving device. I use an iPhone and an iPad and the whole process is eventually controlled by the free app that Eye-Fi make available through the Apple App Store. There are equally useful apps available for Android powered devices and the functionality is pretty much identical. Apart from loading the app the only other thing you have to do is to download and authorise a small change to your wifi settings on your phone which simply installs the settings for the direct mode to work. Once you launch the app you get an opening window which then gives way to the gallery window which in turn tells you what is happening about transfers. Below you can see the card paring screen and the gallery screen.eye_fi_phone
  4. Editing your pictures. Once you have the image on your phone or tablet you can then use the apps of your choice to edit and caption your image before shifting them on. My personal favourite is Photogene4 which has some good image options such as clarity, contrast, saturation, straighten, crop, sharpen and the ability to add IPTC captions – including defaults such as the EXIF time day and date as well as any pre-loaded captions and copyright information. I find that it’s a good idea to write some generic captions using Apple’s Notes app and then copy and paste them into Photogene4. The app also has the option to upload to a wide range of sharing sites as well as to email and ransomer images to FTP servers – making it really useful for work.photogene
    From shooting a frame to having it uploaded to my own FTP server normally takes twenty to thirty seconds if there is a good phone signal and the various uses that I’ve found for this rapid upload range from offering images to people I’ve photographed to providing almost instant pictures for corporate clients to use for their Facebook, Instagram and Twitter feeds at events. This is a very versatile piece of kit and I haven’t even come close to describing everything that it can do. I like the way that this workflow actually does flow and I love the effect that it has had on a couple of clients who really appreciate what it offers them. My first Eye-Fi card was £24.99 including VAT – possibly the best investment that I’ve ever made!

Anyone remember the “old dg28”?

Starting in 1999 I posted over fifty technique samples on my website. These days, hardly a month goes by without a photographer telling me that they read them over and over again and that they learned to not fear using flash by experimenting with some of the ideas that I talked about. Those technique pages used to get some serious traffic!

I’ve been looking back through them in connection with another project that I’m working on and I picked (almost at random) one of the old pieces to post here. It was originally posted in the summer of 2001 and I find it quite interesting that agree with everything I said. I clearly remember the shoot as well; the subject was the same age as me (37 at the time) and he was retraining as a plasterer. I’m now 49 and my career has also changed. Looking at this set of pictures I wonder whether plastering worked out for him. The words are unchanged and all I’ve done is to upload a new version of the picture.

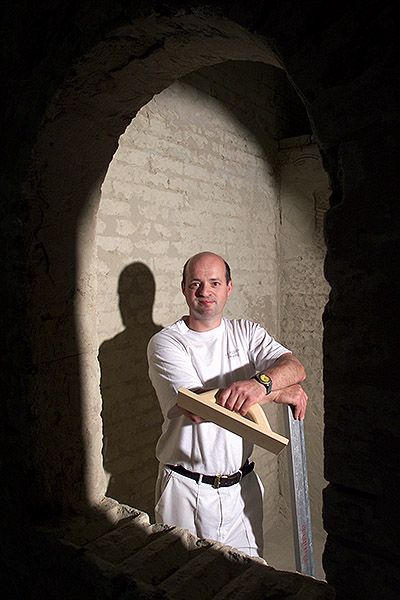
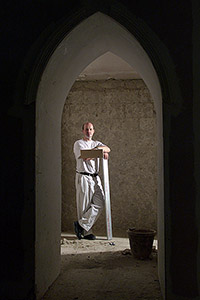
©TSL/Neil Turner. 37 year old retraining as a plasterer  in July 2001.

©TSL/Neil Turner. 37 year old retraining as a plasterer in July 2001.

When most people tai their first steps using lights they try to make the photographs shadowless. The ability to do this is very useful, but sometimes it’s better to place your own shadows exactly where you want them. Some subjects need to be given a distinct treatment.

This portrait of an award winning student was crying out for an unusual image and it was obvious that he would do pretty much anything I asked. The college where he had been studying plastering was a large space divided up into small rooms that the students then practiced their craft in. It was dark and dull coloured with no reflective surfaces so it was pretty much an ideal location for me to work in (apart from the dust).

I quickly spotted a whole series of arches and windows that would serve as a perfect frame to the photograph and set a Lumedyne light up inside the small room.The beauty of working with battery powered kit is that you don’t have to find power points, which were few and far between in the workshop area.

I first tried to shoot with a softbox on the flash unit, but the dull colours and the subjects plain T-shirt made it a pretty boring shot so I decided to shoot without any form of light modifier and removed the softbox in order to get the hard shadow.

The flash exposure was f5.6 at 200 ISO with the softbox in place, but this leapt to f13 with just the metal reflector in place. There was so little available light that everything not lit by the flash was in total darkness. This effect was perfect for the shot. The subject had turned up with few tools and the shot needed a prop or two so we borrowed some plasterers tools and got him to hold them in a way that seemed to relax him. When you are photographing people that are not used to having their picture taken professionally you often need to work as hard at relaxing them as you do in getting the technical bits right. Having some familiar props (teddy bear substitutes) to hand can make all the difference.

I worked hard with this image at getting the composition right by using the arched frame, I tried a couple of other shaped holes too, but this was the best. Getting the shadow in the right place is nothing more or less than trial and error, but using the LCD on the back of a digital SLR helps to shorten that process. I started the shoot working with a 28-70 lens but graduated to a 17-35 pretty quickly. Getting closer to the arch gave me a larger area inside the room to work with and having a six foot tall man, his shadow and some plasterers tools I needed that space.

I think that this photograph helps to demonstrate just how useful adding extra elements into a portrait can be. The props and the shadow help to tell the story as well as making the whole image that little bit more interesting. In the end the picture ran in the newspaper in black and white and the contrast provided by the shadow really helped.
©TSL/Neil Turner. July 2001

©TSL/Neil Turner. July 2001

2013 update and technical footnote:

The camera used was a Canon/Kodak DCS520 with 1.9 megapixels with a Canon 17-35 f2.8L lens. The lighting was a Lumedyne Classic flash system with a 200 w/s pack and a basic head. The DCS520 was great for certain jobs and this kind of lit work suited it down to the ground. The Kodak software was really good and it made it easy to interpolate (upsize) the images by a substantial amount – sometimes as much as 400%.

I used to shoot between 8 and 10 commissions a week and that involved driving an average of 30,000 miles a year. I had an Apple Powerbook G4 and I filed my pictures either using the ISDN line at my flat or using a PCMCIA card with a mobile phone modem built into it. The files that came out of the camera were a native 5.7Mb and generally compressed down to somewhere between 300K and 600K.

I hope to post a few more of these on the blog soon.
A very old favourite portrait

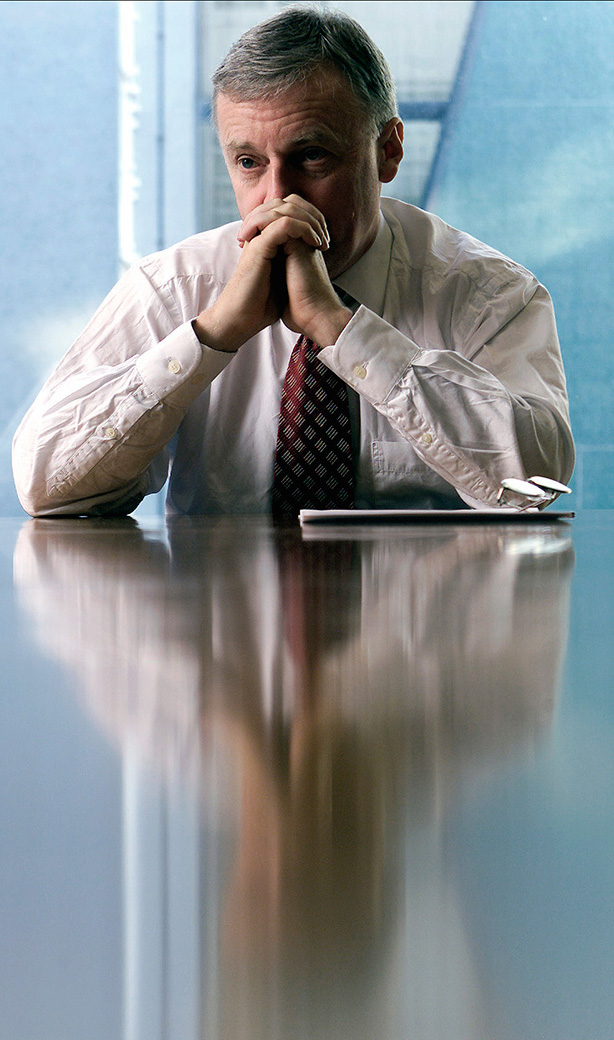
I don’t know if it happens to you when you are looking for something specific but I often search for images and, quite by accident, find something I wasn’t looking for and then that sends me off on a trip down memory lane. I’ve certainly blogged quite a few times in the past about images that meant something to me – either personally or professionally. This portrait of former General Secretary of the Trades Union Congress, John Monks (now Baron Monks of Blackley) was taken in his office at the TUC during an interview with the Times Educational Supplement about his appointment to the Government’s Learning and Skills Council in October 2000.

©Neil Turner/TSL, October 2000. John Monks, TUC General Secretary.

©Neil Turner/TSL, October 2000. John Monks, TUC General Secretary.

The reason that I like this picture is that when I shot it I was delighted to have turned a complete disaster of a shoot into a really nice image. The interview wasn’t going well and the room had a huge picture window which Mr Monks insisted was behind him. The room had dark walls, very dark furniture and no matter how hard I tried the pictures weren’t coming together. I had moved the light (I was working with a single Lumedyne battery powered pack and head with a 70cm shoot through umbrella) to the left of the interviewer and the picture was still boring. There was a decent reflection of the subject in the highly polished table but balancing the lift between the ambient coming through the window and the flash in the room was proving tricky. You need to remember that in those days we were shooting on 1.9 megapixel Kodak DCS520 cameras with tiny LCD screens and you could only get a basic idea of lighting balance.

I was limited where I could place the flash because at that time I was still using Wein optical triggers and the lights in the room had a fault which made them flicker – enough to trigger the flash every second or so. That meant reverting to the emergency back-up synch lead and all of the range restrictions that it placed on where the cable could reach and how it ran around the room.

Gradually I kept changing the shutter speed to allow more and more ambient light into the exposure. I had started at 1/125th of a second at f5.6 on 200 ISO and by the time I got to 1/15th of a second the ambient light really started to kick in and the light reflecting off of the blue tiles and glass in the courtyard outside his window magically took over and eliminated virtually all traces of the gloom and dark wood in the room. I managed to turn the main light off in the room without causing too much trouble – I had to do it because the ambient light inside the room was starting to have an effect on the exposure.

A colourless portrait of a greying man in a dull room sprang into life and I started to relax. This was one of the last frames, shot just as the interview was winding up and it was at 1/8th of a second with the camera resting on the table to try to make sure that there was as little shake as possible. I shot almost all of the interview on a Canon 70-200 f2.8L with a few frames on a Canon 28-70 f2.8L and my old 17-35 f2.8L. Apart from having overcome some difficulties to shoot the portrait, I genuinely loved the colours and I loved the placement of his spectacles. This is a gentle crop that got rid of anything that didn’t add to the overall feel and it quickly became a favourite for a few of the right reasons and many of the wrong ones. That means that it is a good picture and possibly worthy of a place in my portfolio back then but that I was too pleased with my own input to judge that properly!

Sometimes when you shoot pictures through an interview it all goes well and you listen to what’s being said because you are so relaxed. If the pictures are going badly you pick up on the mood of the interview but don’t really hear the conversation. This was definitely a case of the latter. I had no real idea that the interview had been a tough one!

Just because of the light

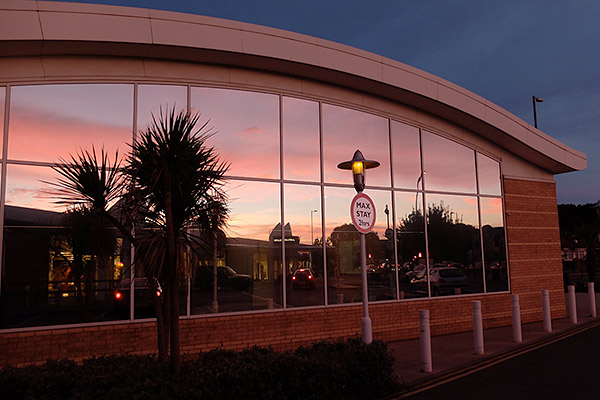
Back in April I posted a picture shot on the Fujifilm X20 just because I liked the light. Without wishing to make this regular thing, here is another one.

©Neil Turner, October 2013. The light reflecting off of Barclays Bank at Dusk.

©Neil Turner, October 2013. The light reflecting off of Barclays Bank at Dusk.

Hope that you like it.