equipment

An interesting portrait

©Neil Turner/TSL. Sanjit Bunker Roy - founder of The Barefoot College in his native Rajasthan in 1984 is also heavily involved in the Global Rainwater Harvesting Organisation. Photographed at the Said Business Centre at Oxford University .

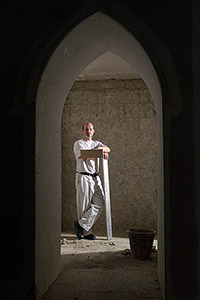
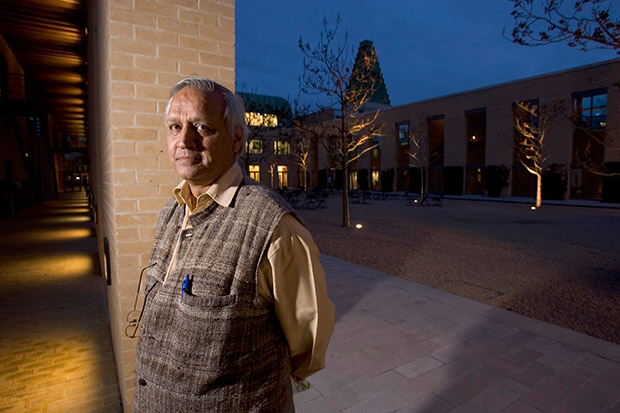
©Neil Turner/TSL. Sanjit Bunker Roy – founder of The Barefoot College in his native Rajasthan in 1984 is also heavily involved in the Global Rainwater Harvesting Organisation. Photographed at the Said Business Centre at Oxford University .

Whilst looking for an image to demonstrate a specific point to a group of NCTJ Photojournalism students I re-discovered this portrait of a charming businessman and philanthropist that I shot back in March 2006 for The Times Higher Education Supplement. The point that I was making was actually about histograms but I wanted to say a little more here about why I liked this picture so much at the time I shot it.

Firstly, he was a really nice man who gave me the time to shoot a small range of images. He was happy to chat, happy to be directed and trusted me to do my job. You would think that the majority of people would react the same way when being photographed by a professional but that is sadly not how it is. I was delighted that, despite being a businessman, he was wearing something a lot more interesting than a grey or navy suit. I got the distinct impression that he had cultivated an image and that he was very happy with it.

My second point is the degree to which I had to mix ambient light, the sky and my own flash. I couldn’t do too much to balance the sky and the lighting around the quadrangle but I had to get the balance between the subject and the ambient just right and I ended up allowing the walkway to the left of the frame go a lot darker than I’d originally intended so that the depth of the blue in the sky was exactly as I’d wanted it. Looking back, I was always keen to see the lighting balance on the screen on the camera and I often shot two versions of a picture with differing balances so that I could choose when looking at it on a decent sized screen in the edit. These days, the screens on cameras are so much better and you get a far better impression of how the photograph will look on the LCD.

My third and final point about this portrait is the way that it applies the old “rule of thirds” in an unusual way. Yes he is almost exactly one third of the way into the frame from the left (classic composition) but his body is facing out of the frame (not classic composition) and everything on the right hand side of the frame isn’t much more than decorative.

I think that the light, the tones and the colours all add up to an interesting and very usable portrait – one that I remember enjoying taking. I also remember the speed with which I had to offload the images over a slightly dodgy GPRS mobile connection. But what about the histogram? The students who were at the lecture would tell you that I spent a lot of time comparing good, bad and ugly histograms and explaining what they all meant before admitting that I rarely, if ever, look at them myself! I know that in certain circles that would be a heretical thing to admit but all photographers have to have some sort of rebellion in them.

Techie stuff: Canon EOS1D MkII, Canon 16-35 f2.8L lens at 16mm, ½ second at f8 on ISO 200 with a Lumedyne Signature series flash with no light modifier. Canon CR2 RAW file converted using Adobe Photoshop.

Eye-Fi card workflow

eye-fi_cards When I was rounding up 2013 I mentioned that I had a lot of success using an Eye-Fi card to wirelessly transmit pictures from my cameras (Canon EOS5D MkIII and Fujifilm X20) to either my iPhone, iPad or laptop where I can do a quick edit and caption before sending them to clients. Inevitably I got a couple of emails using the “ask me anything” feature of this blog asking me to describe my workflow. It is similar between an EOS5D MkIII and the Fujifilm X20 except that the former has twin card slots (one CF compact flash and one SD secure digital) whereas the latter only has the SD slot. I like to shoot RAW which means that in the X20 I have to do an in-camera RAW conversion to create a Jpeg to send out. I have two cards (shown left) – an Eye-Fi branded 8Gb Pro X2 and a Sandisk branded 4Gb one. In practice, they both do much the same job but the orange Eye-Fi one has more options should you want to work differently. Without further ado, here is how it all works on the Canon…

Getting the the settings on the card, your camera and your phone/tablet/computer right is the key to getting everything working well:

  1. Setting up the Eye-Fi card. When you get the card it should come with an SD card reader and by far the best way to set things up is to use that reader to load the card into a computer. There are lots of options that will appear once you have loaded the supplied “Eye-Fi Centre” application. This workflow is all about working in what the manufacturer calls “direct mode”. I choose to only transfer the files I want to my iPhone and so on the card I have selected “Selective Transfer” via the Eye-Fi Centre application. This means that only images that I have protected in the camera menu get transferred. On the Canon I have assigned the “rate” button to protect images for speed. It is also useful to add a couple of wifi networks and to define which file formats to transfer using the application whilst the card is in the computer because it isn’t possible to alter some settings once the card is in the camera. This whole process takes a few minutes and if you get it right, the whole thing test a lot easier from here on in.eye-fi_screenshot
  2. Setting up the camera. In the EOS5D MkIII menu there are three things that I’d recommend you do. The first is to assign the “rate” button to protect selected images. The second is to get the camera to write RAW files to the CF card and medium size Jpegs to the SD (Eye-Fi) card. Finally, you need to enable Eye-Fi transfer from the camera menu. This way you can use the review function with card 2 (the SD slot) and then every time you protect an image written to the Eye-Fi card it will automatically look to transfer that file to the device you have nominated.
    eos_screens
  3. The receiving device. I use an iPhone and an iPad and the whole process is eventually controlled by the free app that Eye-Fi make available through the Apple App Store. There are equally useful apps available for Android powered devices and the functionality is pretty much identical. Apart from loading the app the only other thing you have to do is to download and authorise a small change to your wifi settings on your phone which simply installs the settings for the direct mode to work. Once you launch the app you get an opening window which then gives way to the gallery window which in turn tells you what is happening about transfers. Below you can see the card paring screen and the gallery screen.eye_fi_phone
  4. Editing your pictures. Once you have the image on your phone or tablet you can then use the apps of your choice to edit and caption your image before shifting them on. My personal favourite is Photogene4 which has some good image options such as clarity, contrast, saturation, straighten, crop, sharpen and the ability to add IPTC captions – including defaults such as the EXIF time day and date as well as any pre-loaded captions and copyright information. I find that it’s a good idea to write some generic captions using Apple’s Notes app and then copy and paste them into Photogene4. The app also has the option to upload to a wide range of sharing sites as well as to email and ransomer images to FTP servers – making it really useful for work.photogene
    From shooting a frame to having it uploaded to my own FTP server normally takes twenty to thirty seconds if there is a good phone signal and the various uses that I’ve found for this rapid upload range from offering images to people I’ve photographed to providing almost instant pictures for corporate clients to use for their Facebook, Instagram and Twitter feeds at events. This is a very versatile piece of kit and I haven’t even come close to describing everything that it can do. I like the way that this workflow actually does flow and I love the effect that it has had on a couple of clients who really appreciate what it offers them. My first Eye-Fi card was £24.99 including VAT – possibly the best investment that I’ve ever made!

Anyone remember the “old dg28”?

Starting in 1999 I posted over fifty technique samples on my website. These days, hardly a month goes by without a photographer telling me that they read them over and over again and that they learned to not fear using flash by experimenting with some of the ideas that I talked about. Those technique pages used to get some serious traffic!

I’ve been looking back through them in connection with another project that I’m working on and I picked (almost at random) one of the old pieces to post here. It was originally posted in the summer of 2001 and I find it quite interesting that agree with everything I said. I clearly remember the shoot as well; the subject was the same age as me (37 at the time) and he was retraining as a plasterer. I’m now 49 and my career has also changed. Looking at this set of pictures I wonder whether plastering worked out for him. The words are unchanged and all I’ve done is to upload a new version of the picture.

©TSL/Neil Turner. 37 year old retraining as a plasterer  in July 2001.

©TSL/Neil Turner. 37 year old retraining as a plasterer in July 2001.

When most people tai their first steps using lights they try to make the photographs shadowless. The ability to do this is very useful, but sometimes it’s better to place your own shadows exactly where you want them. Some subjects need to be given a distinct treatment.

This portrait of an award winning student was crying out for an unusual image and it was obvious that he would do pretty much anything I asked. The college where he had been studying plastering was a large space divided up into small rooms that the students then practiced their craft in. It was dark and dull coloured with no reflective surfaces so it was pretty much an ideal location for me to work in (apart from the dust).

I quickly spotted a whole series of arches and windows that would serve as a perfect frame to the photograph and set a Lumedyne light up inside the small room.The beauty of working with battery powered kit is that you don’t have to find power points, which were few and far between in the workshop area.

I first tried to shoot with a softbox on the flash unit, but the dull colours and the subjects plain T-shirt made it a pretty boring shot so I decided to shoot without any form of light modifier and removed the softbox in order to get the hard shadow.

The flash exposure was f5.6 at 200 ISO with the softbox in place, but this leapt to f13 with just the metal reflector in place. There was so little available light that everything not lit by the flash was in total darkness. This effect was perfect for the shot. The subject had turned up with few tools and the shot needed a prop or two so we borrowed some plasterers tools and got him to hold them in a way that seemed to relax him. When you are photographing people that are not used to having their picture taken professionally you often need to work as hard at relaxing them as you do in getting the technical bits right. Having some familiar props (teddy bear substitutes) to hand can make all the difference.

I worked hard with this image at getting the composition right by using the arched frame, I tried a couple of other shaped holes too, but this was the best. Getting the shadow in the right place is nothing more or less than trial and error, but using the LCD on the back of a digital SLR helps to shorten that process. I started the shoot working with a 28-70 lens but graduated to a 17-35 pretty quickly. Getting closer to the arch gave me a larger area inside the room to work with and having a six foot tall man, his shadow and some plasterers tools I needed that space.

I think that this photograph helps to demonstrate just how useful adding extra elements into a portrait can be. The props and the shadow help to tell the story as well as making the whole image that little bit more interesting. In the end the picture ran in the newspaper in black and white and the contrast provided by the shadow really helped.

©TSL/Neil Turner. July 2001

©TSL/Neil Turner. July 2001

2013 update and technical footnote:

The camera used was a Canon/Kodak DCS520 with 1.9 megapixels with a Canon 17-35 f2.8L lens. The lighting was a Lumedyne Classic flash system with a 200 w/s pack and a basic head. The DCS520 was great for certain jobs and this kind of lit work suited it down to the ground. The Kodak software was really good and it made it easy to interpolate (upsize) the images by a substantial amount – sometimes as much as 400%.

I used to shoot between 8 and 10 commissions a week and that involved driving an average of 30,000 miles a year. I had an Apple Powerbook G4 and I filed my pictures either using the ISDN line at my flat or using a PCMCIA card with a mobile phone modem built into it. The files that came out of the camera were a native 5.7Mb and generally compressed down to somewhere between 300K and 600K.

I hope to post a few more of these on the blog soon.

A very old favourite portrait

I don’t know if it happens to you when you are looking for something specific but I often search for images and, quite by accident, find something I wasn’t looking for and then that sends me off on a trip down memory lane. I’ve certainly blogged quite a few times in the past about images that meant something to me – either personally or professionally. This portrait of former General Secretary of the Trades Union Congress, John Monks (now Baron Monks of Blackley) was taken in his office at the TUC during an interview with the Times Educational Supplement about his appointment to the Government’s Learning and Skills Council in October 2000.

©Neil Turner/TSL, October 2000. John Monks, TUC General Secretary.

©Neil Turner/TSL, October 2000. John Monks, TUC General Secretary.

The reason that I like this picture is that when I shot it I was delighted to have turned a complete disaster of a shoot into a really nice image. The interview wasn’t going well and the room had a huge picture window which Mr Monks insisted was behind him. The room had dark walls, very dark furniture and no matter how hard I tried the pictures weren’t coming together. I had moved the light (I was working with a single Lumedyne battery powered pack and head with a 70cm shoot through umbrella) to the left of the interviewer and the picture was still boring. There was a decent reflection of the subject in the highly polished table but balancing the lift between the ambient coming through the window and the flash in the room was proving tricky. You need to remember that in those days we were shooting on 1.9 megapixel Kodak DCS520 cameras with tiny LCD screens and you could only get a basic idea of lighting balance.

I was limited where I could place the flash because at that time I was still using Wein optical triggers and the lights in the room had a fault which made them flicker – enough to trigger the flash every second or so. That meant reverting to the emergency back-up synch lead and all of the range restrictions that it placed on where the cable could reach and how it ran around the room.

Gradually I kept changing the shutter speed to allow more and more ambient light into the exposure. I had started at 1/125th of a second at f5.6 on 200 ISO and by the time I got to 1/15th of a second the ambient light really started to kick in and the light reflecting off of the blue tiles and glass in the courtyard outside his window magically took over and eliminated virtually all traces of the gloom and dark wood in the room. I managed to turn the main light off in the room without causing too much trouble – I had to do it because the ambient light inside the room was starting to have an effect on the exposure.

A colourless portrait of a greying man in a dull room sprang into life and I started to relax. This was one of the last frames, shot just as the interview was winding up and it was at 1/8th of a second with the camera resting on the table to try to make sure that there was as little shake as possible. I shot almost all of the interview on a Canon 70-200 f2.8L with a few frames on a Canon 28-70 f2.8L and my old 17-35 f2.8L. Apart from having overcome some difficulties to shoot the portrait, I genuinely loved the colours and I loved the placement of his spectacles. This is a gentle crop that got rid of anything that didn’t add to the overall feel and it quickly became a favourite for a few of the right reasons and many of the wrong ones. That means that it is a good picture and possibly worthy of a place in my portfolio back then but that I was too pleased with my own input to judge that properly!

Sometimes when you shoot pictures through an interview it all goes well and you listen to what’s being said because you are so relaxed. If the pictures are going badly you pick up on the mood of the interview but don’t really hear the conversation. This was definitely a case of the latter. I had no real idea that the interview had been a tough one!

Cool watchmakers

©Neil Turner, July 2013. Alex Brown and Ian Elliott of Elliott Brown.

©Neil Turner, July 2013. Alex Brown and Ian Elliott of Elliott Brown.

I promised to share new work as and when I could and to add a bit of technical detail whilst doing so. This two person portrait shot on a sweltering July day in Dorset for a leading UK business magazine is a great example of the kind of picture I get asked to shoot. The story was a simple one about a new business partnership designing, making and selling very high class mens’ watches.

There was a limited amount of time for the interview, the pictures and a short video grab and so when I got my slot the two subjects, the reporter and the Picture Editor all jumped into my car and we headed about three quarters of a mile from the company offices to shoot on some open heathland because the style of picture I was being asked for needed an expanse of deep blue sky. We couldn’t shoot at the offices because there just too many tall building around and I had to rely on some local knowledge to find the right spot.

The location was far from perfect because I would have liked a decent amount of shade to put my two subjects in. That wasn’t going to be easy and so I had the reporter holding a large black reflector aloft to give me some artificial shade. There was only the slightest breeze but that was enough to force me into something of a ‘plan B’ which was to move into the shade of some tall bushes about fifty yards away. The downside of this was to lose the unbroken blue sky from behind my subjects (you can see some scrubby heath behind them in the bottom of the frame) but it did allow me to balance the flash (single Elinchrom Ranger Quadra with a 32″ x 24″ soft box) with the sky without the subjects being in direct sunshine themselves. Free from his reflector holding duties, the reporter was happy to hold onto the lighting stand to make sure that it didn’t blow over. No matter how light the breeze, soft boxes act like sails!

I have described shooting from the shade a couple of times before and the basic principle is an easy one: the subject is in deep shade and only lit by the flash whereas the rest of the scene is metered normally and the skill comes from balancing the two halves of the exposure. In practice on a bright and sunny day this almost always means the ambient exposure is going to be 1/200th of a second on 200 ISO at somewhere between f16 and f22. All you then need to do is to get enough power out of your flash to balance that. This sometimes means that you have to lose your light modifier (soft box/umbrella etc) if you don’t have a lot of power and almost always means moving the flash quite close to the subject if you want to keep the light modifier in place. Compromise… I’ve used that word once or twice before too. The camera was a Canon EOS5D MkII and the lens was a Canon 24-70 f2.8L.

The two guys in the photograph make some very cool watches. It’s a new business by the name of Elliott Brown and their first collection goes on sale about now.

©Neil Turner, July 2103

©Neil Turner, July 2103

Cleaning glass

©Neil Turner, August 2013, Bournemouth.

©Neil Turner, August 2013, Bournemouth.

I was looking through a few pictures from this summer this morning when I decided to post this picture just because I liked it. The young man in the photograph is a nephew who has just started his own window cleaning business in the Bournemouth area using filtered water and a long pole instead of ladders, squeegees and chamois leathers. I hope that it takes off and I hope that he gets around to putting this on his website. It was taken with my Fujifilm X20 when I was working at the kitchen table on some pictures that I needed to get to a client and the X20 was the camera that I had to hand.

One thought this morning led, as they inevitably do, to another when I read a posting on a Facebook group by a photographer who has never cleaned their own lenses or their own digital camera chips. Cleaning lenses is too easy to go to the bother of driving to a service centre and parting with money. Obviously if you are at a major sporting event and Canon or Nikon are there you’d be a fool to not take up their offers of free cleaning and checks but beyond that you should learn to do it yourself. I say that as someone who never uses filters on a day-to-day basis as protection and as someone whose home is over 100 miles way from the nearest Canon approved service centre. I also say it as someone who used to be a staff photographer based in London with an employer who picked up the tab for pretty much everything and got quite lazy there for a while! I tend to use the Eclipse solution designed for camera chips along with either a very old quality cotton handkerchief or a soft cloth designed for spectacles. Once I’ve done the glass I usually give the outside of the lens a quick wipe down too – there’s no sense in having dirty gear.

Cleaning camera chips is a whole other matter. Getting it done professionally every once-in-a-while makes sense but at up to £50 + VAT per camera I don’t want to get my chips cleaned as often as I want to get my windows at home done. Of course the “self-cleaning” mechanisms built into today’s cameras really help. In the past it was common to get sizeable amounts of dust on the chip which needed to be removed. These days most of the loose stuff goes away with one or two cycles of the built-in cleaning option. Much of the rest can be loosened or removed using a decent air blower (the rubber bulb type) and if all else fails you can buy the right chemicals and sensor swabs to do a thorough job. If I get an offer of a free clean or I’m having a camera serviced then I always get the chip cleaned too. Canon build in a small sticky strip to catch and keep the dust shaken loose by the piezo-electric motors that do the automatic cleaning every time you turn the camera on and off. The service centre replaces that strip when you take your kit in for an overhaul or repair and it is useful to bear in mind that the strip is only truly effective if a) you have the camera with the baseplate pointing to the ground when the cleaning is in progress and b) the strip gets changed regularly.

Because of the distance I live away from the major repair and service centres I find myself cleaning camera chips using the Eclipse solution every couple of months. It definitely has an effect because I then have to re-calibrate the white balance shifts on the cameras. The end result is that I save a bit of money, a lot of time travelling to and from the service centre and an awful lot of time in post-production not having to remove dust spots. When I travel for work I always take some cleaning kit. I was in India a few years ago now and the dust in my ‘weather sealed’ EOS1D MkII cameras had to be removed on an almost daily basis. I’d hate to think how bad it would have been after a week there without having the kit to do my own cleaning.

It doesn’t have to stop with lenses and chips either. Laptop screens, computer monitors and keyboards are all easy to keep looking their best if you take ten minutes to do so. I used to throw my Domke F-series camera bags into the washing machine (which is how my beautiful grey F1X ended up salmon pink thanks to a stray pair of red socks) and these days I get the vacuum cleaner into my camera bags a couple of times a year.

Charity PR portrait

©Neil Turner, July 2013. The Victoria Education Centre & Sports College

©Neil Turner, July 2013. The Victoria Education Centre & Sports College

Back in July I was commissioned by Livability to go to the Victoria Education Centre & Sports College to shoot a range of pictures for their in-house publications, websites and PR work. I’d worked on news events a couple of times with the charity before but this was the first time I was shooting this kind of job for them. The afternoon started in the horticulture department where a team of professionals and volunteers works with students and clients growing a range of plants for use around the college and for sale to visitors and the public.

The young man in this picture volunteered himself for this picture and he chose which of the several hundred plants he wanted to be photographed with which made my job rather easy. I found this railing in the woods behind the greenhouses and poly-tunnels (where the work gets done) for the portrait. I chose it because I liked the way that the light was coming through the mass of green foliage, because the rail was sturdy and a great height and because I could see the scope for lighting the foreground in balance with the lovely ambient light in the background.

The photograph that you see here is completely ‘as shot’ with no cropping, no white balance adjustments and only a very simple tweak of the shadows in Adobe Camera RAW from the Canon CR2 files from an EOS5D MkII.

I knew that I wanted to shoot with a relatively shallow depth of field so that the background was sufficiently blurred. I was able to get back a decent distance and so I decided to shoot on my 70-200 f2.8L IS Canon lens and to light the subject with my Elinchrom Ranger Quadra with a shoot-through white 100cm umbrella. Once I had everything set up:

  • The flash was just under two metres away from the subject
  • About 30 degrees from the axis of the lens and ten degrees above his eye-line
  • A quick Custom white balance using the Lastolite EzyBalance grey card
  • It quickly became obvious that shooting at f2.8 or even f4 wasn’t really going to work – I wanted to have the whole plant in focus as well as my subject and then have the whole background as far out of focus as possible.
  • I shot a few test frames and looked at them on the LCD screen before opting for a third of a stop wider than f8 (f7.1 according to the EXIF data) and a balancing shutter speed of 1/80th on 200 ISO.

This gave me the lighting balance that I wanted and the depth of field was as good a compromise as I could get. These shoots are always a mass of compromises and that’s one of the biggest lessons that I try to teach when doing seminars and workshops.

I often get asked about the time it takes to shoot these kinds of pictures and the answer in this case was from the moment I unzipped the bag with the light stands in to shooting the first meaningful frame was just over four minutes. I then had another three minutes before other people were demanding the subject’s attention and it took a final three minutes to pack the kit away again – a nice round ten minutes from start to finish. That’s nowhere near being a record but it was comfortable for me and the subject and it really helps that the client liked the results.

Back when I first started to use portable lighting in this way I used to have a Lumedyne head already on a stand in a sling bag with a pack already connected and used a simple umbrella with Pocket Wizard triggers. I used to boast that my kit was not only lightweight but well planned and that I could be ready to shoot in under forty-five seconds from the time I touched the zip on the bag. When I did seminars and talks I’d even get people to time me getting the kit out and regularly beat forty-seconds. These days I’m a bit slower and I carry a bit more kit (I’m also a fair bit older by the way) and so a three minute set-up and break-down time is pretty good (three and a half minutes if there’s a softbox involved). It means that even if your subject is watching you, they don’t really get the chance to get bored waiting.

The rest of the day was fun and the other highlights were the students playing Boccia (a sport that I hadn’t encountered before last year’s Paralympics), one young woman showing off her excellent art and spending time with younger students and their rather docile rabbits.

Big soft light on the cheap

This technique example was originally posted on the ‘pre-blog’ in January 2009

A lot of portrait photography is done with large soft boxes or large umbrellas. The point there being that large light sources give a certain type of soft light that is reasonably flattering, nicely even and pretty good to work with. Bouncing a flash off of a big white wall gives a very similar effect to a large soft box which makes a big pale wall on location a very useful thing.

eaton-054

©Neil Turner, November 2008. Bournemouth, Dorset.

Shooting this portrait of a couple who met and fell in love in later life gave me a few challenges. The picture editor wanted them to be photographed on the beach in my home town of Bournemouth but the weather forecast for the late November morning wasn’t too promising. Having spoken to the couple we decided to head for a location which offered us plenty of parking right near the beach front as well as wide open expanses of sand. The plan was to shoot on the beach and head for one of the local cafes if the rain came. The same stretch of beach also has some covered seating areas, which were to prove very useful.

We started off shooting on the sand but moved pretty quickly under the covered area that you can see to the left. It was out of the wind and out of the rain that was looking likely. The theme for the picture was to be mildly romantic and the strong arch was likely to be useful.

I was shooting with a Canon EOS 50D and 16-35, 24-70 and 70-200 f2.8 L lenses. The lighting was a Lumedyne 200 watt/second pack and Signature head triggered with a pair of Pocket Wizards. The back wall of the covered area was painted with a very pale cream/lemon colour so I decided to bounce the flash off of it.

I mentioned above that the effect is similar to a large soft box and the area of wall illuminated by the flash was about four square metres (a little over ten square feet) which is a big soft light by anyone’s standard.

Looking at the brilliant LCD on the back of the camera after a couple of test shots, it was obvious that the colour of the wall was a little more yellow than was apparent to the naked eye. I shot a frame with a piece of white paper in the man’s hand so that I could do a custom white balance. The net effect of this was to send the daylight behind them and any areas lit by the ambient a little blue – not an unpleasant effect.It was clear that they were enjoying being photographed and were happy to indulge my usual technique of playing around with lenses, compositions, exposures and lighting positions.

I was trying to shoot with a wide lens under the cover and the shot that you see above was taken with my 16-35 f2.8L right at the 16mm end. I usually try to shoot at 200 ISO and the meter reading for the sand and sea behind the couple was 1/125th of a second at f5.6. I altered the output on the flash to give me f5.6 on the couple and changed the shutter speed to 1/180th to marginally underexpose the background. The available light reading on the couple would have been 1/30th at f5.6 so they were lit exclusively by the flash. I shot a lot of different images with similar compositions before changing over to a 70-200 f2.8L IS lens.

I moved my subjects so that they were leaning in the entrance just as the light outside was getting a bit better. By the time I shot the image below the shutter speed was up to 1/250th of a second but not really underexposing at all.

©Neil Turner

©Neil Turner, November 2008. Bournemouth, Dorset.

The ambient light was starting to affect the man’s head and you can see that he has a gentle blue highlight on top of his head. The light balance was just right for about two or three minutes before the ambient became brighter and I had to increase the power on the flash to maintain the balance.

After a few dozen frames we moved back onto the beach where we shot several more ideas. The magazine eventually ran a picture shot on the beach as the day turned brighter and it came towards midday. In the two pictures shown above I am looking almost due south where the midday sun would be. The second picture was taken only 45 minutes before noon and so the reasonably heavy cloud was a real help to make this picture work.

The whole shoot took a little over an hour and the edit took about the same amount of time before I sent the magazine around forty pictures.