Between May 1999 and June 2008 I posted a large number of technique examples on the original http://www.dg28.com taken from my daily work to show how I used light in an era where digital cameras were pretty poor at ISOs over 800 or even 400 in the case of the venerable Kodak DCS520. These days flash is a creative choice rather than a technical necessity but the techniques still stand up. From time to time I re-post one of these old examples just to remind myself how life used to be. This one was first posted fourteen years ago and for a very long time it was amongst my favourite pictures that I had posted.
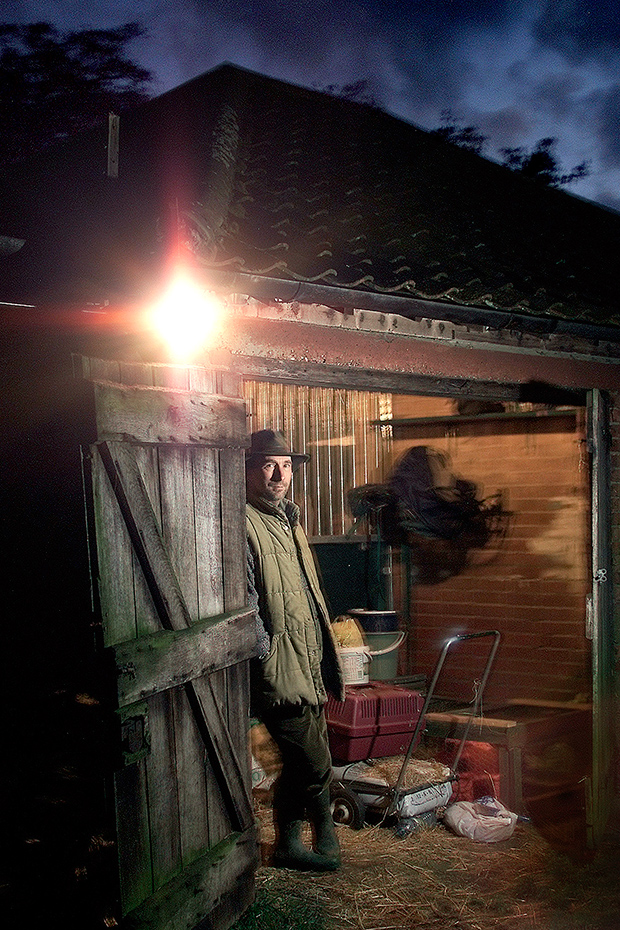
©Neil Turner/ TSL, November 2000.
At the time it felt as if I spent every evening answering follow-up questions about the pictures and techniques that I’d described. These days there are thousands, if not tens of thousands, of people publishing ‘how-to-do-it’ photography blogs but back then there were only a small number of us. It was such an exciting time in our profession. Anyway, here’s the post as it appeared back in November 2000:
Arriving at the job is usually the best times to start having ideas about locations for a portrait. Buildings often have features that lend themselves to use in a photograph, and the grounds can be just as inspirational.
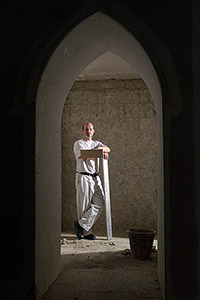
When I arrived at the Suffolk farmhouse of journalist and author Simon Barnes, he and his wife were busy chasing one of their horses around the yard. By the time the mare was back in one of the stables it was all but dark, but I had seen just how wonderful the other stable looked lit by the 60 watt bulb inside it.
This image called for the mixing of available light and fifty joules of Lumedyne flash. The flash head had it’s diffuser cap over the standard reflector at an angle of 60° from the lens axis and at a height of about six inches above Simon’s eye level. I had to use the flash a lot lower than I would have done because I wanted him to keep his hat on and the if the flash had been higher his face would have been in shadow from it’s wide rim.
Cut down to it’s minumum 50 joules at a distance of seven feet the flash reading on 200 ISO was still f6.7, which was a lot more than I would have liked. At f6.7 the inside of the stable needed an exposure of about 1/3rd of a second, and the sky needed 1/2 of a second to get some detail in the lighter areas. The discrepency between the two exposure requirements was only half a stop, so I went with the longer exposure because a little over exposure inside the stable would be fine.
With a 28-70 f2.8L series lens on a DCS520 I started shooting pictures of the upper half of his body and a little of the stable roof and sky. Without changing the exposure I changed lenses to the 17-35 f2.8 and moved back. As I moved back the sensor floodlight came on and the light shining into the lens gave some strange pink flare (bottom right) and the floodlight made an excellent element in the composition. By this time I was hand holding the camera at 1/2 second, which meant that there would be some camera shake so I shot about twenty frames at the same exposure in the hope that a few of them would be still enough to work.
I shot some safer images as well with the inside of the stable lit by another Lumedyne head complete with a warm up filter to simulate the tungsten glow. The image worked really well, and I am more than happy with it. It shows that light and location are the most important factors when planning a location portrait.
Footnote: Immediately after this job I started to carry a sheet of -2 stop neutral density gel in my bag. I have learned lots of lessons the hard way since the beginning of my career in 1986 and, whilst they are fewer and farther between, I still learn plenty of things that way.