pr

Eye-Fi card workflow

eye-fi_cards When I was rounding up 2013 I mentioned that I had a lot of success using an Eye-Fi card to wirelessly transmit pictures from my cameras (Canon EOS5D MkIII and Fujifilm X20) to either my iPhone, iPad or laptop where I can do a quick edit and caption before sending them to clients. Inevitably I got a couple of emails using the “ask me anything” feature of this blog asking me to describe my workflow. It is similar between an EOS5D MkIII and the Fujifilm X20 except that the former has twin card slots (one CF compact flash and one SD secure digital) whereas the latter only has the SD slot. I like to shoot RAW which means that in the X20 I have to do an in-camera RAW conversion to create a Jpeg to send out. I have two cards (shown left) – an Eye-Fi branded 8Gb Pro X2 and a Sandisk branded 4Gb one. In practice, they both do much the same job but the orange Eye-Fi one has more options should you want to work differently. Without further ado, here is how it all works on the Canon…

Getting the the settings on the card, your camera and your phone/tablet/computer right is the key to getting everything working well:

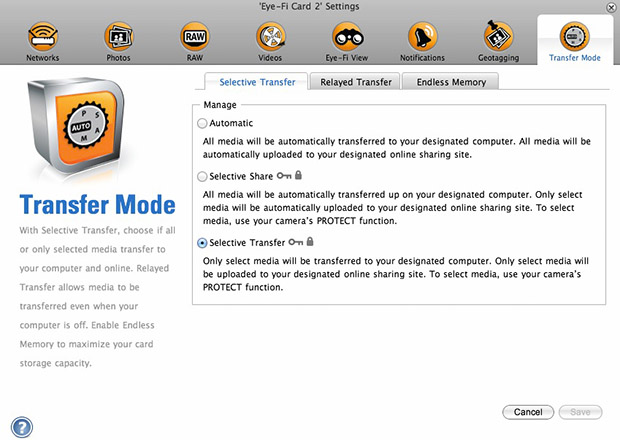
  1. Setting up the Eye-Fi card. When you get the card it should come with an SD card reader and by far the best way to set things up is to use that reader to load the card into a computer. There are lots of options that will appear once you have loaded the supplied “Eye-Fi Centre” application. This workflow is all about working in what the manufacturer calls “direct mode”. I choose to only transfer the files I want to my iPhone and so on the card I have selected “Selective Transfer” via the Eye-Fi Centre application. This means that only images that I have protected in the camera menu get transferred. On the Canon I have assigned the “rate” button to protect images for speed. It is also useful to add a couple of wifi networks and to define which file formats to transfer using the application whilst the card is in the computer because it isn’t possible to alter some settings once the card is in the camera. This whole process takes a few minutes and if you get it right, the whole thing test a lot easier from here on in.eye-fi_screenshot
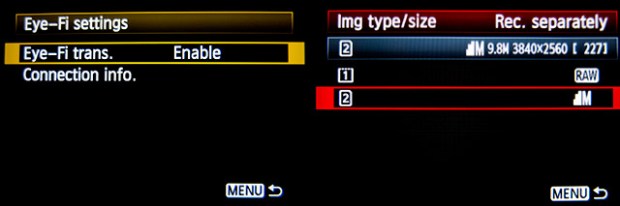
  2. Setting up the camera. In the EOS5D MkIII menu there are three things that I’d recommend you do. The first is to assign the “rate” button to protect selected images. The second is to get the camera to write RAW files to the CF card and medium size Jpegs to the SD (Eye-Fi) card. Finally, you need to enable Eye-Fi transfer from the camera menu. This way you can use the review function with card 2 (the SD slot) and then every time you protect an image written to the Eye-Fi card it will automatically look to transfer that file to the device you have nominated.
    eos_screens
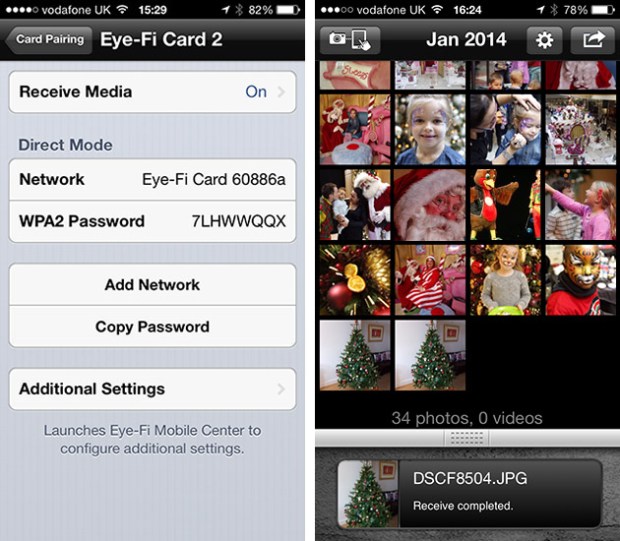
  3. The receiving device. I use an iPhone and an iPad and the whole process is eventually controlled by the free app that Eye-Fi make available through the Apple App Store. There are equally useful apps available for Android powered devices and the functionality is pretty much identical. Apart from loading the app the only other thing you have to do is to download and authorise a small change to your wifi settings on your phone which simply installs the settings for the direct mode to work. Once you launch the app you get an opening window which then gives way to the gallery window which in turn tells you what is happening about transfers. Below you can see the card paring screen and the gallery screen.eye_fi_phone
  4. Editing your pictures. Once you have the image on your phone or tablet you can then use the apps of your choice to edit and caption your image before shifting them on. My personal favourite is Photogene4 which has some good image options such as clarity, contrast, saturation, straighten, crop, sharpen and the ability to add IPTC captions – including defaults such as the EXIF time day and date as well as any pre-loaded captions and copyright information. I find that it’s a good idea to write some generic captions using Apple’s Notes app and then copy and paste them into Photogene4. The app also has the option to upload to a wide range of sharing sites as well as to email and ransomer images to FTP servers – making it really useful for work.photogene
    From shooting a frame to having it uploaded to my own FTP server normally takes twenty to thirty seconds if there is a good phone signal and the various uses that I’ve found for this rapid upload range from offering images to people I’ve photographed to providing almost instant pictures for corporate clients to use for their Facebook, Instagram and Twitter feeds at events. This is a very versatile piece of kit and I haven’t even come close to describing everything that it can do. I like the way that this workflow actually does flow and I love the effect that it has had on a couple of clients who really appreciate what it offers them. My first Eye-Fi card was £24.99 including VAT – possibly the best investment that I’ve ever made!

Revisiting my workflow

It is impossible to work digitally without having some sort of workflow. Most are a bit better than adequate, some are good and some are blindingly awful. I think that it is important to have a look at the way you do things every once in a while to make sure that yours is as good as it can be and achieves the four goals of being;

  • Efficient in terms of both time and memory
  • Repeatable so that the purely functional bits can be done almost on auto-pilot
  • Non destructive so that you don’t lose valuable RAW files or save changes to Jpegs shot in camera
  • Able to be short-cut for jobs where time is even more of an issue

I’ve written about my workflow before and I often teach workshops based on the “photographer’s twelve step plan” – a process with 12 distinct stages from camera to client including backing up and having a coffee! In this blog post I’m simply going to go through my basic workflow with a few hints and tips as I go. I normally use Photo Mechanic to import, sort, caption, rename and export my files and Adobe Photoshop CC to convert RAW (Canon CR2 most of the time) files into the required format. The whole process is colour-managed and I do as much as I can in-camera to save myself time when editing. I work on either a MacBook Pro, a MacBook Air or a Mac Mini depending on where I am and what the job is. Anyway, let’s kick off…

pm_preferences

Before I insert a card into the card reader I launch Photo Mechanic. This screen grab shows the “general” preferences for the application including what I want to happen when I load a memory card. I have checked the box “Open as contact sheet(s)” which means that as soon as the card goes in I see the images in a standard window. In the past I often used “show ingest dialogue” but I have found that ingesting every single frame doesn’t suit me and that it slows the whole process down drastically. Typically I only want between 25% and 35% of the images and so I go through them using the “tag” function (cmd T on a Mac or ctrl T on a PC) to identify those that I’m interested in or those which have unique content.

Once I’ve been through that card and tagged the images I want I use the “copy” function (cmd Y on the Mac and ctrl Y on a PC) and copy those tagged files to a new folder. I use a simple formula YYMMDD-jobname-RAW for those files and then repeat this process with every card used on that job. Photo Mechanic can be set to automatically open and update a new contact sheet with the copied files. I always eject the cards without deleting anything just in case there are problems during the process and put those cards to one side to be deleted later.

pm-preview

pm_contact_sheet

The preview and contact sheet windows are extremely easy ways to look at and select pictures. Once I have my first edit done I apply a generic caption using the Photo mechanic stationery pad (cmd I or ctrl I). At this point I’d like to mention two enormously useful features of Photo Mechanic (available on some other applications too).

The first is variables. These are simple ways of automatically adding information to your captions or filenames. Many are derived from the EXIF data applied in the camera. These include time, day and date as well as other shooting data. Some cameras allow you to set copyright information in the camera and others apply GPS location data too. Other variables might include camera serial numbers, original filenames as well as items that you can add yourself from pre-loaded drop-down menus. I have every county in the United Kingdom loaded as well as a large number of towns and cities and I also have some specific locations where I work regularly pre-loaded. By choosing a specific city from one drop-down menu you can use variables to add it to relevant other areas of the IPTC automatically. You can see some examples of variables in the caption below.

pm_stationery_pad

My main caption starts with {city}, {state}. {iptcday0} {iptcmonthname} {iptcyear4} which will then become something like Brighton, East Sussex. 12 December 2013 if I have all of the right information ready to go. If there are more details to add to the generic caption it is easy enough to do those in batches using the stationery pad.

Variables can also be used in the renaming of files.

pm-rename

This requires you to add the IPTC caption before you rename the files because using the {headline} variable automatically includes the headline you have used in the filename. I find this to be very useful and very good for saving time. In practice Photo Mechanic will sequentially rename 100 files in about ten seconds using this method.

The other really useful feature that Photo Mechanic has for helping with captions is code replacement. The idea is similar to variables except you create your won shortcuts. Sports photographers use this a lot and it saves a great deal of time. Imagine a football (that’s soccer to everyone in north America) team with 22 squad players – many of whom have unfamiliar and difficult to spell names. Using code replacement you can preload a text file with the teams before the game using shirt numbers. The England team, for example, would have numbers from EN01 to EN22 with the names of the players set against those numbers. Using code replacement you would type \EN08\ and the software would immediately recognise that as 8 Wayne Rooney or whatever you have set it to say. I use it for political figures so \dcam\ automatically becomes The Rt Hon David Cameron MP. I can add a second part to that if I so wish \pm\ would add Prime Minister.

I also use code replacement for shooting musicians and bands. It is really easy to create a text file with the names of all of the band members and then use the shortcuts to add the relevant people to each frame. You select the shortcuts yourself and the long versions yourself. Once you get the hang of code replacement, it becomes a central part of your workflow.

At this point I’ll often do a second tighter edit. I’ll keep all of the RAW files that I have copied over from the cards but only convert and send the best to the client. For some news jobs that is only 6-10 images and for other editorial assignments anything between a dozen and thirty. Some of the corporate jobs I shoot end up with a couple of hundred files and working on those proves the efficiency of this workflow because it is scaleable and repeatable.

Once I have my RAW (CR2 or RAF) images selected, captioned and renamed it is time to highlight them all and open them in Adobe Camera RAW in Adobe Photoshop. There are a number of great RAW conversion options out there and whether you use Photoshop, Lightroom, Aperture, Capture One or any of the others you need to make sure that the one you use doesn’t strip your carefully added caption information during the RAW conversion process.

acr-window

This is what the Adobe camera RAW window looks like. You can select a number of images from the strip down the left hand side and apply the same adjustments to all of them. I don’t want to run a complete ACR tutorial here but I would like to mention the straighten, sharpen, crop and lens correction adjustments as well worth learning. Of course those are secondary to the basic correction options such as colour temperature and tint, exposure, contrast, highlight and shadows etc. I find that I rarely need to open an image into Photoshop itself simply because all of the things that I’d normally do to a picture can be done right here in Camera Raw. Every few frames I will highlight those that have been corrected but not yet saved and save them. A decent computer with enough RAM will happily save the adjusted RAW files into whatever format you choose in the background whilst you continue to work on the rest. Once I have hit the “save” button on the last files I then click on “done”. Most of the time I am saving files at their default size as high quality Jpegs with some sharpening into the same folder as the RAW files. Photo Mechanic then updates the folder to show the RAW and Jpeg files together (you can separate them if you wish to) with a thumbnail from the newly saved Jpeg.

One of the best improvements between Adobe Camera RAW in Photoshop CS6 and Photoshop CC is an improved and expanded “save” dialogue window. You now have the option to set a target size, target amount of compression and apply a set degree of sharpening. With modern cameras producing pictures of over 60 megabytes and many of my clients wanting their photographs to be considerably smaller than that I am now using the target size more and more. My default setting is 4800 pixels along the longest side and with a maximum compressed file of 3200 kilobytes.

acr-save

Once I have my images all saved I return to Photo Mechanic and copy the Jpeg files into a new folder ready to send to the client. More and more that folder is a Dropbox one and I will give the link to the images to the client. For news jobs I can simply FTP the images (having saved them at a smaller size) and for some commercial clients that means burning the pictures to a DVD or CD. However they are delivered, the images are correctly sized, nicely prepared from the RAW files and properly captioned and renamed. All of this is done quickly and efficiently without damaging any originals.

When the urgency of the edit is over, I copy the files to a RAID drive in my office, to a portable drive that lives in my car and to a third drive which is away from my office ‘just in case’. I might then treat myself to a coffee…

Smash Up!

The caption that goes with these photos simply says “Badminton England takes to the streets to celebrate ‘Smash Up!’ a new way to play in schools, featuring music and text message breaks.” The client , Badminton England, asked me to go along and get a range of stills at a video shoot which would be the basis for a campaign to promote “Smash Up!” The idea was simple: take a few of the best young badminton players in the country to a skate park in east London and get them to hang out, play a few rallies and generally have fun.

This presents a couple of challenges that a lot of working photographers would be familiar with:

  • Fitting shooting stills around a video crew who have limited time and a lot to do
  • Taking pictures that can be used for promotional materials and not just interesting and creative ones

Experience really helps here but so do people skills and it took me a few minutes to work out who was who and what my best options were. There were a lot of skateboarders and BMX riders at the park and they were dressed much the same as the very young video crew. The folks from Badminton England were a bit easier to spot and my plan quickly evolved into one of keeping out of the way when they were shooting the wider video shots and then to get stuck back into the general image grabbing when the video guys were reviewing their work or setting up their next shots.

Very near the beginning of the morning they were shooting some sequences with two of the young badminton stars and three cameras and so I needed to be out of the way. Next to the skatepark is a railway arch with some decent graffiti and so I went with one of the other players and a BMX rider with my lights to see what we could get.

©Neil Turner, August 2013. Young badminton champion and BMX rider in the railway arches.

©Neil Turner, August 2013. Young badminton champion and BMX rider in the railway arches.

And this is one of the frames selected by Badmiton England to be released with the video. Reasonably simply lit with a 24″ x32″ soft box on an Elinchrom Ranger Quadra from the right hand side of the picture, the player stands as if she is about to receive a serve whilst the BMX rider who was lit by a second Elinchrom Ranger Quadra with no diffusion messed around in the background. We shot versions of this with both of them in action but this was the better shot for the purposes of publicity. There was almost no ambient light in the tunnel and so the whole shot is lit by the the two flash heads (running from a single pack). The camera was a Canon EOS5D MkII with a 16-35 f2.8L lens at 1/125th of a second f9 on 200 ISO.

© Neil Turner, August 2013. Rally taking place next to the skatepark bowl.

© Neil Turner, August 2013. Rally taking place next to the skatepark bowl.

Most of the morning was spent shooting action as it happened – either staged by the video crew or as it really happened. It was a case of hanging around with three cameras each with a different lens (16-35, 24-70 and 70-200 f2.8L series Canon lenses) and making pictures. The whole shoot was around two hours and I sent the client just over 90 pictures – 70 of which were these grabbed shots and the other 20+ were staged and lit images.

© Neil Turner. August 2013. Messing about at the end of the shoot.

© Neil Turner. August 2013. Messing about at the end of the shoot.

As fun shoots go, this was right up there. A client happy for me to shoot what I wanted and a video crew who understood that we both had a job to do under interesting conditions and with a very strict time limit. The campaign goes live very soon and I hope that badminton gets the boost in young players that it deserves.

images 34,59 or 78

Charity PR portrait

©Neil Turner, July 2013. The Victoria Education Centre & Sports College

©Neil Turner, July 2013. The Victoria Education Centre & Sports College

Back in July I was commissioned by Livability to go to the Victoria Education Centre & Sports College to shoot a range of pictures for their in-house publications, websites and PR work. I’d worked on news events a couple of times with the charity before but this was the first time I was shooting this kind of job for them. The afternoon started in the horticulture department where a team of professionals and volunteers works with students and clients growing a range of plants for use around the college and for sale to visitors and the public.

The young man in this picture volunteered himself for this picture and he chose which of the several hundred plants he wanted to be photographed with which made my job rather easy. I found this railing in the woods behind the greenhouses and poly-tunnels (where the work gets done) for the portrait. I chose it because I liked the way that the light was coming through the mass of green foliage, because the rail was sturdy and a great height and because I could see the scope for lighting the foreground in balance with the lovely ambient light in the background.

The photograph that you see here is completely ‘as shot’ with no cropping, no white balance adjustments and only a very simple tweak of the shadows in Adobe Camera RAW from the Canon CR2 files from an EOS5D MkII.

I knew that I wanted to shoot with a relatively shallow depth of field so that the background was sufficiently blurred. I was able to get back a decent distance and so I decided to shoot on my 70-200 f2.8L IS Canon lens and to light the subject with my Elinchrom Ranger Quadra with a shoot-through white 100cm umbrella. Once I had everything set up:

  • The flash was just under two metres away from the subject
  • About 30 degrees from the axis of the lens and ten degrees above his eye-line
  • A quick Custom white balance using the Lastolite EzyBalance grey card
  • It quickly became obvious that shooting at f2.8 or even f4 wasn’t really going to work – I wanted to have the whole plant in focus as well as my subject and then have the whole background as far out of focus as possible.
  • I shot a few test frames and looked at them on the LCD screen before opting for a third of a stop wider than f8 (f7.1 according to the EXIF data) and a balancing shutter speed of 1/80th on 200 ISO.

This gave me the lighting balance that I wanted and the depth of field was as good a compromise as I could get. These shoots are always a mass of compromises and that’s one of the biggest lessons that I try to teach when doing seminars and workshops.

I often get asked about the time it takes to shoot these kinds of pictures and the answer in this case was from the moment I unzipped the bag with the light stands in to shooting the first meaningful frame was just over four minutes. I then had another three minutes before other people were demanding the subject’s attention and it took a final three minutes to pack the kit away again – a nice round ten minutes from start to finish. That’s nowhere near being a record but it was comfortable for me and the subject and it really helps that the client liked the results.

Back when I first started to use portable lighting in this way I used to have a Lumedyne head already on a stand in a sling bag with a pack already connected and used a simple umbrella with Pocket Wizard triggers. I used to boast that my kit was not only lightweight but well planned and that I could be ready to shoot in under forty-five seconds from the time I touched the zip on the bag. When I did seminars and talks I’d even get people to time me getting the kit out and regularly beat forty-seconds. These days I’m a bit slower and I carry a bit more kit (I’m also a fair bit older by the way) and so a three minute set-up and break-down time is pretty good (three and a half minutes if there’s a softbox involved). It means that even if your subject is watching you, they don’t really get the chance to get bored waiting.

The rest of the day was fun and the other highlights were the students playing Boccia (a sport that I hadn’t encountered before last year’s Paralympics), one young woman showing off her excellent art and spending time with younger students and their rather docile rabbits.

What kind of photographer are you?

© Neil Turner, August 2013. Evening light from London's Tower Bridge. From my EyeEm feed.

© Neil Turner, August 2013. Evening light from London’s Tower Bridge. From my EyeEm feed.

When you are introduced in a social situation as a ‘photographer’ there is almost always a follow up which will vary from “do you do weddings?” via “what kind of photographer are you?” to “I take a lot of pictures myself”. How you respond to these various questions and comments says a lot about you.

There was a time when I got quite annoyed that so many people automatically equated professional photography with wedding photography and it didn’t help that I wasn’t a huge fan of the work most wedding photographers were doing.

That has literally all changed. Fewer people automatically assume that I must shoot weddings at the same time as the quality of the best wedding photography has gone from quite good to extraordinarily good. It is inexcusable, not to mention counter-productive, to get worked up about people not understanding a job market as complex as photography when the only professionals that the majority have met are high street portrait photographers and wedding photographers.

My annoyance has gone away (that could of course be my age showing through) and been replaced with a desire to educate as many people as I can about what makes a professional photographer different from a person with a nice camera. I’ve had a go at defining professionalism on this blog before so I want to visit my notions of myself as a photographer:

What kind of photographer AM I?

This is an exercise that we should all do no matter what we do for a living and no matter how we have described ourselves in the past. Every website, social media platform and discussion forum that I appear in has some form of description of me but they vary subtly from one to another. For example, on the EyeEm photo sharing site I have been using this;

Middle-aged editorial photographer still obsessed with taking pictures for fun, for a living and for posterity

Whereas on my AboutMe page I use the following;

Middle-aged editorial & corporate photographer, still crazy about pictures after all of these years

And then on LinkedIn – which I regard as the most important and most serious of the social media platforms for work I use a much longer description;

Freelance photographer based in the south of England providing editorial and editorial style photography to the media industries. Features, portraits, case studies and documentary style work for newspaper, magazine, commercial, PR and NGO clients

On the one that matters, I don’t mention my age and I don’t try to be even remotely witty or self-depricating. Horses for courses. Encapsulating who you are and what you do in one line is a lot easier when you have time to think about and when it is written down. I have lost count of the number of people that I’ve met in situations not directly connected to finding work as a photographer who have gone on to provide me with work. Your social media presence, your website or your blog are important shop windows and it is very important to have good and concise biographies available for those who want to know more. It’s important to keep them up-to-date and professional and that is something we all need to work hard on. Responding in person in a social or business setting is a lot tougher unless you give it a great deal of thought and have a few reasonably well rehearsed (without sounding glib or insincere) answers up your sleeve. I say this because it does matter.

So what are the options?

  • You can come up with one or two simple descriptions of what you do that rolls off of the tongue and says exactly what kind of professional you are.
  • There is an option to have a slightly less perfect description that invites further questions to which you have good answers that will lead into a proper conversation rather than you just giving a straight answer to a straight question.
  • It’s very easy to have some rather more enigmatic answers that give hints to what you do for a living but that have the goal of really dragging the other person/people into a detailed analysis of you and your work.
  • Finally you might want to deflect the question altogether – sometimes you meet people who aren’t interested in you and just want to talk about themselves and it is often easier to give them permission to indulge in that. Similarly there are occasions where you meet people who have a camera around their neck and who want to bore you rigid with their questions about the minutiae of photography.

Once you have been in this business for enough years you tend to make snap judgements and use an answer from any one of the four bullet pointed categories above as the situation demands. That isn’t always easy and so my default position is the second option – the imperfect description that invites conversation. The question can be phrased in far too many ways to work out an exact response for each one but my stock response would be something like;

“I make 90% of my living as an editorial and corporate photographer”

That gives them a chance to ask for definitions of editorial and corporate, to ask who my clients are and to ask how I make the other 10% of my income. I guess that there is a hint of ‘enigmatic’ in that answer but it mainly gives me a chance to assess their response and to line up some good descriptions and the odd anecdote. This is basic conversation and we all have conversations all of the time but I’m a very strong believer in responding professionally to enquiries about my profession.

To me, editorial photography is anything used in a newspaper or magazine, on a website or in a video to help to tell or illustrate a story. The pictures should have been shot as a third party where the person paying you doesn’t have a direct relationship with who or what is in the photographs. I also shoot a lot of PR and commercial pictures in an ‘editorial style’ where I use the same styles and techniques of lighting and composition but where I am being paid by someone who have a personal or business relationship with my subject. My corporate work is very similar but isn’t intended for use in an editorial context. The corporate stuff might be for a brochure or an annual report – a blatantly non-editorial context.

You can see that I have spent quite a bit of time thinking about this stuff. It’s important. At a time when the amount of work out there hasn’t increased with the number of people chasing it and when prices are under constant pressure because of supply and demand you have to have some clear ideas and visions about where you want to be, where you are perceived to be and how to marry those two often conflicting views. As time moves on, your own attitudes and positions change as well and you need to be able to give articulate responses to questions because more than ever before everyone you meet is a potential client or knows someone who is.

Because I make 10% of my income without a camera in my hands – something that has come into being in the last five years – I also have to have simple descriptions of what that entails. That, weirdly, is a lot tougher than describing how I make the 90%. Simply put – I teach, write about and consult on editorial and corporate photography. I am at pains to stress that whilst I love having the variety my heart remains with taking pictures and that my value to clients as a teacher, writer and consultant is vastly increased because I’m still a practitioner.

Quite how many social situations allow you to get through the whole script is a whole other blog post. You have to obey the social conventions and be interested in other people too. How easy that is depends on who they are and how engaging they are – exactly what they were thinking about you.


Philippa Gregory – the contact sheet

© Neil Turner/TSL. Philippa Gregory, October 2004

© Neil Turner/TSL. Philippa Gregory, October 2004

I haven’t done one of these contact sheets for a long time and I thought that this set was an interesting example. I submitted this set of sixteen pictures and they are all landscape in orientation. That’s because the slot they were shot for was across two pages and always a squarish landscape image. As I said in the previous post, the whole thing was done in ten minutes on a dull Autumn (fall) day in Hyde Park. That time included setting up and breaking down the Lumedyne light and chatting to the subject. Note that she is clutching her novel in the opening frame. I find that it’s always a good idea to do that if their publicist insists so that you can then go on to get the pictures that will actually get used.

Portraits, ID pictures and PR

I spend about forty percent of my working life shooting portraits for newspapers and magazines. It is my main passion as well as my career….

You will probably not be surprised to hear that I have some strong opinions about the art / science / craft (delete where applicable in your work) of photography. As an editorial photographer I am really lucky because there are three parties involved when I am shooting someone. There’s me, there’s the subject and there’s the paper – and that is really important to me and to the freedom I have to shoot the picture.

Social photographers usually have only two parties involved in the process – themself and the subject who often doubles as the customer. They are suddenly having to please the person who is sitting there in front of the camera. I really hate having to shoot portraits of family and friends because that’s even worse – imagine having the hassle of shooting a picture of someone who you love and care about and portraying them in a way that they may not have chosen. The freedom of being able to be objective and detached is a wonderful thing!

I have been involved in many arguments, both in person and on the web, about exactly when a photograph of a person becomes a portrait. It is really difficult to give a list of criteria about what constitutes a portrait, but somehow you can just look at a picture and say “yes” or “no” pretty much straight away.

I think that there are three categories of pictures of people. There are photographs that are merely record of what someone looks like that are perfect for ID badges or criminal records that say little or nothing about the subject. There are photographs where what is happening in the picture is more important than who is in it, such as a picture of someone playing sport or a musical instrument. Thirdly there are portraits, where there is enough in the image besides the subject to give a few clues about the subject, but not so much that the viewer is left thinking about what, rather than who. As a location only portraitist I have the added luxury of having the subject’s surroundings to help the image work. Studio photographers have to work really hard with fake props and painted backcloths to do what I can do very easily. Mass produced accessories, even student gowns, add little or nothing to the information that the photographer can give about their subject and can detract from the individuality of an image. You may have noticed that I haven’t mentioned any particular focal length of lens or lighting rig, and that’s deliberate. You can shoot a great portrait with any lens, and in any place – it’s all about your relationship with the subject.

Portraiture is something that you either find easy or you don’t. There are things that you can learn to make the whole process less painful and there are ways of shooting that eliminate risk (and creativity) if you really find that saying something about your subject isn’t what you were cut out to do with your camera. My advice is to talk to your subject, look around the room or the garden for something that they relate to and shoot a lot of frames. You can add a lot of athmosphere with lighting, but if you get the pose, props and position right you have the battle half won. Get your “bedside manner” right and you can call yourself a portrait photographer.

The relationship between the photographer, their subject and their client is vitally important. Editorial photography usually has three parties and it’s a great way to create good images. A while ago I shot a PR portrait of two businessmen. It had to be done in fifteen minutes and the deadline for the pictures to be with the designer was very tight. PR is a strange hybrid of social and editorial photography. There are usually more than two parties involved and they want editorial style shots but they have to be flattering to the subject. It doesn’t matter if the client is a PR company or if you are being paid directly by the company that you are there to promote – the images have to be positive and show no flaws. Is that a two party or a three party relationship? I would call it two and a half.

“Nothing unusual about this job?” I hear you ask. The answer is OH YES! The number of parties involved was as many as six and the decision making process was made harder by the two people in the pictures having the final decision about which image was chosen. Let me explain…

The end client was a European division of a multinational company who needed a picture shot in London. They had asked their London office to arrange a photographer to supply the pictures to the designer who was in another country (that’s three parties so far). The two men in the picture both had a say in the shoot (parties four and five) and then, of course, there was me (party number six). I had to set up the shot without the two businessmen but with the London PR people present. The two men arrived and I shot for ten minutes with two differing backgrounds and then offloaded my RAW files into my laptop. There then followed a quick Photo Mechanic slide show for the two subjects and the London PR where they selected two possible images in which they felt they looked good. We finally settled on the very last frame that I had shot – taken, ironically, about a minute after the two subjects started to make noises about leaving to catch a flight!

It was then a simple case of converting the RAW file on site and sending it as a high resolution email attachment to the designer, copying everyone else who hadn’t seen the choice in at the same time. That, ladies and gentlemen, was a complicated relationship. Editing the images later to send a choice of twenty to the client I decided that there was a better file but by then it was too late.

The difficulty for me with this job was that one of the two subjects vetoed several of the images because he didn’t think he looked right in them and the other subject vetoed one or two as well. The old adage about asking a committee to design a horse and ending up with a camel comes to mind. If too many people have a right to say no, you inevitably end up with the least offensive and least interesting picture!

A mission statement or two

Yesterday morning, The BBC presenter and former Economics Editor Evan Davis was sharing his approach to interviewing senior business people. He said that he wanted to relax them, tempt them into talking more openly and frankly than they might want to and because so few of them are media professionals he has a form of words that he uses to let them know what his role is. He says to them “I’m not here to make you look stupid but if you decide to make yourself look stupid it isn’t my job to stop you”. That, my friends, should be the mission statement of every editorial and news photographer working right across the world. And that got me thinking about some equally succinct statements for other kinds of photography and that in turn got me thinking about definitions of types of photography.

“I’m not here to make you look stupid but if you decide to make yourself look stupid it isn’t my job to stop you”. – Evan Davis

Thanks to the verbal clarity and dexterity of Evan Davis we have news and editorial photographers pretty much covered and the next category of photographers that I wanted to think about was PR photographers. For me this comes next for two reasons: firstly that I do quite a bit of PR work myself and also because so many of the good PR photographers here in the UK have a background as press and editorial photographers. The role of the PR photographer is to shoot editorial style images that show their client in a positive light. I don’t have the same ability with words that a senior BBC journalist does but I came up with the following:

“I’m here to help make you and your business look good by concentrating on the positives and ignoring the negatives.”

The cynic in me wanted to go with “he who pays the piper call the tune” but PR photography done well is a lot more than just pointing the camera where you are told and cashing the cheque. Next in line in both my life and in the photography that I do is commercial work. I guess that this differs from PR not so much in what I shoot but for where the pictures end up which is mostly in brochures, company reports and on their websites.

“I’m here to shoot the pictures that you want in the way that you want me to shoot them and to add my own input in achieving the right images”.

This process could go on and on and I have been trying to think of a mission statement for the paparazzi but the truth is I’m not actually sure what they do and why they do it – and I’m pretty sure that some of them are in the same boat. The best and most successful paps know exactly what they are about and that’s why they get paid the big money for the right pictures. My final thoughts on these definitions and mission statements goes to the names given to themselves by wedding photographers and which of the three mission statements above applies to them. I have something of a problem with “wedding photojournalist” because, for me a photojournalist is there to record events and to help tell the story to the wider world – warts and all. It’s those last three words that I cannot believe any wedding photographer can truly sign up to. Your client is normally the bride and groom or at least a close friend or relative of theirs and I’m pretty sure that they would not be happy for every single element of the big day to be recorded and published. I have no issues with the phrases “documentary style photography” or shooting in a “photojournalistic style” but can a wedding photographer really be a detached observer and recorder of events? Please don’t get me wrong here, I have the utmost respect and admiration for the best wedding photographers who have broken with the wooden and formulaic styles that were around when I and most of my friends were getting married. The quality and volume of the work that they produce in such demanding and unrepeatable situations is amazing but I really don’t like the hijacking of the title photojournalist for what is, essentially, very good PR.