work

Revisiting my workflow

It is impossible to work digitally without having some sort of workflow. Most are a bit better than adequate, some are good and some are blindingly awful. I think that it is important to have a look at the way you do things every once in a while to make sure that yours is as good as it can be and achieves the four goals of being;

  • Efficient in terms of both time and memory
  • Repeatable so that the purely functional bits can be done almost on auto-pilot
  • Non destructive so that you don’t lose valuable RAW files or save changes to Jpegs shot in camera
  • Able to be short-cut for jobs where time is even more of an issue

I’ve written about my workflow before and I often teach workshops based on the “photographer’s twelve step plan” – a process with 12 distinct stages from camera to client including backing up and having a coffee! In this blog post I’m simply going to go through my basic workflow with a few hints and tips as I go. I normally use Photo Mechanic to import, sort, caption, rename and export my files and Adobe Photoshop CC to convert RAW (Canon CR2 most of the time) files into the required format. The whole process is colour-managed and I do as much as I can in-camera to save myself time when editing. I work on either a MacBook Pro, a MacBook Air or a Mac Mini depending on where I am and what the job is. Anyway, let’s kick off…

pm_preferences

Before I insert a card into the card reader I launch Photo Mechanic. This screen grab shows the “general” preferences for the application including what I want to happen when I load a memory card. I have checked the box “Open as contact sheet(s)” which means that as soon as the card goes in I see the images in a standard window. In the past I often used “show ingest dialogue” but I have found that ingesting every single frame doesn’t suit me and that it slows the whole process down drastically. Typically I only want between 25% and 35% of the images and so I go through them using the “tag” function (cmd T on a Mac or ctrl T on a PC) to identify those that I’m interested in or those which have unique content.

Once I’ve been through that card and tagged the images I want I use the “copy” function (cmd Y on the Mac and ctrl Y on a PC) and copy those tagged files to a new folder. I use a simple formula YYMMDD-jobname-RAW for those files and then repeat this process with every card used on that job. Photo Mechanic can be set to automatically open and update a new contact sheet with the copied files. I always eject the cards without deleting anything just in case there are problems during the process and put those cards to one side to be deleted later.

pm-preview

pm_contact_sheet

The preview and contact sheet windows are extremely easy ways to look at and select pictures. Once I have my first edit done I apply a generic caption using the Photo mechanic stationery pad (cmd I or ctrl I). At this point I’d like to mention two enormously useful features of Photo Mechanic (available on some other applications too).

The first is variables. These are simple ways of automatically adding information to your captions or filenames. Many are derived from the EXIF data applied in the camera. These include time, day and date as well as other shooting data. Some cameras allow you to set copyright information in the camera and others apply GPS location data too. Other variables might include camera serial numbers, original filenames as well as items that you can add yourself from pre-loaded drop-down menus. I have every county in the United Kingdom loaded as well as a large number of towns and cities and I also have some specific locations where I work regularly pre-loaded. By choosing a specific city from one drop-down menu you can use variables to add it to relevant other areas of the IPTC automatically. You can see some examples of variables in the caption below.

pm_stationery_pad

My main caption starts with {city}, {state}. {iptcday0} {iptcmonthname} {iptcyear4} which will then become something like Brighton, East Sussex. 12 December 2013 if I have all of the right information ready to go. If there are more details to add to the generic caption it is easy enough to do those in batches using the stationery pad.

Variables can also be used in the renaming of files.

pm-rename

This requires you to add the IPTC caption before you rename the files because using the {headline} variable automatically includes the headline you have used in the filename. I find this to be very useful and very good for saving time. In practice Photo Mechanic will sequentially rename 100 files in about ten seconds using this method.

The other really useful feature that Photo Mechanic has for helping with captions is code replacement. The idea is similar to variables except you create your won shortcuts. Sports photographers use this a lot and it saves a great deal of time. Imagine a football (that’s soccer to everyone in north America) team with 22 squad players – many of whom have unfamiliar and difficult to spell names. Using code replacement you can preload a text file with the teams before the game using shirt numbers. The England team, for example, would have numbers from EN01 to EN22 with the names of the players set against those numbers. Using code replacement you would type \EN08\ and the software would immediately recognise that as 8 Wayne Rooney or whatever you have set it to say. I use it for political figures so \dcam\ automatically becomes The Rt Hon David Cameron MP. I can add a second part to that if I so wish \pm\ would add Prime Minister.

I also use code replacement for shooting musicians and bands. It is really easy to create a text file with the names of all of the band members and then use the shortcuts to add the relevant people to each frame. You select the shortcuts yourself and the long versions yourself. Once you get the hang of code replacement, it becomes a central part of your workflow.

At this point I’ll often do a second tighter edit. I’ll keep all of the RAW files that I have copied over from the cards but only convert and send the best to the client. For some news jobs that is only 6-10 images and for other editorial assignments anything between a dozen and thirty. Some of the corporate jobs I shoot end up with a couple of hundred files and working on those proves the efficiency of this workflow because it is scaleable and repeatable.

Once I have my RAW (CR2 or RAF) images selected, captioned and renamed it is time to highlight them all and open them in Adobe Camera RAW in Adobe Photoshop. There are a number of great RAW conversion options out there and whether you use Photoshop, Lightroom, Aperture, Capture One or any of the others you need to make sure that the one you use doesn’t strip your carefully added caption information during the RAW conversion process.

acr-window

This is what the Adobe camera RAW window looks like. You can select a number of images from the strip down the left hand side and apply the same adjustments to all of them. I don’t want to run a complete ACR tutorial here but I would like to mention the straighten, sharpen, crop and lens correction adjustments as well worth learning. Of course those are secondary to the basic correction options such as colour temperature and tint, exposure, contrast, highlight and shadows etc. I find that I rarely need to open an image into Photoshop itself simply because all of the things that I’d normally do to a picture can be done right here in Camera Raw. Every few frames I will highlight those that have been corrected but not yet saved and save them. A decent computer with enough RAM will happily save the adjusted RAW files into whatever format you choose in the background whilst you continue to work on the rest. Once I have hit the “save” button on the last files I then click on “done”. Most of the time I am saving files at their default size as high quality Jpegs with some sharpening into the same folder as the RAW files. Photo Mechanic then updates the folder to show the RAW and Jpeg files together (you can separate them if you wish to) with a thumbnail from the newly saved Jpeg.

One of the best improvements between Adobe Camera RAW in Photoshop CS6 and Photoshop CC is an improved and expanded “save” dialogue window. You now have the option to set a target size, target amount of compression and apply a set degree of sharpening. With modern cameras producing pictures of over 60 megabytes and many of my clients wanting their photographs to be considerably smaller than that I am now using the target size more and more. My default setting is 4800 pixels along the longest side and with a maximum compressed file of 3200 kilobytes.

acr-save

Once I have my images all saved I return to Photo Mechanic and copy the Jpeg files into a new folder ready to send to the client. More and more that folder is a Dropbox one and I will give the link to the images to the client. For news jobs I can simply FTP the images (having saved them at a smaller size) and for some commercial clients that means burning the pictures to a DVD or CD. However they are delivered, the images are correctly sized, nicely prepared from the RAW files and properly captioned and renamed. All of this is done quickly and efficiently without damaging any originals.

When the urgency of the edit is over, I copy the files to a RAID drive in my office, to a portable drive that lives in my car and to a third drive which is away from my office ‘just in case’. I might then treat myself to a coffee…
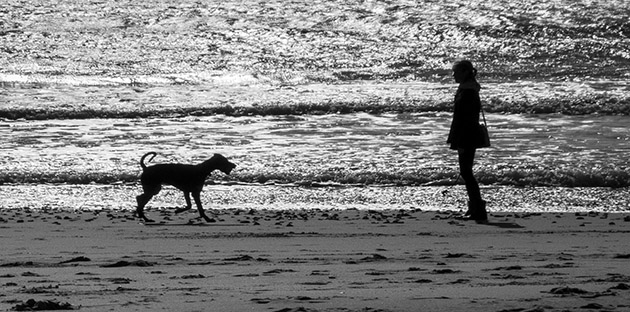
Back on the beach

In another “just because” moment I thought that I’d post this picture I grabbed on the beach today. I’ve blogged about my near obsession with shooting dogs on the beach and today I was at my favourite part of my favourite beach when the combination of light and subject matter came together meaning that all I had to do was compose, wait and click.

©Neil Turner, October 2013. Bournemouth

©Neil Turner, October 2013. Bournemouth

I actually saw this picture as a mono image too and anyone who has been following this blog will know that this was a major step forward for me in my quest to be able to truly see in monochrome when I want to. To add the final piece to the jigsaw of this image, I love a good silhouette too.

The picture was shot on a Fujifilm X20 at the fullest extent of its 112mm equivalent zoom and it shows a dog with its owner having something of a difference of opinion about what should happen with a ball. You don’t expect to get such beautiful weather in late October – especially less than 36 hours after a massive storm had lashed this part of the English coast. Within a minute or two of shooting this picture I did a RAW conversion in the camera before using an Eye-Fi card to transfer it to my iPhone 5S where I used the Photogene 4 app to optimise and caption the image before uploading it to EyeEm (in colour). The version shown here is the more considered black and white image converted in Photoshop CC on my Mac at home.

Monochrome and me

I was asked by a good client of mine to have a look at a set of black and white photographs that a new photographer had shot for them. They quite liked them but couldn’t see why they weren’t enthused by them because they fitted the brief. My answer was that if they had been in colour they’d have been seriously dull but that in black and white they were elevated to mediocre because black and white has impact. I tried to find the words to say that for monochrome to work really well you needed the light to contribute to the finished picture in an even more compelling way than it has to for good colour images. That wasn’t to say that great light doesn’t make for great colour pictures – far from it – but by this time my explanation was foundering and I was starting to sound less than coherent. At that point I cut my losses and simply said “to sum up, the light isn’t very interesting and without colour all you have is light and shade”. Wow… nailed it right at the end!

I drove home thinking about my own long and chequered history with shooting black and white: from the first frames I ever shot as a young kid through the exercises in light and shade, focal length and depth of field and movement that I did as a student to the hundreds of rolls I shot as an emerging professional photographer I have never been all that pleased with my ability to consistently shoot interesting black and white images  – ones that I didn’t privately think would look better in colour.

  • Photographic heresy alert – I’m a better photographer in colour and so are 90% of my fellow photographers.
  • Photographic jealousy alert – I envy those who can just “see” in terms of black, white and shades of grey
  • Photographic honesty alert – I have decided to do something about it, 27+ years into my professional career

Thinking long and hard about monochrome and me has been an interesting experience. I’ve found myself examining the way images look through the viewfinder and asking whether the picture I’m about to take relies on colour, light, both or neither. Don’t get me wrong, I don’t have a clipboard or a mental checklist to hand – it’s just a momentary thought that pops up a few times on each job. I’m definitely making progress. I’ve been shooting a lot of events during the Bournemouth Arts By The Sea Festival over the last three weeks and on more than one occasion I knew that some of my pictures were destined to be monochrome, better in black and white.

©Neil Turner, September 2013. The vesry first frame I shot during the Bournemouth Arts By The Sea Festival 2013 - a man reading the programme a few minutes before it all started.

©Neil Turner, September 2013. The very first frame I shot during the Bournemouth Arts By The Sea Festival 2013 – a man reading the programme a few minutes before it all started.

©Neil Turner, October 2013. Mark Kermode playing bass with The Dodge Brothers at the Bournemouth Arts By The Sea Festival

©Neil Turner, October 2013. Mark Kermode playing bass with The Dodge Brothers at the Bournemouth Arts By The Sea Festival

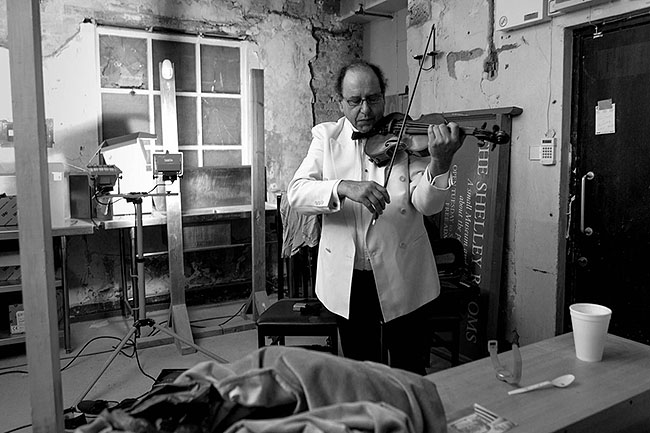
©Neil Turner, September 2013. Violinist Jack Maguire warming up in his makeshift dressing room

©Neil Turner, September 2013. Violinist Jack Maguire warming up in his makeshift dressing room

It isn’t that I’ve never shot anything good in black and white it’s just that most of the time I wasn’t ‘seeing’ without colour. The market for black and white isn’t huge right now anyway and I haven’t had to develop myself in that direction. The funny thing is that it is the explosion of social media and sites like Instagram and EyeEm that have made me experiment more and, more importantly, it has been my love affair with the Fujifilm X20 that has pushed me into shooting pictures that bear little resemblance to the suff that I do for work – often monochrome fits that bill rather well.

Monochrome and Me… it’s been a long and weird relationship. I like to think that it is maturing nicely and that it is now entering something of a golden era. There’s still no money in it but that isn’t really the point.

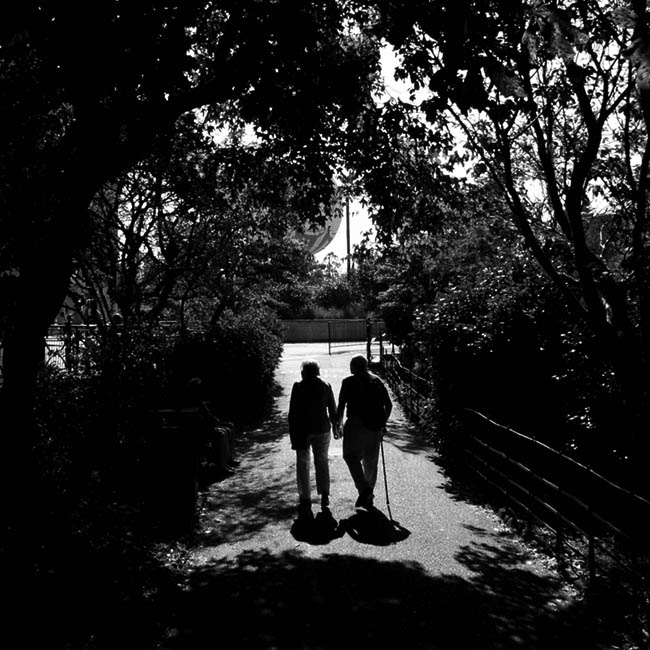
©Neil Turner, September 2013. Pensioners walking out of the Pleasure Gardens, Bournemouth

©Neil Turner, September 2013. Pensioners walking out of the Pleasure Gardens, Bournemouth

Cool watchmakers

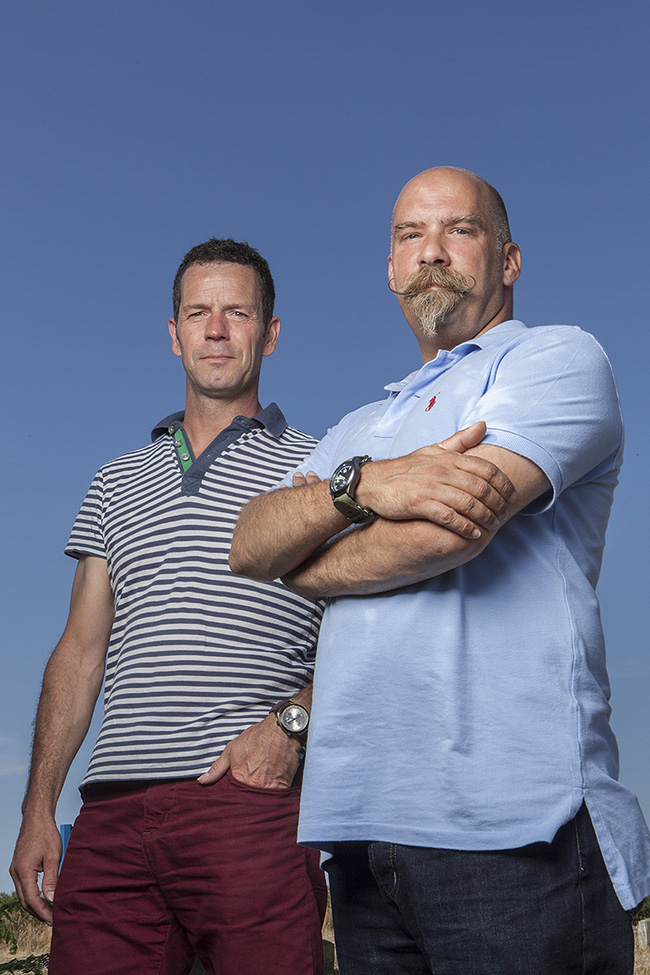
©Neil Turner, July 2013. Alex Brown and Ian Elliott of Elliott Brown.

©Neil Turner, July 2013. Alex Brown and Ian Elliott of Elliott Brown.

I promised to share new work as and when I could and to add a bit of technical detail whilst doing so. This two person portrait shot on a sweltering July day in Dorset for a leading UK business magazine is a great example of the kind of picture I get asked to shoot. The story was a simple one about a new business partnership designing, making and selling very high class mens’ watches.

There was a limited amount of time for the interview, the pictures and a short video grab and so when I got my slot the two subjects, the reporter and the Picture Editor all jumped into my car and we headed about three quarters of a mile from the company offices to shoot on some open heathland because the style of picture I was being asked for needed an expanse of deep blue sky. We couldn’t shoot at the offices because there just too many tall building around and I had to rely on some local knowledge to find the right spot.

The location was far from perfect because I would have liked a decent amount of shade to put my two subjects in. That wasn’t going to be easy and so I had the reporter holding a large black reflector aloft to give me some artificial shade. There was only the slightest breeze but that was enough to force me into something of a ‘plan B’ which was to move into the shade of some tall bushes about fifty yards away. The downside of this was to lose the unbroken blue sky from behind my subjects (you can see some scrubby heath behind them in the bottom of the frame) but it did allow me to balance the flash (single Elinchrom Ranger Quadra with a 32″ x 24″ soft box) with the sky without the subjects being in direct sunshine themselves. Free from his reflector holding duties, the reporter was happy to hold onto the lighting stand to make sure that it didn’t blow over. No matter how light the breeze, soft boxes act like sails!

I have described shooting from the shade a couple of times before and the basic principle is an easy one: the subject is in deep shade and only lit by the flash whereas the rest of the scene is metered normally and the skill comes from balancing the two halves of the exposure. In practice on a bright and sunny day this almost always means the ambient exposure is going to be 1/200th of a second on 200 ISO at somewhere between f16 and f22. All you then need to do is to get enough power out of your flash to balance that. This sometimes means that you have to lose your light modifier (soft box/umbrella etc) if you don’t have a lot of power and almost always means moving the flash quite close to the subject if you want to keep the light modifier in place. Compromise… I’ve used that word once or twice before too. The camera was a Canon EOS5D MkII and the lens was a Canon 24-70 f2.8L.

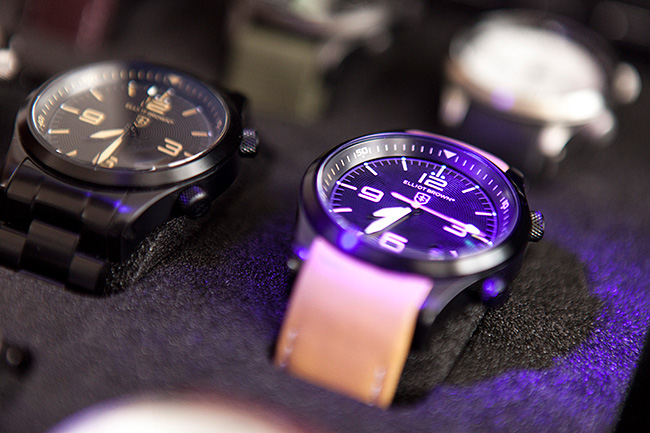
The two guys in the photograph make some very cool watches. It’s a new business by the name of Elliott Brown and their first collection goes on sale about now.

©Neil Turner, July 2103

©Neil Turner, July 2103

Cleaning glass

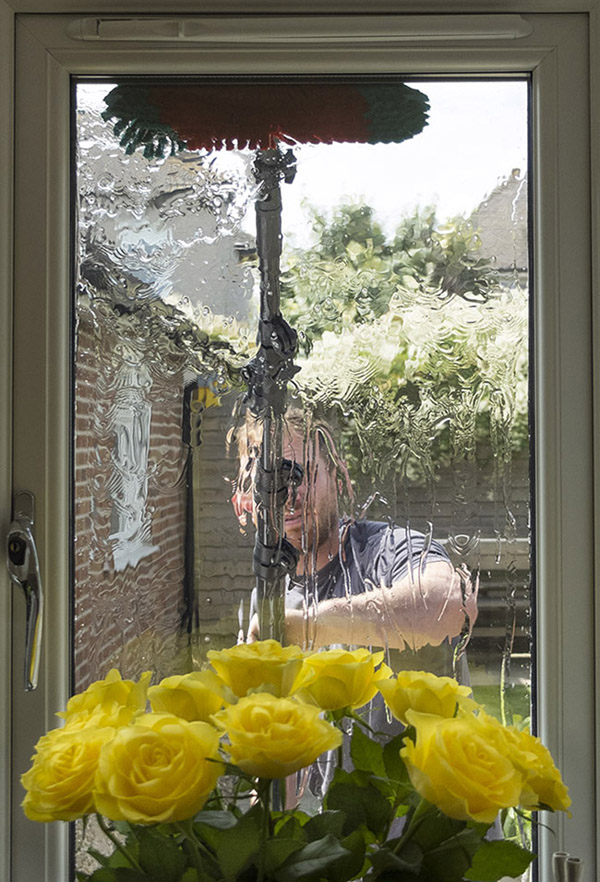
©Neil Turner, August 2013, Bournemouth.

©Neil Turner, August 2013, Bournemouth.

I was looking through a few pictures from this summer this morning when I decided to post this picture just because I liked it. The young man in the photograph is a nephew who has just started his own window cleaning business in the Bournemouth area using filtered water and a long pole instead of ladders, squeegees and chamois leathers. I hope that it takes off and I hope that he gets around to putting this on his website. It was taken with my Fujifilm X20 when I was working at the kitchen table on some pictures that I needed to get to a client and the X20 was the camera that I had to hand.

One thought this morning led, as they inevitably do, to another when I read a posting on a Facebook group by a photographer who has never cleaned their own lenses or their own digital camera chips. Cleaning lenses is too easy to go to the bother of driving to a service centre and parting with money. Obviously if you are at a major sporting event and Canon or Nikon are there you’d be a fool to not take up their offers of free cleaning and checks but beyond that you should learn to do it yourself. I say that as someone who never uses filters on a day-to-day basis as protection and as someone whose home is over 100 miles way from the nearest Canon approved service centre. I also say it as someone who used to be a staff photographer based in London with an employer who picked up the tab for pretty much everything and got quite lazy there for a while! I tend to use the Eclipse solution designed for camera chips along with either a very old quality cotton handkerchief or a soft cloth designed for spectacles. Once I’ve done the glass I usually give the outside of the lens a quick wipe down too – there’s no sense in having dirty gear.

Cleaning camera chips is a whole other matter. Getting it done professionally every once-in-a-while makes sense but at up to £50 + VAT per camera I don’t want to get my chips cleaned as often as I want to get my windows at home done. Of course the “self-cleaning” mechanisms built into today’s cameras really help. In the past it was common to get sizeable amounts of dust on the chip which needed to be removed. These days most of the loose stuff goes away with one or two cycles of the built-in cleaning option. Much of the rest can be loosened or removed using a decent air blower (the rubber bulb type) and if all else fails you can buy the right chemicals and sensor swabs to do a thorough job. If I get an offer of a free clean or I’m having a camera serviced then I always get the chip cleaned too. Canon build in a small sticky strip to catch and keep the dust shaken loose by the piezo-electric motors that do the automatic cleaning every time you turn the camera on and off. The service centre replaces that strip when you take your kit in for an overhaul or repair and it is useful to bear in mind that the strip is only truly effective if a) you have the camera with the baseplate pointing to the ground when the cleaning is in progress and b) the strip gets changed regularly.

Because of the distance I live away from the major repair and service centres I find myself cleaning camera chips using the Eclipse solution every couple of months. It definitely has an effect because I then have to re-calibrate the white balance shifts on the cameras. The end result is that I save a bit of money, a lot of time travelling to and from the service centre and an awful lot of time in post-production not having to remove dust spots. When I travel for work I always take some cleaning kit. I was in India a few years ago now and the dust in my ‘weather sealed’ EOS1D MkII cameras had to be removed on an almost daily basis. I’d hate to think how bad it would have been after a week there without having the kit to do my own cleaning.

It doesn’t have to stop with lenses and chips either. Laptop screens, computer monitors and keyboards are all easy to keep looking their best if you take ten minutes to do so. I used to throw my Domke F-series camera bags into the washing machine (which is how my beautiful grey F1X ended up salmon pink thanks to a stray pair of red socks) and these days I get the vacuum cleaner into my camera bags a couple of times a year.

Smash Up!

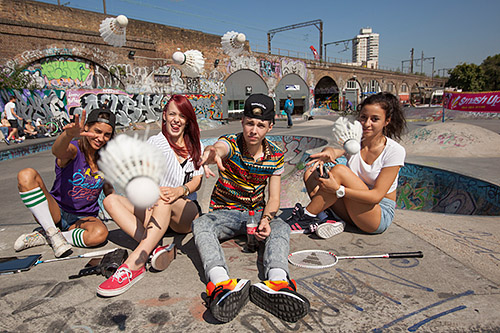
The caption that goes with these photos simply says “Badminton England takes to the streets to celebrate ‘Smash Up!’ a new way to play in schools, featuring music and text message breaks.” The client , Badminton England, asked me to go along and get a range of stills at a video shoot which would be the basis for a campaign to promote “Smash Up!” The idea was simple: take a few of the best young badminton players in the country to a skate park in east London and get them to hang out, play a few rallies and generally have fun.

This presents a couple of challenges that a lot of working photographers would be familiar with:

  • Fitting shooting stills around a video crew who have limited time and a lot to do
  • Taking pictures that can be used for promotional materials and not just interesting and creative ones

Experience really helps here but so do people skills and it took me a few minutes to work out who was who and what my best options were. There were a lot of skateboarders and BMX riders at the park and they were dressed much the same as the very young video crew. The folks from Badminton England were a bit easier to spot and my plan quickly evolved into one of keeping out of the way when they were shooting the wider video shots and then to get stuck back into the general image grabbing when the video guys were reviewing their work or setting up their next shots.

Very near the beginning of the morning they were shooting some sequences with two of the young badminton stars and three cameras and so I needed to be out of the way. Next to the skatepark is a railway arch with some decent graffiti and so I went with one of the other players and a BMX rider with my lights to see what we could get.

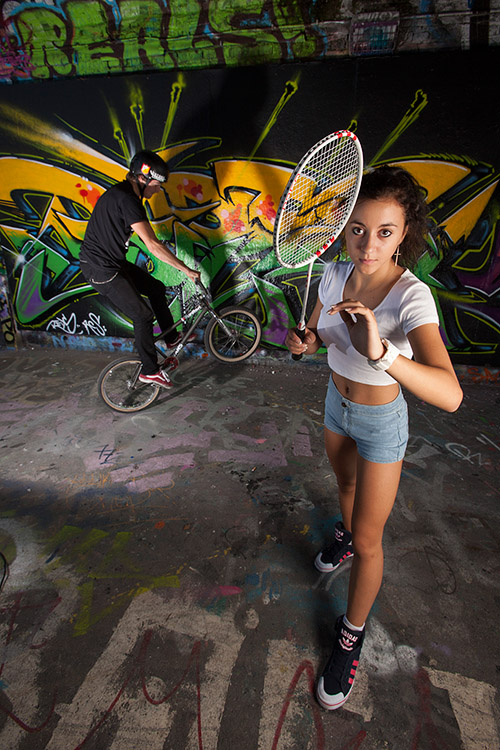
©Neil Turner, August 2013. Young badminton champion and BMX rider in the railway arches.

©Neil Turner, August 2013. Young badminton champion and BMX rider in the railway arches.

And this is one of the frames selected by Badmiton England to be released with the video. Reasonably simply lit with a 24″ x32″ soft box on an Elinchrom Ranger Quadra from the right hand side of the picture, the player stands as if she is about to receive a serve whilst the BMX rider who was lit by a second Elinchrom Ranger Quadra with no diffusion messed around in the background. We shot versions of this with both of them in action but this was the better shot for the purposes of publicity. There was almost no ambient light in the tunnel and so the whole shot is lit by the the two flash heads (running from a single pack). The camera was a Canon EOS5D MkII with a 16-35 f2.8L lens at 1/125th of a second f9 on 200 ISO.

© Neil Turner, August 2013. Rally taking place next to the skatepark bowl.

© Neil Turner, August 2013. Rally taking place next to the skatepark bowl.

Most of the morning was spent shooting action as it happened – either staged by the video crew or as it really happened. It was a case of hanging around with three cameras each with a different lens (16-35, 24-70 and 70-200 f2.8L series Canon lenses) and making pictures. The whole shoot was around two hours and I sent the client just over 90 pictures – 70 of which were these grabbed shots and the other 20+ were staged and lit images.

© Neil Turner. August 2013. Messing about at the end of the shoot.

© Neil Turner. August 2013. Messing about at the end of the shoot.

As fun shoots go, this was right up there. A client happy for me to shoot what I wanted and a video crew who understood that we both had a job to do under interesting conditions and with a very strict time limit. The campaign goes live very soon and I hope that badminton gets the boost in young players that it deserves.

images 34,59 or 78

Charity PR portrait

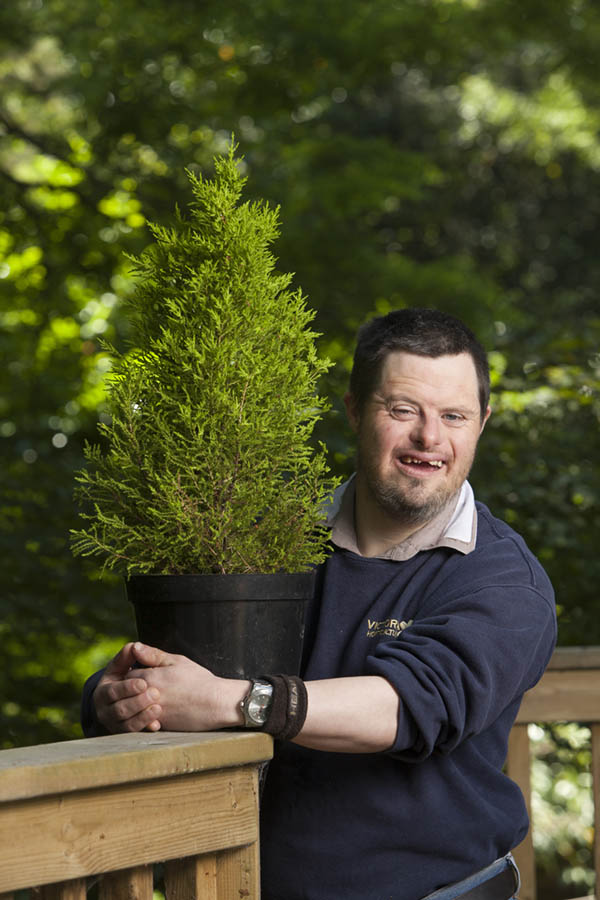
©Neil Turner, July 2013. The Victoria Education Centre & Sports College

©Neil Turner, July 2013. The Victoria Education Centre & Sports College

Back in July I was commissioned by Livability to go to the Victoria Education Centre & Sports College to shoot a range of pictures for their in-house publications, websites and PR work. I’d worked on news events a couple of times with the charity before but this was the first time I was shooting this kind of job for them. The afternoon started in the horticulture department where a team of professionals and volunteers works with students and clients growing a range of plants for use around the college and for sale to visitors and the public.

The young man in this picture volunteered himself for this picture and he chose which of the several hundred plants he wanted to be photographed with which made my job rather easy. I found this railing in the woods behind the greenhouses and poly-tunnels (where the work gets done) for the portrait. I chose it because I liked the way that the light was coming through the mass of green foliage, because the rail was sturdy and a great height and because I could see the scope for lighting the foreground in balance with the lovely ambient light in the background.

The photograph that you see here is completely ‘as shot’ with no cropping, no white balance adjustments and only a very simple tweak of the shadows in Adobe Camera RAW from the Canon CR2 files from an EOS5D MkII.

I knew that I wanted to shoot with a relatively shallow depth of field so that the background was sufficiently blurred. I was able to get back a decent distance and so I decided to shoot on my 70-200 f2.8L IS Canon lens and to light the subject with my Elinchrom Ranger Quadra with a shoot-through white 100cm umbrella. Once I had everything set up:

  • The flash was just under two metres away from the subject
  • About 30 degrees from the axis of the lens and ten degrees above his eye-line
  • A quick Custom white balance using the Lastolite EzyBalance grey card
  • It quickly became obvious that shooting at f2.8 or even f4 wasn’t really going to work – I wanted to have the whole plant in focus as well as my subject and then have the whole background as far out of focus as possible.
  • I shot a few test frames and looked at them on the LCD screen before opting for a third of a stop wider than f8 (f7.1 according to the EXIF data) and a balancing shutter speed of 1/80th on 200 ISO.

This gave me the lighting balance that I wanted and the depth of field was as good a compromise as I could get. These shoots are always a mass of compromises and that’s one of the biggest lessons that I try to teach when doing seminars and workshops.

I often get asked about the time it takes to shoot these kinds of pictures and the answer in this case was from the moment I unzipped the bag with the light stands in to shooting the first meaningful frame was just over four minutes. I then had another three minutes before other people were demanding the subject’s attention and it took a final three minutes to pack the kit away again – a nice round ten minutes from start to finish. That’s nowhere near being a record but it was comfortable for me and the subject and it really helps that the client liked the results.

Back when I first started to use portable lighting in this way I used to have a Lumedyne head already on a stand in a sling bag with a pack already connected and used a simple umbrella with Pocket Wizard triggers. I used to boast that my kit was not only lightweight but well planned and that I could be ready to shoot in under forty-five seconds from the time I touched the zip on the bag. When I did seminars and talks I’d even get people to time me getting the kit out and regularly beat forty-seconds. These days I’m a bit slower and I carry a bit more kit (I’m also a fair bit older by the way) and so a three minute set-up and break-down time is pretty good (three and a half minutes if there’s a softbox involved). It means that even if your subject is watching you, they don’t really get the chance to get bored waiting.

The rest of the day was fun and the other highlights were the students playing Boccia (a sport that I hadn’t encountered before last year’s Paralympics), one young woman showing off her excellent art and spending time with younger students and their rather docile rabbits.

Social media … is it working yet?

A little over two years ago I wrote a blog post about social networking where I asked largely rhetorical questions about whether there was a point to it, which platforms were the right ones and whether or not it made any difference. About three weeks ago I wrote on Twitter that I’d spent half a day integrating my social media – getting my Tweets to show up on LinkedIn and getting my photos posted on EyeEm to show up on Facebook and then getting every single platform to react to one another when I wanted them to. Not only did I set all of that up on the desktop and laptop computers but I also did it on the iPad and the iPhone. Boy, am I ever integrated now!

This morning I added a post on a LinkedIn group about explaining to reluctant businesses why they should be using social media:

“The simplest way to explain it to the doubters is to point to the utter stupidity of NOT using social media in the world in which we currently live. You didn’t need it ten years ago and theres’ a chance it might be past it’s best in ten years time but right here, right now it is the method chosen by a massive proportion of the population for making choices, doing research and engaging with business.”

So… is social media working yet? You wouldn’t expect me to give a clear and unequivocal answer to a direct question that I posed myself would you? Of course not – except there is an answer that I have given a few times when talking about this:

“It isn’t not working”.

How do I explain that? I’d be worried if social media was having a negative effect on my business and career but I have been really careful to avoid the stupidity of posting banal, overly-personal or critical observations on any platform unless they were going to have a positive effect – which is almost never. On a few closed Facebook groups I might be a little less guarded and in private messages I might use the odd bit of cussing but on the whole my social media profiles have been kept clean. That has meant very little controversy, relatively few spikes in activity and a lower profile than I might have gained had I been happy to upset a number of people. That’s all OK but why would I imply that all wasn’t well with social media? Well, the hours spent plugging away haven’t been directly rewarded with more business and it would be hard to quantify the actual benefits of getting out there in the worlds of social media. So in the two years since I first blogged about this I have got a lot better at doing it, gained a few jobs here and there and generally promoted myself positively. I’m going to keep on doing it because I genuinely believe that to avoid social media is a very bad thing.

The irony is that this blog is the one thing that I want people to see, read and interact with. That’s my strategy and that’s why I wanted to get the integration going – the other platforms are there to boost the blog and the blog is there to raise my profile. Whether or not that circle is vicious or virtuous is something only others can decide upon.

©Neil Turner, May 2013. First seen on EyeEm - there are so many ways to promote your business these days!

©Neil Turner, May 2013. First seen on EyeEm – there are so many ways to promote your business these days!