work

Where does the work come from?

It has been a little while since I last posted on this blog; apologies for this but sometimes life gets in the way of blogging! Anyway, I thought that those who are interested in the business side of photography might be interested in something that came into my thinking on a long drive back from a job listening to a business programme on BBC radio. When I got home I produced a couple of reports from my invoices using the wonderful Billings Pro application on my Mac. The one that caught my eye was one that gave me the raw data to work out how the bulk of my work (based on turnover) in the last six years as a freelance has come in.

Conventional wisdom says that a photographer gets out there with their folio after making cold calls and arranging appointments with potential clients. When I say ‘conventional wisdom’ I mean ‘what they taught me in college’. It is the classic sales tactic: research potential customers, show them what you have to offer and then (hopefully) close the deal at a mutually acceptable price. 99% of photographers and probably 88% or all businesses will probably tell you that it is neither that simple or that straightforward.

I started by working out some categories for the way I have initially got the work:

  • Cold calling and portfolio viewings
  • People finding me via the web
  • Referrals from family and friends outside the photography business
  • Referrals from other photographers
  • From colleagues I knew before going freelance
  • Sub-contracted work via other photographers
  • Other odd sources

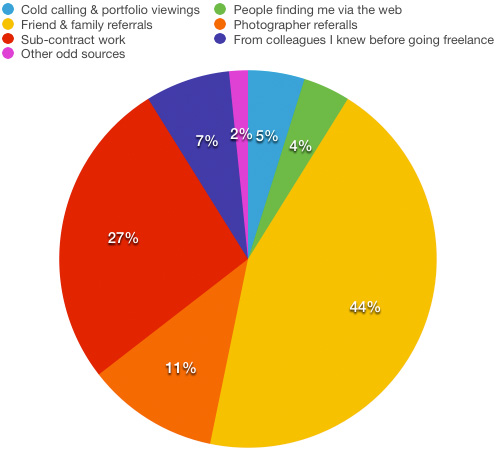
I then quickly added up how much work (monetary value) each of those six sections accounted for and got the following results:
monetary_value


The monetary value for each client is based on that initial method of contact. Some high value clients have been very loyal to me and I hope that I have, in turn, given them the photographs that they need to keep those excellent two-way relationships going. On the flip side, most of the work that has come via the web has been one-off jobs for clients who don’t have a lot of work to commission.

Now I don’t know about you, but I found that to be quite a shocking set of results. Only 5% of my income has been generated by getting out there and trying to make sales in what you would call a ‘traditional’ way yet more than twice that figure came from referrals from other photographers. The sub-contract figure at 27% is also a lot higher than I thought that it would be but the biggest surprise is how low the figure for income generated via work from pre-freelancing colleagues. In my first year as a freelance that figure was considerably higher but it has been eclipsed by the friends and family percentage which, at 44%, is somewhat higher than I would have thought. People finding me through the web includes not only those who have found my website through searches but also the various social media platforms that we all spend so much time working on – 4% isn’t a great return on all of that effort either.

If I had the time, I’d like to work out how different the chart would be if I based the figures on the amount of time spent on the jobs rather than the money invoiced. My strong suspicion is that the cold calling and portfolio section would be a fair bit bigger as would the one for pre-freelancing colleagues because those are both news and editorial biased sections whereas the friends and family one is far more corporate and commercial.

So what conclusion should I draw from this? Maybe I should spend less time trying to generate work from cold-calling and spend a lot more time with family and friends? I suspect that the true answer is that I need to change my targets for the cold calling to more corporate and commercial ones simply because they have a higher value per job.

Portfolio features now updated

©Neil Turner/TSL. April 2005. Kabalega, Uganda.

©Neil Turner/TSL. April 2005. Kabalega, Uganda.

The funny thing about updating the features section on my portfolio website is that I have a section called “portraits” and another section that should be called “not portraits”. That isn’t a  particularly elegant way to categorise the thirty plus images featured in that particular gallery but I have yet to find a work that sums it up. Features is as close as I seem to be able to get.

Anyway, it’s a big relief to have finished the refresh and the last of the design updates for now. When I was looking through the huge folder of images that were under consideration I was struck by the picture above of a teenaged Ugandan boy who was part of a group helped to think about issues that were affecting their lives by an art teacher who had visited the United Kingdom where he had picked up this technique. They were an interesting set of images of a fascinating project and I’m really glad to have been able to include this picture in the new folio – even if the picture was shot nearly nine years ago.

The new “features gallery” is now on show at www.dg28.com/folio/features/ and I hope that you have some time to have a look.

Portfolio updates – finally!

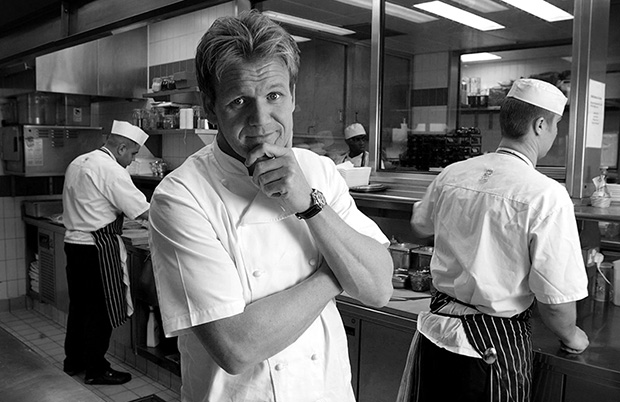
©Neil Turner/TSL February 2003. Gordon Ramsay photographed in his kitchen

©Neil Turner/TSL February 2003. Gordon Ramsay photographed in his kitchen

I have just finished uploading a major update to my website with a refreshed selection of new and old images in the portfolio section and an updated look to the templates pages with links to all of my social media.

I still do most of the work on my site myself and so it takes a lot longer to do but I am very happy with the way that photographs look on my site and I guess that is a major selling point. There will be lots more changes over the next couple of weeks but I’d like to invite you come to the site and have a look at the new portraits selection as well as two new galleries of personal work which will definitely be updated as they are both about continuing passions of mine.

My website is www.dg28.com and if you have any feedback, I’d love to hear it.

How long does gear last?

When I teach new photographers the business studies element of what it is to be a working photographer I go through a whole exercise which adds up the cost of the gear and then divides that cost by the number of working days that it might be expected to last before you need to replace it. My formula was mentioned in a previous post and I try to be realistic about the life span of the principle kit that we need. Camera bodies, for example, last somewhere between two and three years on average whereas lenses last four, five or even six years. It’s a simple idea and when you add it all up you come out with a figure that represents the amount of money it costs to be a photographer based on working a fixed number of days per year. For most photographers that’s around the £45 – £60 mark.

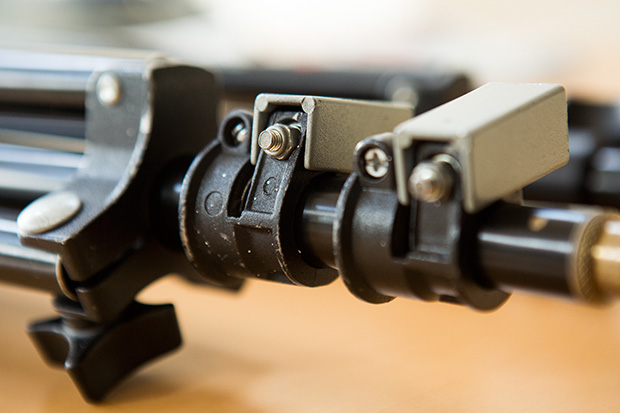
©Neil Turner. March 2014. My Elinca branded lighting stand that is at least 21 years old

©Neil Turner. March 2014. My Elinca branded lighting stand that is at least 21 years old

Some gear, such as tripods and equipment bags last a lot longer and there’s good evidence to say that a Pelican case is for life as long as it doesn’t get stolen. I was looking at some kit this morning and making sure that I had everything that I needed for a two-day job over the weekend when one of my lighting stands came apart. That got me thinking about how much this stand had cost me on a ‘per day’ basis since I bought it somewhere between 1990 and 1993. I won’t go into how I can narrow the dates down but let us say that it is at least 21 years old. At today’s prices this stand would probably cost about £70.00 (but probably cost me a lot less) and by dividing that by 21 you can see that it has cost me £3.33 a year. That’s a meagre £0.26 a month or, if I work 150 days a year that’s £0.02 per working day.

I have used lighting stands every single working day since then and, whilst it hasn’t always been this one, my preference for a specific brand seems to be justified by the way that they take a battering. That brand is Manfrotto – even though this one is labelled “Elinca SA” it is clearly a version of an older Manfrotto 052 model (not the same as the current 052 or 1052) because it is almost identical to another stand that I have which is labelled “Manfrotto 052”. I also have a pair of identical lighter-weight stands where one is branded Manfrotto and the other is branded Lastolite and a pair of tiny stands where one is Manfrotto and the other is Bogen. It doesn’t take a genius to work out that one manufacturer was/is making them and that they were/are being sold under many labels.

Going back to the stand itself, when I say “fell apart” what I mean is that this stand came apart at one of the connections. When I had a good look it was obvious that it had lost a bolt and nut that tightened around the metal tubing keeping it in place. Three minutes later, I’d found a suitable replacement amongst the bits and pieces in my garage and the stand was fixed and ready for a lot of action over the next weekend. So that’s a lighting stand of extreme professional quality that costs me two pennies a day – what a bargain! Of course I have forgotten to add the maintenance costs – £0.12 for the bolt that I fitted today plus my labour at a maximum of ten minutes.

For the record, I have three Manfrotto tripods (all with Manfrotto heads), three Manfrotto monopods and a case full of their accessories (Super-clamps, suction clamp, low-level stand, quick release adapters, a boom and so on). I reckon that I have about £1,000.00 worth of Manfrotto gear in total – most of which is over ten years old and some of which is over twenty years old.

Manfrotto haven’t paid me for this blog post, nor have I spoken to anyone from the company or any of their distributors or retailers. I just think that their kit is pretty good value for money. Of course, if they want to offer me a retrospective bribe…

An interesting portrait

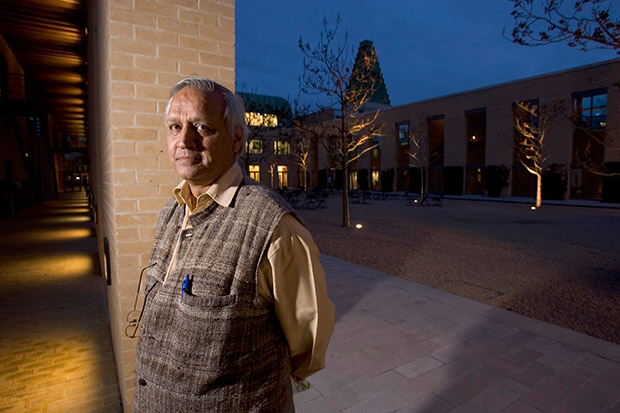
©Neil Turner/TSL. Sanjit Bunker Roy - founder of The Barefoot College in his native Rajasthan in 1984 is also heavily involved in the Global Rainwater Harvesting Organisation. Photographed at the Said Business Centre at Oxford University .

©Neil Turner/TSL. Sanjit Bunker Roy – founder of The Barefoot College in his native Rajasthan in 1984 is also heavily involved in the Global Rainwater Harvesting Organisation. Photographed at the Said Business Centre at Oxford University .

Whilst looking for an image to demonstrate a specific point to a group of NCTJ Photojournalism students I re-discovered this portrait of a charming businessman and philanthropist that I shot back in March 2006 for The Times Higher Education Supplement. The point that I was making was actually about histograms but I wanted to say a little more here about why I liked this picture so much at the time I shot it.

Firstly, he was a really nice man who gave me the time to shoot a small range of images. He was happy to chat, happy to be directed and trusted me to do my job. You would think that the majority of people would react the same way when being photographed by a professional but that is sadly not how it is. I was delighted that, despite being a businessman, he was wearing something a lot more interesting than a grey or navy suit. I got the distinct impression that he had cultivated an image and that he was very happy with it.

My second point is the degree to which I had to mix ambient light, the sky and my own flash. I couldn’t do too much to balance the sky and the lighting around the quadrangle but I had to get the balance between the subject and the ambient just right and I ended up allowing the walkway to the left of the frame go a lot darker than I’d originally intended so that the depth of the blue in the sky was exactly as I’d wanted it. Looking back, I was always keen to see the lighting balance on the screen on the camera and I often shot two versions of a picture with differing balances so that I could choose when looking at it on a decent sized screen in the edit. These days, the screens on cameras are so much better and you get a far better impression of how the photograph will look on the LCD.

My third and final point about this portrait is the way that it applies the old “rule of thirds” in an unusual way. Yes he is almost exactly one third of the way into the frame from the left (classic composition) but his body is facing out of the frame (not classic composition) and everything on the right hand side of the frame isn’t much more than decorative.

I think that the light, the tones and the colours all add up to an interesting and very usable portrait – one that I remember enjoying taking. I also remember the speed with which I had to offload the images over a slightly dodgy GPRS mobile connection. But what about the histogram? The students who were at the lecture would tell you that I spent a lot of time comparing good, bad and ugly histograms and explaining what they all meant before admitting that I rarely, if ever, look at them myself! I know that in certain circles that would be a heretical thing to admit but all photographers have to have some sort of rebellion in them.

Techie stuff: Canon EOS1D MkII, Canon 16-35 f2.8L lens at 16mm, ½ second at f8 on ISO 200 with a Lumedyne Signature series flash with no light modifier. Canon CR2 RAW file converted using Adobe Photoshop.

Out Walking

Ever since I started using the EyeEm photo sharing site I have been trying to shoot more pictures “just for the fun of it”. The platform allows you to add your pictures to albums and one of my favourites is entitled “Out Walking”. I often shoot with my Fujifilm X20 with and Eye-Fi card in it, convert the RAW fils to Jpeg using the neat film simulation modes before uploading them to my iPhone and going through the process I described in my Eye-Fi Workflow post a week or so ago. I also vowed a while ago to get better at black and white. I’m not sure that’s going quite so well but I often combine the two. It’s great fun and even mildly addictive!

Anyway, for no other reason that I want to share them, here are some of the images.

© Neil Turner, January 2014. Man holding sign offering tattoos an tattoo removal touts for business on the pavement just outside one of main areas of Camden Market

© Neil Turner, January 2014. Man holding sign offering tattoos an tattoo removal touts for business on the pavement just outside one of main areas of Camden Market

© Neil Turner January 2014. Cold and bored stall-holder selling keep calm t-shirts at Camden Market.

© Neil Turner January 2014. Cold and bored stall-holder selling keep calm t-shirts at Camden Market.

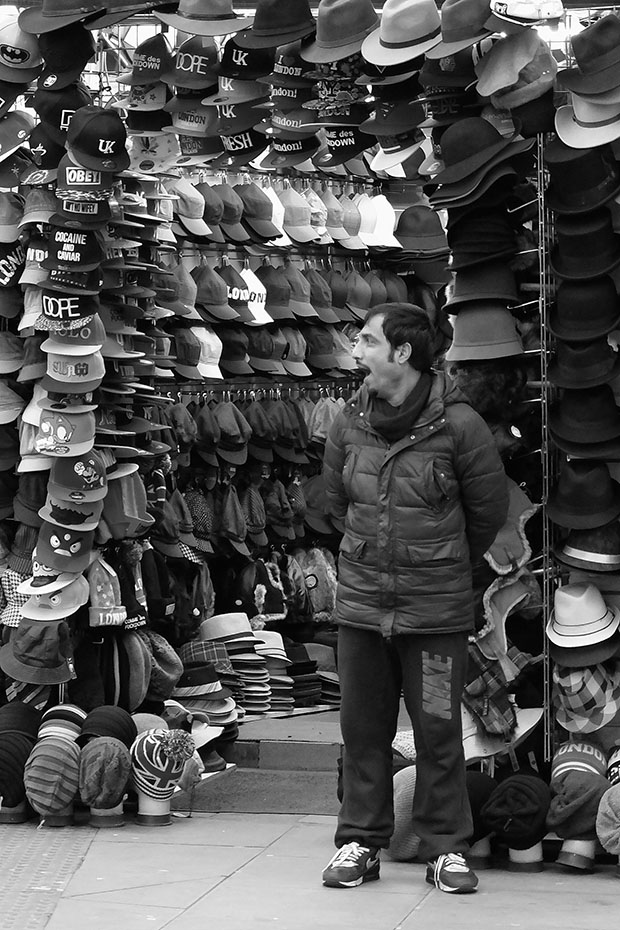
© Neil Turner, January 2014. Bored shop keeper outside his open hat shop just outside one of main areas of Camden Market

© Neil Turner, January 2014. Bored shop keeper outside his open hat shop just outside one of main areas of Camden Market

Eye-Fi card workflow

eye-fi_cards When I was rounding up 2013 I mentioned that I had a lot of success using an Eye-Fi card to wirelessly transmit pictures from my cameras (Canon EOS5D MkIII and Fujifilm X20) to either my iPhone, iPad or laptop where I can do a quick edit and caption before sending them to clients. Inevitably I got a couple of emails using the “ask me anything” feature of this blog asking me to describe my workflow. It is similar between an EOS5D MkIII and the Fujifilm X20 except that the former has twin card slots (one CF compact flash and one SD secure digital) whereas the latter only has the SD slot. I like to shoot RAW which means that in the X20 I have to do an in-camera RAW conversion to create a Jpeg to send out. I have two cards (shown left) – an Eye-Fi branded 8Gb Pro X2 and a Sandisk branded 4Gb one. In practice, they both do much the same job but the orange Eye-Fi one has more options should you want to work differently. Without further ado, here is how it all works on the Canon…

Getting the the settings on the card, your camera and your phone/tablet/computer right is the key to getting everything working well:

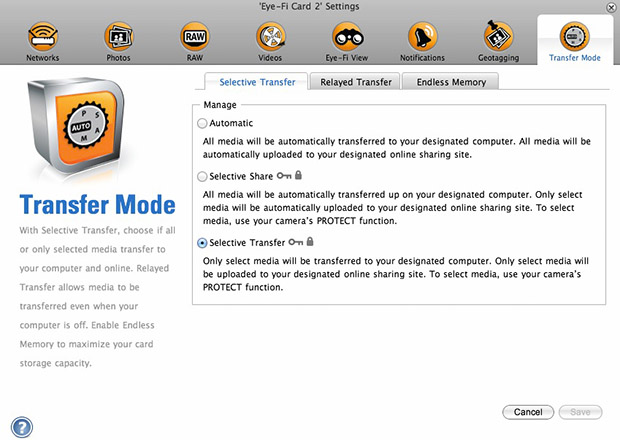
  1. Setting up the Eye-Fi card. When you get the card it should come with an SD card reader and by far the best way to set things up is to use that reader to load the card into a computer. There are lots of options that will appear once you have loaded the supplied “Eye-Fi Centre” application. This workflow is all about working in what the manufacturer calls “direct mode”. I choose to only transfer the files I want to my iPhone and so on the card I have selected “Selective Transfer” via the Eye-Fi Centre application. This means that only images that I have protected in the camera menu get transferred. On the Canon I have assigned the “rate” button to protect images for speed. It is also useful to add a couple of wifi networks and to define which file formats to transfer using the application whilst the card is in the computer because it isn’t possible to alter some settings once the card is in the camera. This whole process takes a few minutes and if you get it right, the whole thing test a lot easier from here on in.eye-fi_screenshot
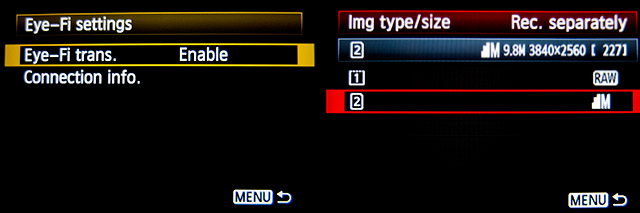
  2. Setting up the camera. In the EOS5D MkIII menu there are three things that I’d recommend you do. The first is to assign the “rate” button to protect selected images. The second is to get the camera to write RAW files to the CF card and medium size Jpegs to the SD (Eye-Fi) card. Finally, you need to enable Eye-Fi transfer from the camera menu. This way you can use the review function with card 2 (the SD slot) and then every time you protect an image written to the Eye-Fi card it will automatically look to transfer that file to the device you have nominated.
    eos_screens
  3. The receiving device. I use an iPhone and an iPad and the whole process is eventually controlled by the free app that Eye-Fi make available through the Apple App Store. There are equally useful apps available for Android powered devices and the functionality is pretty much identical. Apart from loading the app the only other thing you have to do is to download and authorise a small change to your wifi settings on your phone which simply installs the settings for the direct mode to work. Once you launch the app you get an opening window which then gives way to the gallery window which in turn tells you what is happening about transfers. Below you can see the card paring screen and the gallery screen.eye_fi_phone
  4. Editing your pictures. Once you have the image on your phone or tablet you can then use the apps of your choice to edit and caption your image before shifting them on. My personal favourite is Photogene4 which has some good image options such as clarity, contrast, saturation, straighten, crop, sharpen and the ability to add IPTC captions – including defaults such as the EXIF time day and date as well as any pre-loaded captions and copyright information. I find that it’s a good idea to write some generic captions using Apple’s Notes app and then copy and paste them into Photogene4. The app also has the option to upload to a wide range of sharing sites as well as to email and ransomer images to FTP servers – making it really useful for work.photogene
    From shooting a frame to having it uploaded to my own FTP server normally takes twenty to thirty seconds if there is a good phone signal and the various uses that I’ve found for this rapid upload range from offering images to people I’ve photographed to providing almost instant pictures for corporate clients to use for their Facebook, Instagram and Twitter feeds at events. This is a very versatile piece of kit and I haven’t even come close to describing everything that it can do. I like the way that this workflow actually does flow and I love the effect that it has had on a couple of clients who really appreciate what it offers them. My first Eye-Fi card was £24.99 including VAT – possibly the best investment that I’ve ever made!

So here it is… merry Christmas

©Neil Turner, 2013.

©Neil Turner, 2013.

Well today is my last day at the coal face until the new year (unless there’s interesting work and money on offer). Thinking back on the way work has been in 2013, it’s been a funny old year – but I could say that about any one of the last six or seven. Yet again I don’t have any pictures worth entering into competitions but that doesn’t mean that I’m not proud of a lot of the pictures I’ve taken and it certainly doesn’t mean that I haven’t had a lot of fun in the process. There are a few 2014 pictures already in my on-line and hard copy portfolios and my corporate book has had a pretty good year.

I’ve been sticking pictures onto EyeEm and enjoying the work of others on the same platform. I’ve even started to repost some of those images on my Facebook page which is slowly getting more ‘likes’.

Apart from shooting pictures my year has had a lot of great teaching moments and I’m looking forward to returning to the chalk face for one day a week between the new year and Easter.

Blogging has been rewarding and I’ve written a few posts that have been seen by thousands right around the world as well as a few more that only myself and a few regular readers have seen. The highlight of my blogging year was when I wrote about “Photographer B” – a post that was shared and tweeted about more than any other for quite a while. I hope that it made a few people think about what is happening in the world of professional photography.

I tried to resist the temptation of handing out a few awards (no cash, no trophy, just kudos) so, in no particular order here they are:

Best new piece of kit acquired: The EyeFi Prox2 SD card – for transmitting images to my phone, iPad or computer direct from my cameras. The runner-up is the iPhone 5S and an honourable mention goes to the Lithium ion batteries on the Elinchrom Ranger Quadra.

Best piece of old kit: First place goes to my Canon 70-200 f2.8L IS lens. It is 11 years old and just as sharp as ever thanks to one of my other winners. Runner-up is the Elinchrom Ranger Quadra.

Favourite supplier: For the work they’ve done on my gear, for supplying new kit at superb prices and for being some of the nicest people I’ve ever met this award goes to Fixation. I have two runners-up – The Flash Centre and Castle Cameras both of whom treat me very well even though I hardly ever spend any money with them!

Favourite piece of software: For the tenth consecutive year, it has to be Photo Mechanic because it makes my workflow and therefore my working life better. The runner up is Photogene4 on the iOS operating system.

Favourite client: Picking one out of the bunch would be unfair – I would like to say a public ‘thank you” to everyone who has used my services this year and it is heartening to be able to say that I haven’t suffered a single problem of non-paying during 2013.

Unsung hero award: For making great kit that just does its job day after day and week after week I’d like to recognise the contribution that Timberland footwear makes to my working life. I wrote about the photographer and their uniform quite a while ago and nothing has changed.

Happily, I don’t have a crystal ball. If I owned one I’d spend far too much time looking forward and not enough time in the moment and certainly a lot less time trying to perfect the ‘decisive moment’. 2014 promises many things – new cameras, better computers, upgraded software and the ever-present pressure to create more pictures, faster and for less money. It feels as if our industry has lost far too many characters and heroes this year. The list is long and distinguished and I hope that each and every one of them rests in peace.

So that’s it… the 2013 working year is as good as over and all that’s left to say is thanks to everyone who has read and supported this blog, thank you to all of my colleagues and friends who have helped make 2013 memorable and thank you to my lovely wife for her amazing support.