Editorial

The term photographer is no longer enough

Just under two years ago I wrote about the definition of the word ‘photographer’ and about how everyone is one these days. I have become more and more interested in the definition and I have come up with the following question:

Can you use the word ‘photographer’ in isolation any more?

What I’m asking there is whether there is anyone out there whose work, hobby or pastime is sufficiently vague that you can just say photographer? I’m probably not the best example but I have my permission to talk about me so here goes; I use a combination of editorial, corporate, press, documentary, portrait, features, PR and commercial in front of the word photographer depending on what I’m shooting, who I’m talking to and where I am. I also use photojournalist from time to time but never ‘just’ photographer without qualifying it.

This got me thinking a bit further. When I teach photography I often compare it to driving. I talk about when you first got behind the wheel of a car and had to think hard about which pedal was which and where the gears were and how some of this was already there because we had been passengers for the preceding 17 years of our lives and we had probably driven go-karts and played computer driving games. The same goes for becoming a photographer. Handling the camera takes a lot of thought at first but it becomes second nature after a while and 99% of us had already been in pictures, used a simple point and shoot as well as doing drawings and getting the basics of composition.

This lead to the thought about the similarities between the word photographer and the word driver. Rarely do you hear ‘driver’ without something more specific in front of it – bus driver, lorry driver, train driver or racing driver amongst many others. I have to wonder whether this is just a natural human need for more information or a desire to stick people and what they do into convenient boxes. I am certain that there are a lot of photographers out there who would rail against being pegged as one kind of photographer and I’m equally certain that there are probably an equal number who would delight in being thought of as completely specialised. Of course there is a group in the middle like me whose descriptor changes on a daily or even hourly basis.

I find it quite amusing when I come across photographers who latch on to genres of photography that either make no sense or that are deliberately elitist or confusing to anyone other than the ‘in-crowd’. I have mentioned my dislike of ‘wedding photojournalism’ before. It is perfectly descriptive but it makes no sense. Wedding photographers are hired by the family or the couple getting married and, no matter what style they shoot in, they are not in any real way acting as journalists using photographs. What they are is wedding photographers using a photojournalistic style. It’s too late to reign it back though. Language is a dynamic and moveable thing and the word photojournalism has already become something different in this context.

When I was first thinking about how I was going to write this post I had just shot a whole series of photographs at a large secondary school where there was a rule that the academic staff were “teachers first and subject specialists second” which meant that nobody working there was a Geography Teacher or a History Teacher or even an English Teacher but were instead a Teacher of Geography or a Teacher of History or a Teacher of English. I spent a while trying to see if I could make that idea work for photography – the idea that we were photographers first and specialists second. Who would prefer to be called a “Photographer of Fashion” or a “Photographer of Sports”? Those work but “Photographer of Portraits” and “Photographer of Corporate (stuff)” don’t really do it for me.

At a dinner party recently I was asked by someone that I’d never met before the obvious “so what do you do?” question. I answered “Editorial & Corporate Photographer” and got a blank look back. The gentleman was an intelligent chap and a local government official but he had to ask me to dissect what an editorial and corporate photographer was. By the end of the conversation I realised that it would have been easier to say “self-employed photographer” and give him the option of digging deeper – so that’s my new tactic at dinner parties.

That incident, the thoughts about teachers and drivers and my general confusion about explaining who I am and what I do have left me pretty much back at the start of this mildly philosophical blog: Each and every time you need to define yourself as a photographer you need to select the appropriate descriptors and adjectives for that particular context. There doesn’t appear to be a solution to this problem that I can see.

I need to go and prepare for tomorrow’s session where, if I were to use my driving analogy, I’m going to be the driving instructor. I suspect that the comparison between photography and driving has many miles to run…

Eye-Fi card workflow

eye-fi_cards When I was rounding up 2013 I mentioned that I had a lot of success using an Eye-Fi card to wirelessly transmit pictures from my cameras (Canon EOS5D MkIII and Fujifilm X20) to either my iPhone, iPad or laptop where I can do a quick edit and caption before sending them to clients. Inevitably I got a couple of emails using the “ask me anything” feature of this blog asking me to describe my workflow. It is similar between an EOS5D MkIII and the Fujifilm X20 except that the former has twin card slots (one CF compact flash and one SD secure digital) whereas the latter only has the SD slot. I like to shoot RAW which means that in the X20 I have to do an in-camera RAW conversion to create a Jpeg to send out. I have two cards (shown left) – an Eye-Fi branded 8Gb Pro X2 and a Sandisk branded 4Gb one. In practice, they both do much the same job but the orange Eye-Fi one has more options should you want to work differently. Without further ado, here is how it all works on the Canon…

Getting the the settings on the card, your camera and your phone/tablet/computer right is the key to getting everything working well:

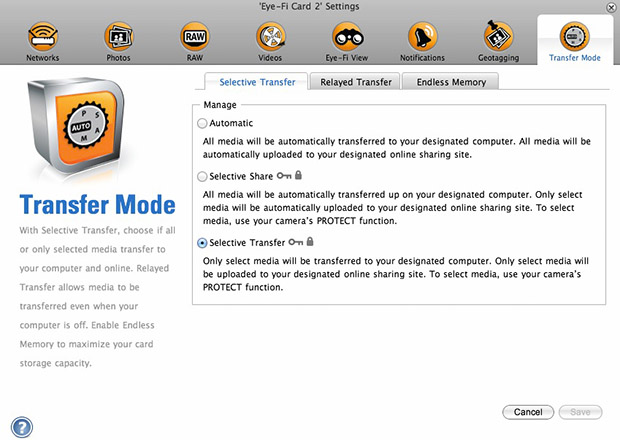
  1. Setting up the Eye-Fi card. When you get the card it should come with an SD card reader and by far the best way to set things up is to use that reader to load the card into a computer. There are lots of options that will appear once you have loaded the supplied “Eye-Fi Centre” application. This workflow is all about working in what the manufacturer calls “direct mode”. I choose to only transfer the files I want to my iPhone and so on the card I have selected “Selective Transfer” via the Eye-Fi Centre application. This means that only images that I have protected in the camera menu get transferred. On the Canon I have assigned the “rate” button to protect images for speed. It is also useful to add a couple of wifi networks and to define which file formats to transfer using the application whilst the card is in the computer because it isn’t possible to alter some settings once the card is in the camera. This whole process takes a few minutes and if you get it right, the whole thing test a lot easier from here on in.eye-fi_screenshot
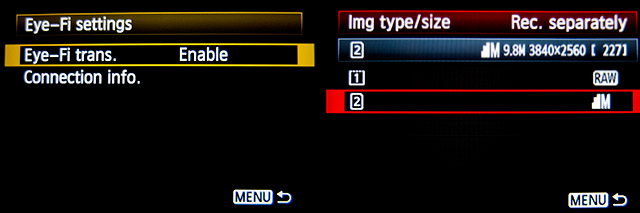
  2. Setting up the camera. In the EOS5D MkIII menu there are three things that I’d recommend you do. The first is to assign the “rate” button to protect selected images. The second is to get the camera to write RAW files to the CF card and medium size Jpegs to the SD (Eye-Fi) card. Finally, you need to enable Eye-Fi transfer from the camera menu. This way you can use the review function with card 2 (the SD slot) and then every time you protect an image written to the Eye-Fi card it will automatically look to transfer that file to the device you have nominated.
    eos_screens
  3. The receiving device. I use an iPhone and an iPad and the whole process is eventually controlled by the free app that Eye-Fi make available through the Apple App Store. There are equally useful apps available for Android powered devices and the functionality is pretty much identical. Apart from loading the app the only other thing you have to do is to download and authorise a small change to your wifi settings on your phone which simply installs the settings for the direct mode to work. Once you launch the app you get an opening window which then gives way to the gallery window which in turn tells you what is happening about transfers. Below you can see the card paring screen and the gallery screen.eye_fi_phone
  4. Editing your pictures. Once you have the image on your phone or tablet you can then use the apps of your choice to edit and caption your image before shifting them on. My personal favourite is Photogene4 which has some good image options such as clarity, contrast, saturation, straighten, crop, sharpen and the ability to add IPTC captions – including defaults such as the EXIF time day and date as well as any pre-loaded captions and copyright information. I find that it’s a good idea to write some generic captions using Apple’s Notes app and then copy and paste them into Photogene4. The app also has the option to upload to a wide range of sharing sites as well as to email and ransomer images to FTP servers – making it really useful for work.photogene
    From shooting a frame to having it uploaded to my own FTP server normally takes twenty to thirty seconds if there is a good phone signal and the various uses that I’ve found for this rapid upload range from offering images to people I’ve photographed to providing almost instant pictures for corporate clients to use for their Facebook, Instagram and Twitter feeds at events. This is a very versatile piece of kit and I haven’t even come close to describing everything that it can do. I like the way that this workflow actually does flow and I love the effect that it has had on a couple of clients who really appreciate what it offers them. My first Eye-Fi card was £24.99 including VAT – possibly the best investment that I’ve ever made!

So here it is… merry Christmas

©Neil Turner, 2013.

©Neil Turner, 2013.

Well today is my last day at the coal face until the new year (unless there’s interesting work and money on offer). Thinking back on the way work has been in 2013, it’s been a funny old year – but I could say that about any one of the last six or seven. Yet again I don’t have any pictures worth entering into competitions but that doesn’t mean that I’m not proud of a lot of the pictures I’ve taken and it certainly doesn’t mean that I haven’t had a lot of fun in the process. There are a few 2014 pictures already in my on-line and hard copy portfolios and my corporate book has had a pretty good year.

I’ve been sticking pictures onto EyeEm and enjoying the work of others on the same platform. I’ve even started to repost some of those images on my Facebook page which is slowly getting more ‘likes’.

Apart from shooting pictures my year has had a lot of great teaching moments and I’m looking forward to returning to the chalk face for one day a week between the new year and Easter.

Blogging has been rewarding and I’ve written a few posts that have been seen by thousands right around the world as well as a few more that only myself and a few regular readers have seen. The highlight of my blogging year was when I wrote about “Photographer B” – a post that was shared and tweeted about more than any other for quite a while. I hope that it made a few people think about what is happening in the world of professional photography.

I tried to resist the temptation of handing out a few awards (no cash, no trophy, just kudos) so, in no particular order here they are:

Best new piece of kit acquired: The EyeFi Prox2 SD card – for transmitting images to my phone, iPad or computer direct from my cameras. The runner-up is the iPhone 5S and an honourable mention goes to the Lithium ion batteries on the Elinchrom Ranger Quadra.

Best piece of old kit: First place goes to my Canon 70-200 f2.8L IS lens. It is 11 years old and just as sharp as ever thanks to one of my other winners. Runner-up is the Elinchrom Ranger Quadra.

Favourite supplier: For the work they’ve done on my gear, for supplying new kit at superb prices and for being some of the nicest people I’ve ever met this award goes to Fixation. I have two runners-up – The Flash Centre and Castle Cameras both of whom treat me very well even though I hardly ever spend any money with them!

Favourite piece of software: For the tenth consecutive year, it has to be Photo Mechanic because it makes my workflow and therefore my working life better. The runner up is Photogene4 on the iOS operating system.

Favourite client: Picking one out of the bunch would be unfair – I would like to say a public ‘thank you” to everyone who has used my services this year and it is heartening to be able to say that I haven’t suffered a single problem of non-paying during 2013.

Unsung hero award: For making great kit that just does its job day after day and week after week I’d like to recognise the contribution that Timberland footwear makes to my working life. I wrote about the photographer and their uniform quite a while ago and nothing has changed.

Happily, I don’t have a crystal ball. If I owned one I’d spend far too much time looking forward and not enough time in the moment and certainly a lot less time trying to perfect the ‘decisive moment’. 2014 promises many things – new cameras, better computers, upgraded software and the ever-present pressure to create more pictures, faster and for less money. It feels as if our industry has lost far too many characters and heroes this year. The list is long and distinguished and I hope that each and every one of them rests in peace.

So that’s it… the 2013 working year is as good as over and all that’s left to say is thanks to everyone who has read and supported this blog, thank you to all of my colleagues and friends who have helped make 2013 memorable and thank you to my lovely wife for her amazing support.

Revisiting my workflow

It is impossible to work digitally without having some sort of workflow. Most are a bit better than adequate, some are good and some are blindingly awful. I think that it is important to have a look at the way you do things every once in a while to make sure that yours is as good as it can be and achieves the four goals of being;

  • Efficient in terms of both time and memory
  • Repeatable so that the purely functional bits can be done almost on auto-pilot
  • Non destructive so that you don’t lose valuable RAW files or save changes to Jpegs shot in camera
  • Able to be short-cut for jobs where time is even more of an issue

I’ve written about my workflow before and I often teach workshops based on the “photographer’s twelve step plan” – a process with 12 distinct stages from camera to client including backing up and having a coffee! In this blog post I’m simply going to go through my basic workflow with a few hints and tips as I go. I normally use Photo Mechanic to import, sort, caption, rename and export my files and Adobe Photoshop CC to convert RAW (Canon CR2 most of the time) files into the required format. The whole process is colour-managed and I do as much as I can in-camera to save myself time when editing. I work on either a MacBook Pro, a MacBook Air or a Mac Mini depending on where I am and what the job is. Anyway, let’s kick off…
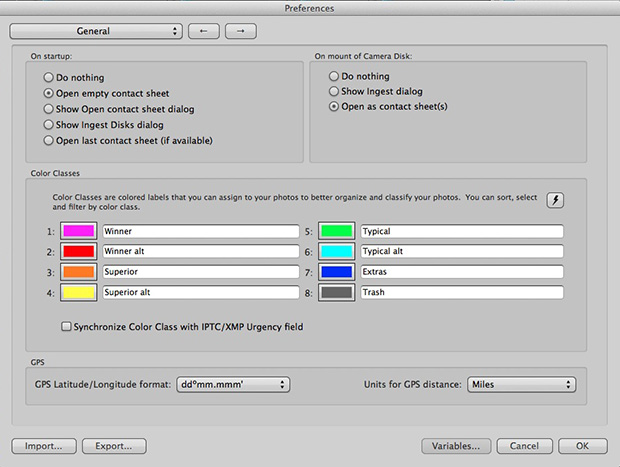
pm_preferences

Before I insert a card into the card reader I launch Photo Mechanic. This screen grab shows the “general” preferences for the application including what I want to happen when I load a memory card. I have checked the box “Open as contact sheet(s)” which means that as soon as the card goes in I see the images in a standard window. In the past I often used “show ingest dialogue” but I have found that ingesting every single frame doesn’t suit me and that it slows the whole process down drastically. Typically I only want between 25% and 35% of the images and so I go through them using the “tag” function (cmd T on a Mac or ctrl T on a PC) to identify those that I’m interested in or those which have unique content.

Once I’ve been through that card and tagged the images I want I use the “copy” function (cmd Y on the Mac and ctrl Y on a PC) and copy those tagged files to a new folder. I use a simple formula YYMMDD-jobname-RAW for those files and then repeat this process with every card used on that job. Photo Mechanic can be set to automatically open and update a new contact sheet with the copied files. I always eject the cards without deleting anything just in case there are problems during the process and put those cards to one side to be deleted later.

pm-preview

pm_contact_sheet

The preview and contact sheet windows are extremely easy ways to look at and select pictures. Once I have my first edit done I apply a generic caption using the Photo mechanic stationery pad (cmd I or ctrl I). At this point I’d like to mention two enormously useful features of Photo Mechanic (available on some other applications too).

The first is variables. These are simple ways of automatically adding information to your captions or filenames. Many are derived from the EXIF data applied in the camera. These include time, day and date as well as other shooting data. Some cameras allow you to set copyright information in the camera and others apply GPS location data too. Other variables might include camera serial numbers, original filenames as well as items that you can add yourself from pre-loaded drop-down menus. I have every county in the United Kingdom loaded as well as a large number of towns and cities and I also have some specific locations where I work regularly pre-loaded. By choosing a specific city from one drop-down menu you can use variables to add it to relevant other areas of the IPTC automatically. You can see some examples of variables in the caption below.

pm_stationery_pad

My main caption starts with {city}, {state}. {iptcday0} {iptcmonthname} {iptcyear4} which will then become something like Brighton, East Sussex. 12 December 2013 if I have all of the right information ready to go. If there are more details to add to the generic caption it is easy enough to do those in batches using the stationery pad.

Variables can also be used in the renaming of files.

pm-rename

This requires you to add the IPTC caption before you rename the files because using the {headline} variable automatically includes the headline you have used in the filename. I find this to be very useful and very good for saving time. In practice Photo Mechanic will sequentially rename 100 files in about ten seconds using this method.

The other really useful feature that Photo Mechanic has for helping with captions is code replacement. The idea is similar to variables except you create your won shortcuts. Sports photographers use this a lot and it saves a great deal of time. Imagine a football (that’s soccer to everyone in north America) team with 22 squad players – many of whom have unfamiliar and difficult to spell names. Using code replacement you can preload a text file with the teams before the game using shirt numbers. The England team, for example, would have numbers from EN01 to EN22 with the names of the players set against those numbers. Using code replacement you would type \EN08\ and the software would immediately recognise that as 8 Wayne Rooney or whatever you have set it to say. I use it for political figures so \dcam\ automatically becomes The Rt Hon David Cameron MP. I can add a second part to that if I so wish \pm\ would add Prime Minister.

I also use code replacement for shooting musicians and bands. It is really easy to create a text file with the names of all of the band members and then use the shortcuts to add the relevant people to each frame. You select the shortcuts yourself and the long versions yourself. Once you get the hang of code replacement, it becomes a central part of your workflow.

At this point I’ll often do a second tighter edit. I’ll keep all of the RAW files that I have copied over from the cards but only convert and send the best to the client. For some news jobs that is only 6-10 images and for other editorial assignments anything between a dozen and thirty. Some of the corporate jobs I shoot end up with a couple of hundred files and working on those proves the efficiency of this workflow because it is scaleable and repeatable.

Once I have my RAW (CR2 or RAF) images selected, captioned and renamed it is time to highlight them all and open them in Adobe Camera RAW in Adobe Photoshop. There are a number of great RAW conversion options out there and whether you use Photoshop, Lightroom, Aperture, Capture One or any of the others you need to make sure that the one you use doesn’t strip your carefully added caption information during the RAW conversion process.

acr-window

This is what the Adobe camera RAW window looks like. You can select a number of images from the strip down the left hand side and apply the same adjustments to all of them. I don’t want to run a complete ACR tutorial here but I would like to mention the straighten, sharpen, crop and lens correction adjustments as well worth learning. Of course those are secondary to the basic correction options such as colour temperature and tint, exposure, contrast, highlight and shadows etc. I find that I rarely need to open an image into Photoshop itself simply because all of the things that I’d normally do to a picture can be done right here in Camera Raw. Every few frames I will highlight those that have been corrected but not yet saved and save them. A decent computer with enough RAM will happily save the adjusted RAW files into whatever format you choose in the background whilst you continue to work on the rest. Once I have hit the “save” button on the last files I then click on “done”. Most of the time I am saving files at their default size as high quality Jpegs with some sharpening into the same folder as the RAW files. Photo Mechanic then updates the folder to show the RAW and Jpeg files together (you can separate them if you wish to) with a thumbnail from the newly saved Jpeg.

One of the best improvements between Adobe Camera RAW in Photoshop CS6 and Photoshop CC is an improved and expanded “save” dialogue window. You now have the option to set a target size, target amount of compression and apply a set degree of sharpening. With modern cameras producing pictures of over 60 megabytes and many of my clients wanting their photographs to be considerably smaller than that I am now using the target size more and more. My default setting is 4800 pixels along the longest side and with a maximum compressed file of 3200 kilobytes.

acr-save

Once I have my images all saved I return to Photo Mechanic and copy the Jpeg files into a new folder ready to send to the client. More and more that folder is a Dropbox one and I will give the link to the images to the client. For news jobs I can simply FTP the images (having saved them at a smaller size) and for some commercial clients that means burning the pictures to a DVD or CD. However they are delivered, the images are correctly sized, nicely prepared from the RAW files and properly captioned and renamed. All of this is done quickly and efficiently without damaging any originals.

When the urgency of the edit is over, I copy the files to a RAID drive in my office, to a portable drive that lives in my car and to a third drive which is away from my office ‘just in case’. I might then treat myself to a coffee…
Updating my folio and painting the Forth Bridge

folio_screen_grab

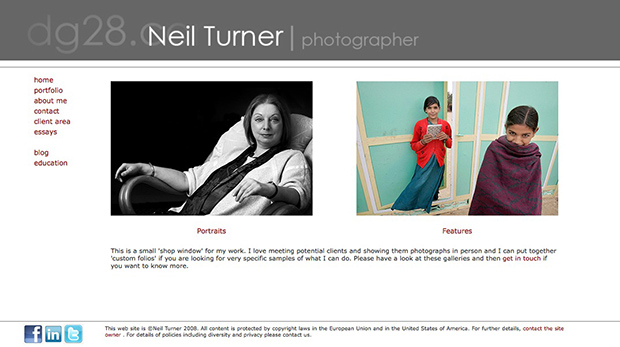
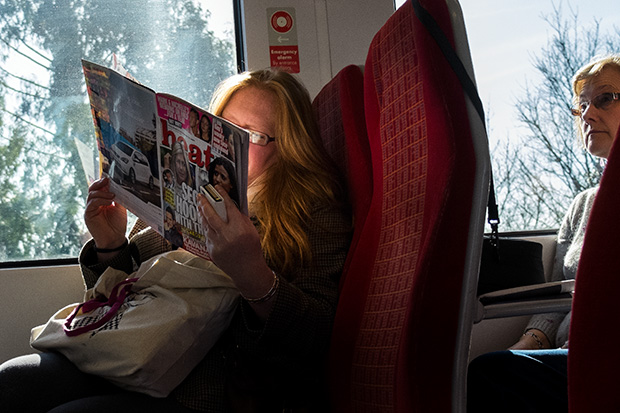
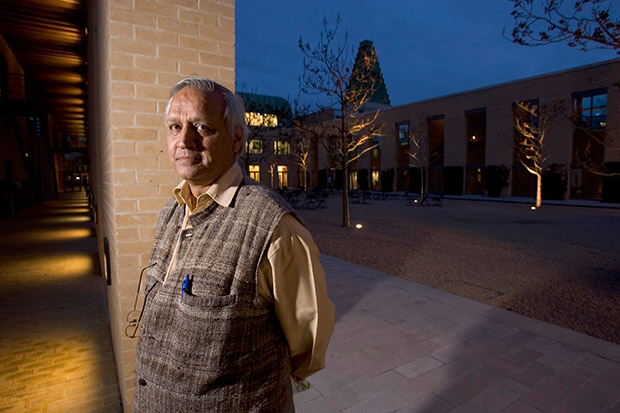
In the UK we have a saying that describes a never-ending task “painting the Forth Bridge”. The idea is simple; once the painters have finished painting the bridge, it’s time to start back at the other end which has been weathering for a number of years by then. Keeping your own portfolio up-to-date is a similar task. There are so many ways to present your work and none of them are perfect and so I keep tinkering with content, layout and even the technology. Five years ago it was Flash and then basic HTML code and then a bit of Javascript and now it is a combination of everything except Flash. My idea is that I want to be able to update easily and regularly without having to format and code stuff. Preparing the images is done using a couple of Photoshop Actions and then the images themselves are inserted into a “slider” which is set to play automatically but which can be stopped and images can be picked out for a closer inspection.

I would be very interested in any views and opinions that anyone has about the site and the way it works. It isn’t an exact science but I think that I’m getting closer to understanding how it all works. Of course photographers are their own worst editors and I suspect that the content will annoy many of you. Whatever you think, let me have it.

The bridge is freshly painted, I’m having a day or two off and then I’m going to start again. One of these days I might even change the colour…

Anyone remember the “old dg28”?

Starting in 1999 I posted over fifty technique samples on my website. These days, hardly a month goes by without a photographer telling me that they read them over and over again and that they learned to not fear using flash by experimenting with some of the ideas that I talked about. Those technique pages used to get some serious traffic!

I’ve been looking back through them in connection with another project that I’m working on and I picked (almost at random) one of the old pieces to post here. It was originally posted in the summer of 2001 and I find it quite interesting that agree with everything I said. I clearly remember the shoot as well; the subject was the same age as me (37 at the time) and he was retraining as a plasterer. I’m now 49 and my career has also changed. Looking at this set of pictures I wonder whether plastering worked out for him. The words are unchanged and all I’ve done is to upload a new version of the picture.

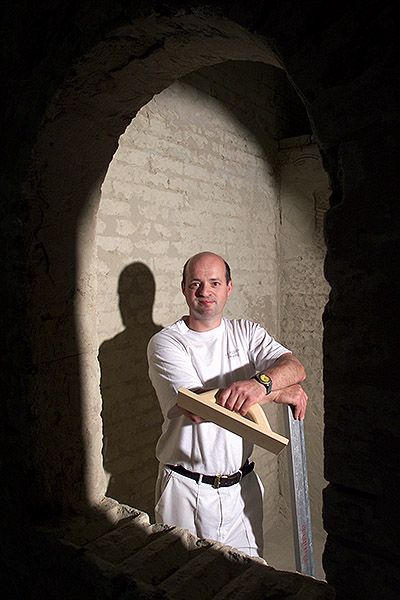
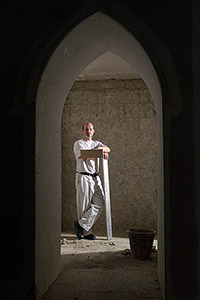
©TSL/Neil Turner. 37 year old retraining as a plasterer  in July 2001.

©TSL/Neil Turner. 37 year old retraining as a plasterer in July 2001.

When most people tai their first steps using lights they try to make the photographs shadowless. The ability to do this is very useful, but sometimes it’s better to place your own shadows exactly where you want them. Some subjects need to be given a distinct treatment.

This portrait of an award winning student was crying out for an unusual image and it was obvious that he would do pretty much anything I asked. The college where he had been studying plastering was a large space divided up into small rooms that the students then practiced their craft in. It was dark and dull coloured with no reflective surfaces so it was pretty much an ideal location for me to work in (apart from the dust).

I quickly spotted a whole series of arches and windows that would serve as a perfect frame to the photograph and set a Lumedyne light up inside the small room.The beauty of working with battery powered kit is that you don’t have to find power points, which were few and far between in the workshop area.

I first tried to shoot with a softbox on the flash unit, but the dull colours and the subjects plain T-shirt made it a pretty boring shot so I decided to shoot without any form of light modifier and removed the softbox in order to get the hard shadow.

The flash exposure was f5.6 at 200 ISO with the softbox in place, but this leapt to f13 with just the metal reflector in place. There was so little available light that everything not lit by the flash was in total darkness. This effect was perfect for the shot. The subject had turned up with few tools and the shot needed a prop or two so we borrowed some plasterers tools and got him to hold them in a way that seemed to relax him. When you are photographing people that are not used to having their picture taken professionally you often need to work as hard at relaxing them as you do in getting the technical bits right. Having some familiar props (teddy bear substitutes) to hand can make all the difference.

I worked hard with this image at getting the composition right by using the arched frame, I tried a couple of other shaped holes too, but this was the best. Getting the shadow in the right place is nothing more or less than trial and error, but using the LCD on the back of a digital SLR helps to shorten that process. I started the shoot working with a 28-70 lens but graduated to a 17-35 pretty quickly. Getting closer to the arch gave me a larger area inside the room to work with and having a six foot tall man, his shadow and some plasterers tools I needed that space.

I think that this photograph helps to demonstrate just how useful adding extra elements into a portrait can be. The props and the shadow help to tell the story as well as making the whole image that little bit more interesting. In the end the picture ran in the newspaper in black and white and the contrast provided by the shadow really helped.

©TSL/Neil Turner. July 2001

©TSL/Neil Turner. July 2001

2013 update and technical footnote:

The camera used was a Canon/Kodak DCS520 with 1.9 megapixels with a Canon 17-35 f2.8L lens. The lighting was a Lumedyne Classic flash system with a 200 w/s pack and a basic head. The DCS520 was great for certain jobs and this kind of lit work suited it down to the ground. The Kodak software was really good and it made it easy to interpolate (upsize) the images by a substantial amount – sometimes as much as 400%.

I used to shoot between 8 and 10 commissions a week and that involved driving an average of 30,000 miles a year. I had an Apple Powerbook G4 and I filed my pictures either using the ISDN line at my flat or using a PCMCIA card with a mobile phone modem built into it. The files that came out of the camera were a native 5.7Mb and generally compressed down to somewhere between 300K and 600K.

I hope to post a few more of these on the blog soon.

Back on the beach

In another “just because” moment I thought that I’d post this picture I grabbed on the beach today. I’ve blogged about my near obsession with shooting dogs on the beach and today I was at my favourite part of my favourite beach when the combination of light and subject matter came together meaning that all I had to do was compose, wait and click.

©Neil Turner, October 2013. Bournemouth

©Neil Turner, October 2013. Bournemouth

I actually saw this picture as a mono image too and anyone who has been following this blog will know that this was a major step forward for me in my quest to be able to truly see in monochrome when I want to. To add the final piece to the jigsaw of this image, I love a good silhouette too.

The picture was shot on a Fujifilm X20 at the fullest extent of its 112mm equivalent zoom and it shows a dog with its owner having something of a difference of opinion about what should happen with a ball. You don’t expect to get such beautiful weather in late October – especially less than 36 hours after a massive storm had lashed this part of the English coast. Within a minute or two of shooting this picture I did a RAW conversion in the camera before using an Eye-Fi card to transfer it to my iPhone 5S where I used the Photogene 4 app to optimise and caption the image before uploading it to EyeEm (in colour). The version shown here is the more considered black and white image converted in Photoshop CC on my Mac at home.

A very old favourite portrait

I don’t know if it happens to you when you are looking for something specific but I often search for images and, quite by accident, find something I wasn’t looking for and then that sends me off on a trip down memory lane. I’ve certainly blogged quite a few times in the past about images that meant something to me – either personally or professionally. This portrait of former General Secretary of the Trades Union Congress, John Monks (now Baron Monks of Blackley) was taken in his office at the TUC during an interview with the Times Educational Supplement about his appointment to the Government’s Learning and Skills Council in October 2000.

©Neil Turner/TSL, October 2000. John Monks, TUC General Secretary.

©Neil Turner/TSL, October 2000. John Monks, TUC General Secretary.

The reason that I like this picture is that when I shot it I was delighted to have turned a complete disaster of a shoot into a really nice image. The interview wasn’t going well and the room had a huge picture window which Mr Monks insisted was behind him. The room had dark walls, very dark furniture and no matter how hard I tried the pictures weren’t coming together. I had moved the light (I was working with a single Lumedyne battery powered pack and head with a 70cm shoot through umbrella) to the left of the interviewer and the picture was still boring. There was a decent reflection of the subject in the highly polished table but balancing the lift between the ambient coming through the window and the flash in the room was proving tricky. You need to remember that in those days we were shooting on 1.9 megapixel Kodak DCS520 cameras with tiny LCD screens and you could only get a basic idea of lighting balance.

I was limited where I could place the flash because at that time I was still using Wein optical triggers and the lights in the room had a fault which made them flicker – enough to trigger the flash every second or so. That meant reverting to the emergency back-up synch lead and all of the range restrictions that it placed on where the cable could reach and how it ran around the room.

Gradually I kept changing the shutter speed to allow more and more ambient light into the exposure. I had started at 1/125th of a second at f5.6 on 200 ISO and by the time I got to 1/15th of a second the ambient light really started to kick in and the light reflecting off of the blue tiles and glass in the courtyard outside his window magically took over and eliminated virtually all traces of the gloom and dark wood in the room. I managed to turn the main light off in the room without causing too much trouble – I had to do it because the ambient light inside the room was starting to have an effect on the exposure.

A colourless portrait of a greying man in a dull room sprang into life and I started to relax. This was one of the last frames, shot just as the interview was winding up and it was at 1/8th of a second with the camera resting on the table to try to make sure that there was as little shake as possible. I shot almost all of the interview on a Canon 70-200 f2.8L with a few frames on a Canon 28-70 f2.8L and my old 17-35 f2.8L. Apart from having overcome some difficulties to shoot the portrait, I genuinely loved the colours and I loved the placement of his spectacles. This is a gentle crop that got rid of anything that didn’t add to the overall feel and it quickly became a favourite for a few of the right reasons and many of the wrong ones. That means that it is a good picture and possibly worthy of a place in my portfolio back then but that I was too pleased with my own input to judge that properly!

Sometimes when you shoot pictures through an interview it all goes well and you listen to what’s being said because you are so relaxed. If the pictures are going badly you pick up on the mood of the interview but don’t really hear the conversation. This was definitely a case of the latter. I had no real idea that the interview had been a tough one!